The HT Contact Form plugin allows you to connect your forms with Zoho CRM, automatically creating records in various CRM modules from form submissions. With OAuth2 authentication and support for Leads, Contacts, Deals, and more, this integration brings your form data directly into your sales and customer management workflows.
Key Features
- Multi-Module Support: Create records in Leads, Contacts, Accounts, Deals, and more
- OAuth2 Authentication: Secure, token-based authentication with auto-refresh
- Dynamic Field Loading: Fields loaded automatically from your Zoho CRM modules
- Picklist Support: Dropdown options populated from Zoho field definitions
- Update or Create: Optionally update existing records instead of duplicating
- Global Data Centers: Support for US, EU, IN, AU, CN, and JP regions
Prerequisites
Before using the Zoho CRM integration, make sure you have a Zoho CRM account (free or paid), access to the Zoho API Console, and your OAuth2 credentials (Client ID and Client Secret).
Creating OAuth2 Credentials
- Go to the Zoho API Console
- Click Add Client
- Select Server-based Applications
- Fill in the details:
- Client Name: HT Contact Form
- Homepage URL: Your website URL
- Authorized Redirect URI:
https://yoursite.com/wp-admin/admin.php?page=htcontact-form&path=integrations&zohocrm_auth=1
- Click Create
- Copy your Client ID and Client Secret
Important: The redirect URI must match exactly, including https:// and the full path. Your site must use HTTPS for OAuth2 to work.
Data Centers
Select the data center that matches your Zoho account region:
| Region | Data Center | API Domain |
|---|---|---|
| United States | US | zohoapis.com |
| Europe | EU | zohoapis.eu |
| India | IN | zohoapis.in |
| Australia | AU | zohoapis.com.au |
| China | CN | zohoapis.com.cn |
| Japan | JP | zohoapis.jp |
How to Find Your Region: Check your Zoho CRM URL — crm.zoho.com = US, crm.zoho.eu = EU, crm.zoho.in = IN, and so on.
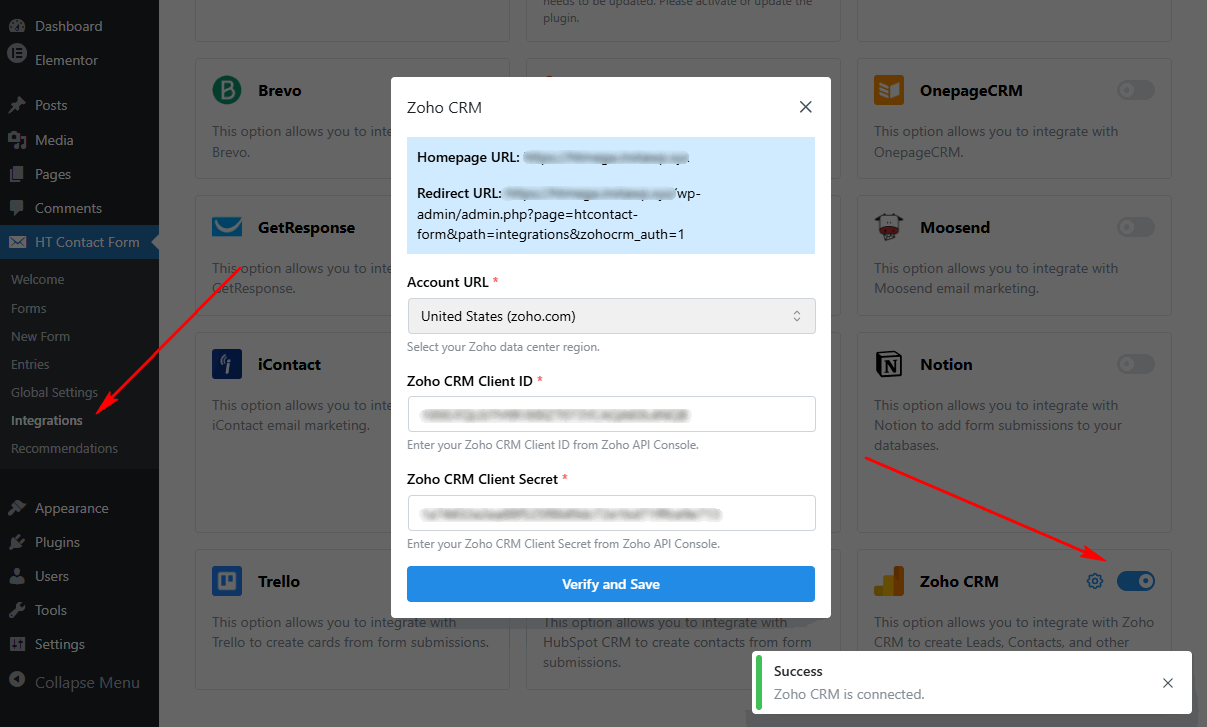
Step 1: Configure Global Settings
First, you need to connect your Zoho CRM account using OAuth2 credentials.
- Go to HT Contact Form → Settings → Integrations
- Find Zoho CRM and click Configure
- Select your Data Center (region)
- Enter your Client ID
- Enter your Client Secret
- Click Verify and Save
- Authorize the application in the popup window
- Connection established!
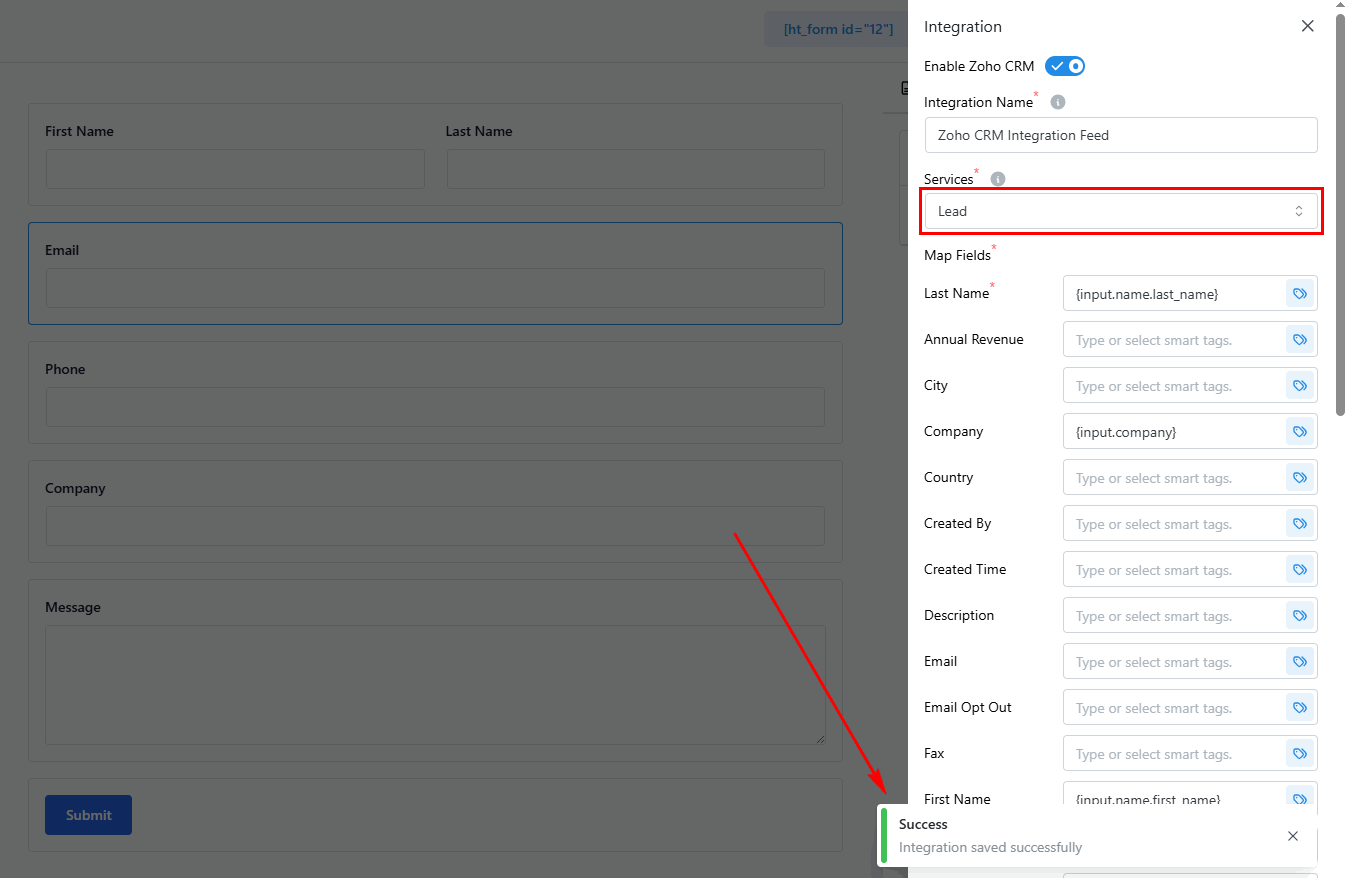
Step 2: Add Zoho CRM Integration to Your Form
Once connected, you can add the Zoho CRM integration to any form.
- Edit your form
- Go to the Integrations tab
- Click Add New → Zoho CRM
- Select a Module (Leads, Contacts, Deals, etc.)
- Map form fields to module fields
- Optionally enable Update Existing
- Click Save Integration
Integration Settings Overview
| Setting | Required | Description |
|---|---|---|
| Module | Yes | Select the Zoho CRM module (Leads, Contacts, etc.) |
| Field Mapping | Yes | Map form fields to module fields |
| Update Existing | No | Update existing records instead of creating new ones |
Supported Modules
Create records in any of these Zoho CRM modules:
| Module | Description | Common Use |
|---|---|---|
| Leads | Sales leads and prospects | Contact forms, lead gen |
| Contacts | Individual contacts | Customer forms |
| Accounts | Companies/Organizations | B2B registration |
| Deals | Sales opportunities | Quote requests |
| Tasks | To-do items | Task creation forms |
| Campaigns | Marketing campaigns | Campaign responses |
| Vendors | Suppliers/vendors | Vendor registration |
| Cases | Support cases | Support request forms |
| Solutions | Knowledge base | Solution submissions |
Field Types
Fields are loaded dynamically based on the selected module. Each Zoho field has a type that determines how data is formatted:
| Type | Description | Smart Tags | Notes |
|---|---|---|---|
| Text | Single line text | Yes | Standard text input |
| Email address | Yes | Validated email | |
| Phone | Phone number | Yes | Any phone format |
| URL | Web address | Yes | Must be valid URL |
| Number | Numeric values | Yes | Integer or decimal |
| Currency | Money values | Yes | Numeric with currency |
| Date | Date values | Yes | YYYY-MM-DD format |
| Picklist | Single selection | No | Select from dropdown |
| Multi-picklist | Multiple selection | No | Select from dropdown |
| Checkbox | Boolean | Yes | true/false |
| Long text | Multi-line text | Yes | Textarea content |
Important: Picklist fields display as dropdowns with available options from Zoho. You cannot use smart tags for picklist fields — select from the provided options. Zoho validates picklist values against predefined options.
Smart Tags Reference
Use {input.field_name} to include form values dynamically (except picklist fields).
| Smart Tag | Description |
|---|---|
{input.email} | Email field value |
{input.first_name} | First name |
{input.last_name} | Last name |
{input.phone} | Phone number |
{input.company} | Company name |
{input.any_field} | Any form field by admin label |
Complete Configuration Example: Lead Capture
Here’s an example of setting up Zoho CRM integration for capturing website leads.
Form Fields: First Name, Last Name, Email, Phone, Company
Integration Configuration
Module: Leads
Field Mapping:
  Last_Name: {input.last_name}
  First_Name: {input.first_name}
  Email: {input.email}
  Phone: {input.phone}
  Company: {input.company}
  Lead_Source: Website (picklist selection)
Update Existing: Enabled
Result: Lead created (or updated if email already exists) with website source attribution. Zoho workflows trigger automatically for lead assignment and follow-up.

Common Use Cases
- Lead Generation Pipeline: Capture website leads and create Lead records with source tracking, contact info, and initial qualification data.
- Contact Form to CRM: Connect your contact forms to automatically create or update Contact records, maintaining a single source of customer data.
- Deal/Opportunity Creation: Create Deal records from quote request forms with estimated value, product interest, and expected close dates.
- Account Registration: Create Account (company) records from B2B registration forms with company details and industry information.
- Support Case Creation: Generate Case records from support request forms with issue details, priority, and customer information.
- Campaign Response Tracking: Link form submissions to Campaigns in Zoho CRM for marketing attribution and campaign performance tracking.
Update Existing Records
Enable this option to update existing records instead of creating duplicates.
How It Works
- Plugin searches for an existing record by email
- If found: Updates the record with new values
- If not found: Creates a new record
Best For
- Forms that might be submitted multiple times
- Contact update forms
- Profile update scenarios
- Preventing duplicate leads/contacts
Tip: If multiple records match the same email, the first result is updated. Make sure email mapping is included when using this feature.
OAuth2 Authentication
The integration uses OAuth2 with automatic token refresh:
- Initial Authorization: User clicks “Connect to Zoho CRM”
- Redirect to Zoho: User logs in and approves access
- Token Exchange: Authorization code exchanged for tokens
- Token Storage: Tokens stored securely in WordPress
- Auto-Refresh: Access tokens refresh automatically before expiration
| Token Type | Validity | Auto-Refresh |
|---|---|---|
| Access Token | 1 hour | Yes |
| Refresh Token | Long-term | Yes |
You shouldn’t need to re-authorize unless you revoke access in Zoho, client credentials change, or WordPress options are cleared.
Troubleshooting
Connection Issues
Problem: “Invalid client” error when connecting.
Solutions:
- Verify Client ID and Secret are correct
- Check data center selection matches your Zoho region
- Ensure redirect URI matches exactly in Zoho API Console
- Try recreating the client in Zoho API Console
Records Not Appearing
Problem: Form submits but no record in Zoho CRM.
Solutions:
- Check module selection is correct
- Verify required fields are mapped (e.g., Last_Name for Leads/Contacts)
- Look for errors in form submission logs
- Check Zoho CRM permissions for your user
Fields Not Loading
Problem: Field dropdown is empty after selecting module.
Solutions:
- Ensure connection is active (test with Verify)
- Verify module is selected
- Clear integration cache by saving settings
- Check Zoho CRM permissions for the module
Token Errors
Problem: “Invalid grant” or authentication errors.
Solutions:
- Re-authorize the connection (click Connect again)
- Verify Client Secret hasn’t changed in Zoho
- Check Zoho API Console for revoked access
- Ensure refresh token hasn’t expired
Picklist Values Not Matching
Problem: Picklist field shows error or wrong value.
Solutions:
- Use dropdown selection, not smart tags
- Verify option exists in Zoho field definition
- Check for case sensitivity in option values
- Update Zoho picklist if new options are needed
Frequently Asked Questions
Q: Do I need a paid Zoho CRM account?
A: No, the free edition includes API access. Some modules may only be available in paid editions.
Q: What happens if a record already exists?
A: If “Update Existing” is enabled, the record is updated. If disabled, a duplicate may be created (Zoho allows duplicate emails).
Q: Can I create records in multiple modules at once?
A: Yes, add multiple Zoho CRM integrations to the same form, each targeting a different module.
Q: Why can’t I use smart tags for picklist fields?
A: Zoho validates picklist values against predefined options. Smart tag values might not match, causing errors.
Q: How do I trigger Zoho workflows?
A: Records are created with workflow triggers enabled, so your Zoho workflows that trigger on record creation will fire automatically.
Q: What if I change my Zoho password?
A: OAuth2 tokens remain valid. You only need to re-authorize if you revoke access in Zoho settings.
Q: Can I map to lookup/relation fields?
A: Lookup fields require the related record ID, which is complex to map from forms. Use text fields as alternatives or create records in multiple modules.
Best Practices
Data Center Selection
- Match your account – Use the same region as your Zoho CRM
- Check URL – Your Zoho CRM URL indicates your region
- Don’t change – Changing data center requires re-authorization
Field Mapping
- Map required fields – Check Zoho for mandatory fields per module
- Use picklists correctly – Select from dropdown, don’t use smart tags
- Match data types – Ensure form data matches Zoho field type
- Include email – Required for “Update Existing” functionality
Record Management
- Enable update existing – Prevent duplicates for repeat submissions
- Test thoroughly – Submit test entries and verify in Zoho
- Use workflows – Set up Zoho workflows to process new records
- Monitor regularly – Check for integration errors in logs
Security
- Protect credentials – Client Secret is sensitive
- Use HTTPS – Required for OAuth2 redirect
- Limit permissions – Grant only necessary scopes
- Review access – Periodically audit connected apps in Zoho
That’s it! Thank you for choosing HT Contact Form to enhance your CRM workflow. If you need additional assistance, feel free to contact our support team. Our dedicated support team would be more than happy to assist you.