Adding Meta Pixel (formerly Facebook Pixel) to your Shopify store allows you track conversions, build retargeting audiences, and give Meta’s algorithm the data it needs to optimize your ad campaigns. This guide walks you through the full process — creating your pixel, installing it on Shopify, enabling Conversion API for server-side tracking, configuring events, and verifying everything works.
What You’ll Need
- A Shopify store (any plan)
- A Meta Business account with access to Events Manager
- Your Meta Pixel ID (covered in Step 2)
- Your Conversion API access token (covered in Step 5)
Setup time: 5–10 minutes. No coding required.
How to Add Meta Pixel(Facebook Pixel) to Shopify: Step by Step
Step 1 – Create a Meta Pixel in Events Manager
Skip this step if you already have a pixel.
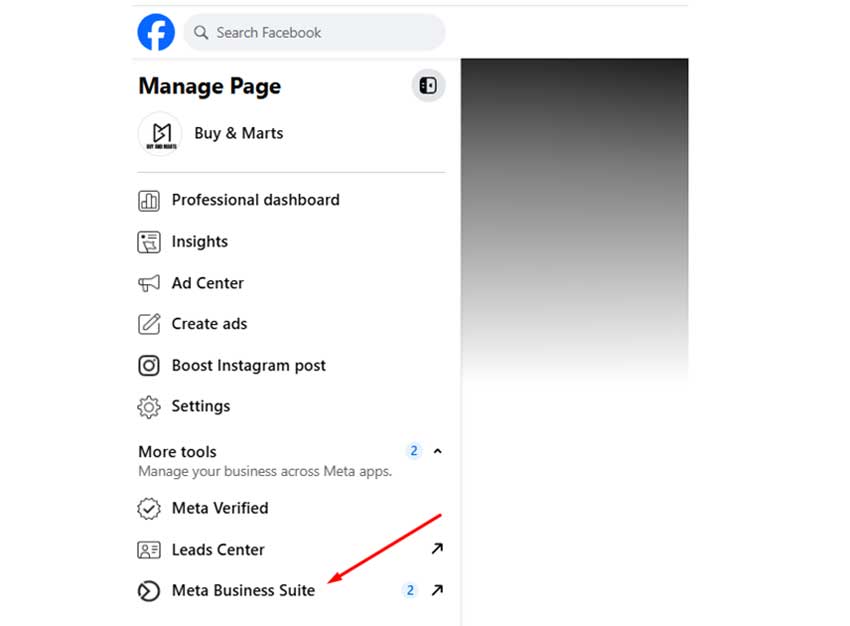
Log into Meta Business Suite and open Events Manager from the left sidebar.
Click Connect Data Sources → select Web → click Connect.
Choose Meta Pixel → click Connect.
Name your pixel (e.g., your store name) and click Create Pixel.
Your pixel now exists in Meta’s system. Next, you need the Pixel ID to connect it to Shopify.
Step 2 – Find Your Pixel ID
Your Pixel ID is a 15–16-digit number that uniquely identifies your pixel.
- In Events Manager, click Data Sources and select your pixel.
- Click the Settings tab.
- Copy the Pixel ID displayed near the top of the page.
Keep this page open, you’ll need it again for the Conversion API access token in Step 5.
Tip: Make sure you’re copying the Pixel ID, not the Dataset ID. They look similar but serve different purposes.
Step 3 – Install a Meta Pixel App on Shopify
The simplest way to add Meta Pixel to Shopify is through a dedicated app. We’ll use Pixee – Multi Pixel & Meta Ads in this guide — it’s free, supports Conversion API, and handles multiple ad platforms from one dashboard.
- Open the Pixee app, listed on the Shopify App Store, or search “Pixee” in your Shopify admin under Apps.
- Click Install → then Install App on the confirmation screen.
- Pixee will prompt you to activate the app embed. Click the link to open the Theme Customizer.
- In the Customizer, confirm the Pixee embed is toggled on, then click Save.
- Return to Pixee and click Check Status & Continue.
⚠️ Do not skip the Customizer step. If the app embed isn’t activated, the pixel won’t load on your storefront. This is the single most common setup issue.
Step 4 – Add Your Meta Pixel ID
Now connect your pixel to the app:
- In the Pixee dashboard, click Create Pixel.
- Enter a pixel name (e.g., “Main Store Pixel”).
- Paste the Pixel ID you copied in Step 2.
- Click Save.
Your pixel now appears in the dashboard’s pixel list. Pixee supports multiple Meta Pixels — repeat this step if you need separate pixels for different ad accounts or agencies.
Step 5 – Enable Conversion API (Server-Side Tracking)
Conversion API (CAPI) sends event data directly from your Shopify server to Meta, bypassing ad blockers and iOS privacy restrictions. Without it, you’re likely missing 20–30% of your actual conversions.
Get your access token:
- In Events Manager, select your pixel → click the Settings tab.
- Scroll to the Conversions API section.
- Click Generate Access Token and copy it.
Store this token safely — you won’t be able to view it again after leaving the page.
Enable CAPI in Pixee:
- In the Pixee dashboard, click the edit icon next to your pixel.
- Toggle Conversion API to Active.
- Paste your access token.
- Click Save.
Pixee automatically handles event deduplication by assigning matching event IDs to both browser and server events. Meta uses these IDs to count each conversion once — not twice.
Step 6 – Choose Which Events to Track
Events are specific actions visitors take on your store. In the Pixee dashboard, go to Settings to configure which events to track.
| Event | When It Fires | Enable? |
| PageView | Every page load | ✅ Always |
| ViewContent | Product page viewed | ✅ Always |
| AddToCart | Item added to cart | ✅ Always |
| InitiateCheckout | Checkout started | ✅ Always |
| Purchase | Order completed | ✅ Always |
| Search | Site search used | ✅ Recommended |
| AddToWishlist | Item wishlisted | Optional |
| AddPaymentInfo | Payment info entered | Optional |
| CompleteRegistration | Account created | Optional |
Enable at least PageView, ViewContent, AddToCart, InitiateCheckout, and Purchase. These five core events are what Meta needs to optimize ad delivery and calculate ROAS. Without the Purchase event specifically, Meta can’t do value-based optimization — your campaigns will chase clicks instead of revenue.
The optional events (AddToWishlist, AddPaymentInfo, CompleteRegistration) are useful for building granular retargeting audiences and analyzing your checkout funnel, but they’re not critical for basic ad optimization.
Step 7 – Test Your Meta Pixel
Never assume the pixel works just because you completed the setup. Always verify with both methods below.
Method 1: Meta Pixel Helper (Chrome Extension)
- Install Meta Pixel Helper from the Chrome Web Store.
- Visit your Shopify store in a new tab.
- Browse a product page → add to cart → start checkout.
- Click the Pixel Helper icon after each action.
- Confirm the correct events fire (PageView, ViewContent, AddToCart, etc.) and the Pixel ID matches what you entered in Pixee.
Green icon = event fired successfully.
Yellow or red = something needs attention.
Method 2: Meta Events Manager — Test Events
- In Events Manager, select your pixel → click the Test Events tab.
- Enter your Shopify store URL → click Open Website.
- Browse your store in the new tab — view products, add to cart, begin checkout.
- Return to Events Manager and check for real-time events.
- Look at the Processing Method column — you should see both “Browser” and “Server” entries if CAPI is active.
If only browser events appear, revisit Step 5 and check your access token. If no events appear at all, confirm the Pixee app embed is activated in the Theme Customizer (Step 3).
Important: Disable any ad blockers in your browser before testing. Ad blockers prevent browser-side pixel events from firing, which makes it look like your setup is broken when the server side may be working fine.
Troubleshooting Common Issues
- Pixel Helper shows no pixel: The most common cause is skipping the Theme Customizer activation in Step 3. Go to Shopify admin → Online Store → Themes → Customize, confirm Pixee’s app embed is toggled on, and save. Clear your browser cache and test again in an incognito window.
- Events not appearing in Events Manager: Double-check that the Pixel ID in Pixee matches your Events Manager pixel exactly — a single digit off and nothing will connect. If the ID is correct, wait 15–20 minutes for Meta to process new events. Also, try an incognito window to rule out browser extension interference.
- CAPI events are missing (only browser events appear): Your access token is likely expired or was entered incorrectly. Go to Events Manager → Settings → Conversions API, generate a fresh token, paste it into Pixee’s CAPI settings, and save. Server events should start appearing within a few minutes.
Bonus — Add TikTok, Snapchat & Pinterest Pixels
Pixee isn’t limited to Meta. From the same dashboard, you can add and manage pixels for TikTok, Snapchat, Pinterest, and Google Ads.
The process is similar — get your pixel or tag ID from the ad platform, add it in Pixee, and enable events. One app handles all your tracking instead of installing separate apps for each platform.
Looking for alternatives? Check out our comparison of the best Meta Pixel apps for Shopify to see how Pixee compares against other options.
For more guides, visit our Shopify tutorials section.
