WooLentor, now known as ShopLentor, lets you create a custom WooCommerce product template with Elementor without editing theme files. You can control where the product image, title, price, description, Add to Cart area, product meta, tabs, related products, upsells, and other dynamic elements appear.
Note: WooLentor was renamed to ShopLentor. Current versions of the plugin use the ShopLentor name, while some older tutorials, settings, or widget labels may still use WooLentor or the WL: prefix.
Quick Answer
Go to ShopLentor → Template Builder, create a Single product template, and choose Elementor as the editor. Add the required product widgets, customize the layout, set the template as default, and publish it.
What You Need
Before starting, make sure these plugins are installed and activated:
- WooCommerce
- Elementor
- ShopLentor (formerly WooLentor)
Elementor Pro is not required for this workflow because ShopLentor provides the WooCommerce product widgets and template-building features.
You should also have at least one published WooCommerce product with a title, image, price, short description, stock information, and other relevant product data. ShopLentor uses this information as dynamic content while you design and preview the template.
Steps of customizing WooCommerce product template
Step 1: Install ShopLentor
If ShopLentor is not installed:
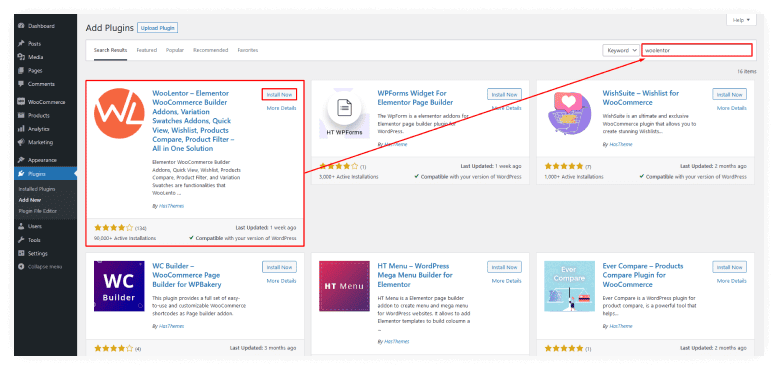
- Sign in to your WordPress dashboard.
- Go to Plugins → Add New Plugin.
- Search for ShopLentor.
- Click Install Now.
- Click Activate.
After activation, the ShopLentor menu should appear in the WordPress dashboard.
Step 2: Enable the Template Builder
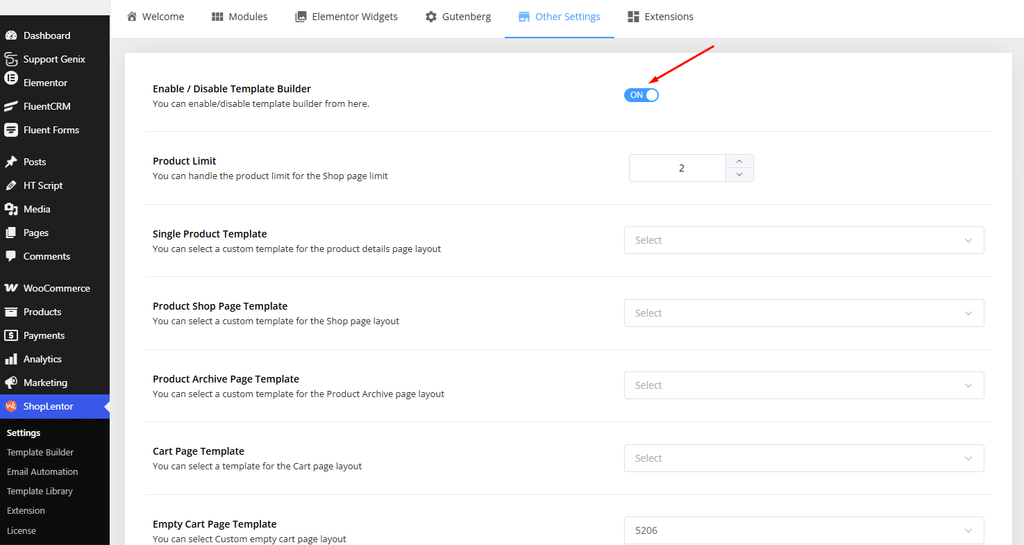
Depending on your ShopLentor version, the Template Builder option may appear in a slightly different location.
- Go to ShopLentor → Settings.
- Open the settings section that contains the Template Builder option.
- Find Enable / Disable Template Builder.
- Turn the option on.
- Save the settings.
Older WooLentor versions may show this option under WooCommerce Template.
Step 3: Enable the Required Product Widgets
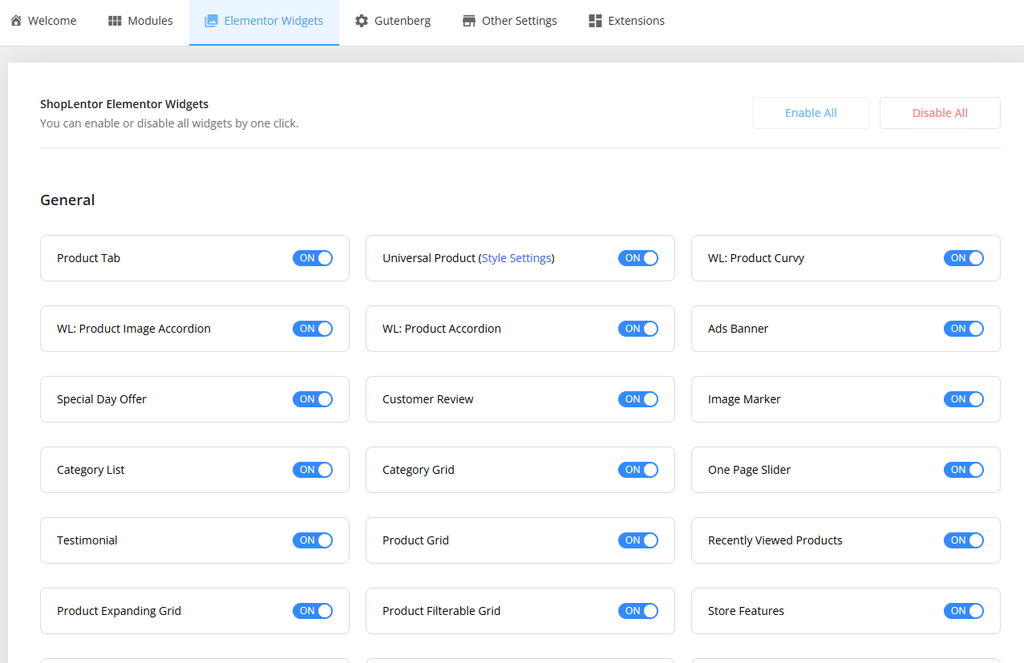
ShopLentor allows you to enable only the Elementor widgets you need.
- Go to ShopLentor → Settings.
- Open the Elementor Widgets or equivalent widget settings section.
- Enable the product widgets you want to use.
- Save the settings.
Common widgets for a product template include:
- Product Image
- Product Title
- Product Rating
- Product Price
- Product Short Description
- Product Stock
- Product Add To Cart
- Product Meta
- Product Data Tabs
- Related Product
- Product Upsell
You can enable additional product widgets when your design requires them.
Step 4: Create a Single Product Template
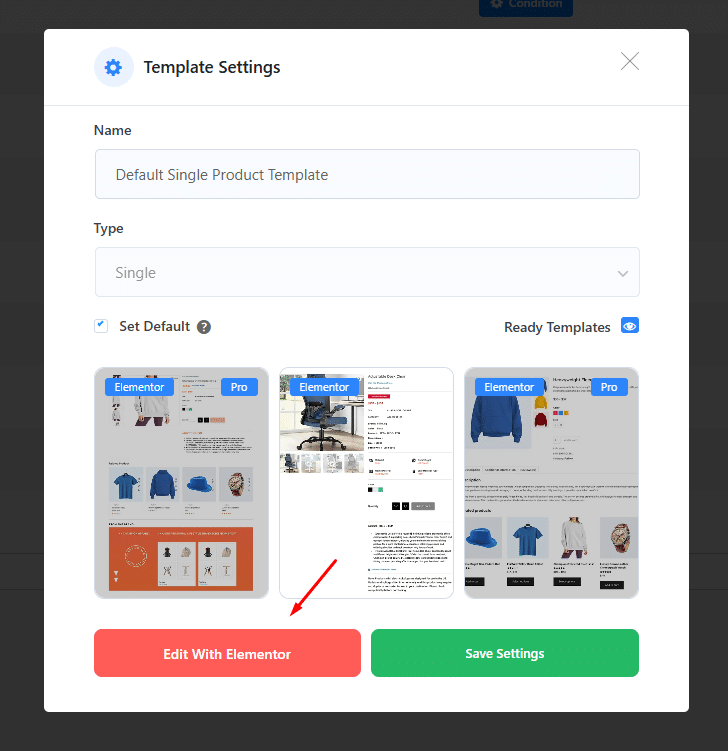
- Go to ShopLentor → Template Builder.
- Click Add New or Add New Template.
- Enter a template name, such as Default Single Product Template.
- Select Single as the template type.
- Select Elementor as the editor.
- Enable Set Default if you want this layout to apply to your product pages.
- Choose a sample design or start with a blank layout.
- Save the template settings.
- Click Edit with Elementor.
If your version uses slightly different labels, choose the template type intended for individual WooCommerce product pages rather than Shop or Archive pages.
Step 5: Build the Product Layout
You can start with a ShopLentor sample design or create the layout from scratch.
A common product-page structure uses two columns at the top:
- Left column: Product Image
- Right column: Product Title, Rating, Price, Short Description, Stock, Add to Cart, and Product Meta
- Full-width section below: Product Data Tabs, Related Product, and Product Upsell
This is only a recommended structure. You can arrange the widgets differently to match your store design.
In Elementor:
- Add the main container or section.
- Create the required columns or containers.
- Reserve one area for product media.
- Use another area for product information and purchase controls.
- Add full-width sections below for detailed product information and recommendations.
Step 6: Add the Product Widgets
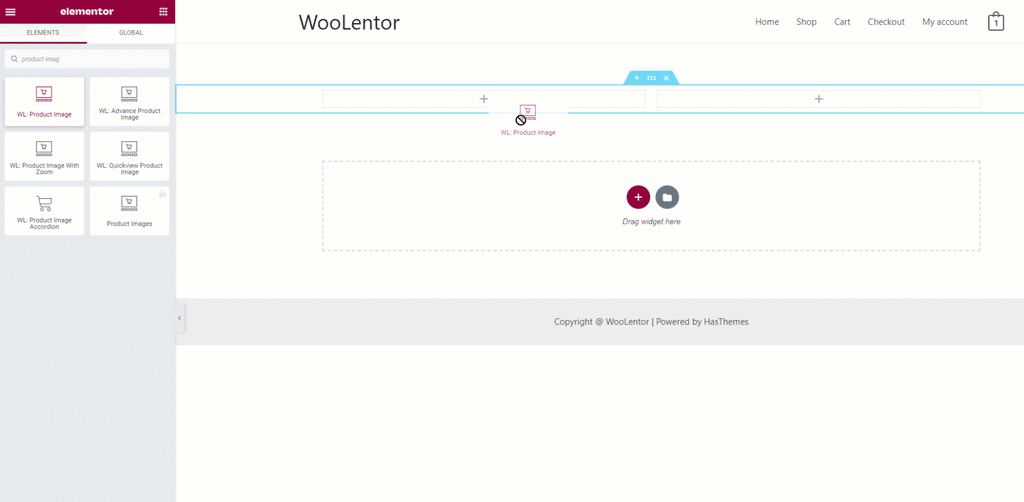
Search for the required ShopLentor product widgets in the Elementor panel and drag them into the appropriate containers.
| Widget | Recommended Placement |
|---|---|
| Product Image | Product media area |
| Product Title | Top of the product information area |
| Product Rating | Near the title or price |
| Product Price | Below the title or rating |
| Product Short Description | Above the purchase controls |
| Product Stock | Near the price or Add to Cart area |
| Product Add To Cart | Main purchase area |
| Product Meta | Below the purchase controls |
| Product Data Tabs | Full-width section below the summary |
| Related Product | Lower section of the page |
| Product Upsell | Near related or recommended products |
Product Image
Use the ShopLentor Product Image widget so each product displays its own featured image and gallery dynamically.
Product Title and Price
Use the dynamic Product Title and Product Price widgets instead of typing static content. This ensures that the template loads the correct title and price for every product.
Product Short Description
The Product Short Description widget displays the content from the product’s short-description field. Keep the individual product descriptions concise and useful for purchasing decisions.
Product Add To Cart
Add the Product Add To Cart widget in a prominent position. Test it with both simple and variable products to make sure quantity fields, variation selectors, and the purchase button display correctly.
Product Data Tabs
Place the Product Data Tabs widget below the main product area if you want to display the product description, additional information, and reviews in tabs.
Avoid adding the same product information twice unless the duplication is intentional.
Related Products
WooCommerce automatically generates related products primarily from products that share categories or tags with the current product.
Use the Related Product widget to control how those products appear inside your custom template.
Upsell Products
To display specific upsells:
- Edit the WooCommerce product.
- Open Product data → Linked Products.
- Add products in the Upsells field.
- Update the product.
Then add the ShopLentor Product Upsell widget to the template.
Step 7: Customize the Design and Mobile Layout
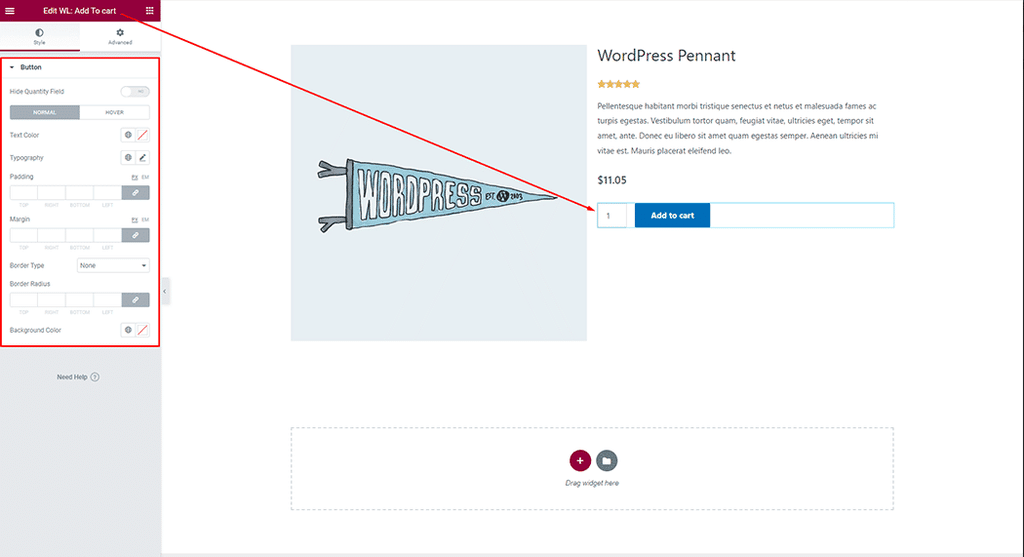
Use Elementor’s Content, Style, and Advanced controls to adjust:
- Typography
- Colors
- Spacing
- Alignment
- Backgrounds
- Borders
- Responsive settings
Keep the product title and price easy to scan, and make the Add to Cart area visually clear.
For responsive design:
- Open Elementor’s Responsive Mode.
- Check the tablet and mobile layouts.
- Stack the product image above the product information when the columns become too narrow.
- Adjust font sizes, spacing, and container widths where necessary.
- Confirm that variation selectors, quantity fields, and the Add to Cart button fit comfortably on smaller screens.
Test the published page on a real mobile device when possible.
Step 8: Publish and Set the Template as Default
- Click Publish or Update in Elementor.
- Return to ShopLentor → Template Builder.
- Find the new Single product template.
- Confirm that its Default status is enabled if you want it to replace the standard product-page layout.
- Open a published WooCommerce product in a new browser tab.
- Check that the custom template appears correctly.
If the old layout still appears, clear your site, plugin, CDN, and browser caches before testing again.
Optional: Some ShopLentor plans or versions may support assigning different templates to individual products. If you need this feature, check the available product-template assignment options in your current ShopLentor installation.
Step 9: Test the Product Page
Before finishing, test the template on more than one product.
Check the following:
- Simple and variable products display correctly.
- Product images and gallery thumbnails work.
- Regular and sale prices display properly.
- Variation selectors work as expected.
- Quantity controls and Add to Cart work.
- The correct product and variation reach the cart.
- Product Data Tabs display the expected content.
- Related products and upsells appear where applicable.
- The layout works on desktop, tablet, and mobile.
- The page works while you are signed out.
Testing multiple products is important because the same template must handle different titles, image sizes, descriptions, prices, stock conditions, and variations.
Troubleshooting
The Custom Template Does Not Appear
Check that:
- The Template Builder is enabled.
- The template type is set for a single product page.
- The template is published.
- The template is set as default.
- Another Single template is not already set as default.
- Cached versions of the old page have been cleared.
ShopLentor Widgets Are Missing
Go to the ShopLentor widget settings, enable the required Elementor widgets, save the settings, and reload Elementor.
Also confirm that WooCommerce, Elementor, and ShopLentor are active.
The Editor Shows Empty Product Content
Dynamic widgets need a WooCommerce product to provide preview data.
Make sure at least one published product contains the information required by the widgets you are using, such as an image, price, description, stock status, or reviews.
Variable Product Options Do Not Appear
Check that:
- The product type is Variable product.
- Attributes have been added.
- The attributes are enabled for variations.
- Variations have been created.
- Each purchasable variation has a valid price.
Then test the Product Add To Cart widget again.
The Mobile Layout Looks Broken
Review the container widths, wrapping, spacing, typography, and column direction in Elementor’s responsive settings.
Pay particular attention to the product gallery, variation selectors, quantity field, Add to Cart button, tabs, and product grids.
Frequently Asked Questions
Is WooLentor the Same as ShopLentor?
Yes. WooLentor is the former name of ShopLentor. Older documentation, URLs, widget prefixes, or settings may still use the WooLentor name.
Is Elementor Pro Required?
No. ShopLentor can use the free version of Elementor for this workflow because it provides its own WooCommerce product widgets and Template Builder.
Can One Template Display Every Product?
Yes. When a Single product template is set as the default, ShopLentor uses the same layout structure while loading the dynamic content of each WooCommerce product.
Can Different Products Use Different Templates?
Some ShopLentor plans or versions may support individual product-template assignment. Check your current ShopLentor plan and product-editing options if you need different layouts for specific products.
Why Does Elementor Show the Same Product While Designing?
Elementor uses a sample product to preview dynamic content while you edit the template. On the live store, the template loads the title, image, price, description, variations, stock, and other data belonging to the product being viewed.