How to Increase WordPress Memory Limit
Is your WordPress site loading slowly or showing memory errors? Increasing your WordPress memory limit can solve these performance issues quickly.
You can easily increase the WordPress memory limit yourself. One method involves editing your site’s configuration files. This includes the wp-config memory limit or the .htaccess memory limit WordPress settings. Another option is contacting your hosting provider for assistance.
Whether you want to perform a WordPress PHP memory limit increase manually or not, we’ve got you covered. This guide shows you how to increase WordPress memory limit using safe methods. Boost your site’s performance by making smart changes today.
To do it your responsibility, you can manage it in a few ways:
Before You Begin: Critical Safety Steps
Important: Always backup your website before making any file changes. This protects your site if something goes wrong.
Create backups of these files:
- wp-config.php
- .htaccess
- php.ini (if it exists)
Test changes on a staging site first when possible. This prevents downtime on your live website.
What is WordPress Memory Limit?
WordPress memory limit refers to the maximum RAM your WordPress site can use. The WP memory limit determines how many plugins and themes can run simultaneously.
Modern WordPress sites typically start with 256MB by default. However, complex sites often require 512MB, 1GB, or more depending on their needs.
Think of memory limit as your site’s workspace. More complex sites need bigger workspaces to function properly.
Why You Need to Increase WordPress Memory Limit
When you need to WordPress increase memory limit, you’ll typically see warning signs:
- “Fatal error: Allowed memory size exhausted” messages
- Slow page loading times
- Plugin activation failures
- White screen of death
- Admin dashboard crashes
Increase WordPress memory allocation is essential for sites with multiple plugins. Large databases and high traffic volumes also require more memory.
How to Check WordPress Memory Limit
Before you increase WordPress memory limit, check your current allocation using these methods:
Method 1: WordPress Dashboard
Navigate to Tools > Site Health > Info
Look for the “Server” section
Find “PHP memory limit” value
Method 2: WooCommerce Status (if installed)
Go to WooCommerce > Status to check WordPress memory limit quickly.
Method 3: Plugin Method
Install the “WP Memory Usage” plugin to check WordPress memory limit. This plugin monitors usage in real-time.
Memory Limit Recommendations by Site Type
Choose the right memory limit for your specific WordPress site:
- Basic blog or portfolio: 256MB
- Business website with plugins: 512MB
- E-commerce store (WooCommerce): 1GB
- High-traffic or complex sites: 2GB or more
5 Ways to Increase Your WordPress Memory Limit
Ready to increase the WordPress memory limit? Here are five proven methods:
1. Edit wp-config.php file
he most effective way to increase memory limit WordPress is editing wp-config settings.
Step-by-step process:
- Access your site files via FTP or cPanel File Manager
- Locate the wp-config.php file in your root directory
- Add this line before “/ That’s all, stop editing! Happy blogging. /”:
define('WP_MEMORY_LIMIT', '512');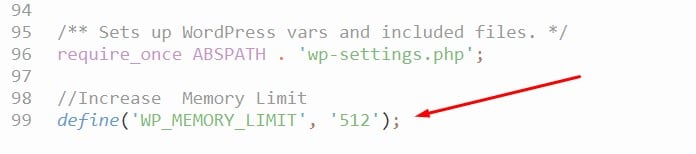
This WP config memory limit method works for most hosting providers. It gives you direct control over your WordPress memory limit increase.
Note: Replace 512M with your desired memory limit (256M, 1024M, etc.).
2. WordPress Memory Limit using htaccess file
Most web hosting companies do not allow you to modify the .htaccess file, and if they do, it can cause problems with your website.
However, if they allow, open and edit the .htaccess file and set the value 512M for php_value_memory_limit.
I would recommend using the first two steps because editing the .htaccess file may break your website.
To increase memory limit WordPress htaccess method:
- Locate your .htaccess file in the root directory
- Add this line:
php_value memory_limit 512MNote: The htaccess memory limit WordPress method may not work on all servers and could potentially cause issues. Always backup your .htaccess file first.
3. Create/Edit PHP.ini file
Most web hosting companies do not allow you to modify the .htaccess file, and if they do, it can cause problems with your website.
Increase WordPress Memory Limit through php.ini is a possibility, but only in rare cases as this feature isn’t very commonly used by novices or those who don’t know what they are doing. Increase Memory Limit on servers.
If you have proper access, you can create/edit the php.ini file using FTP or cPanel.
To increase php memory limit WordPress server-wide, use this method:
- Create or locate the php.ini file in your root directory
- Add or modify this line:
inimemory_limit = 512MThis method provides system-level WordPress php memory limit control. However, it may not be available on all shared hosting plans.
4. Using cPanel PHP Setting.
Changing the PHP memory limit in cPanel is the easiest way (if you have the access to cPanel).
For WP increase memory limit via hosting control panel:
- Log into your cPanel dashboard
- Find “MultiPHP INI Editor” or “PHP Settings”
- Select your domain from the dropdown
- Set memory_limit to 512M or your desired amount
- Save changes and wait for propagation

This provides an easy GUI method to change WordPress memory limit. No manual file editing required.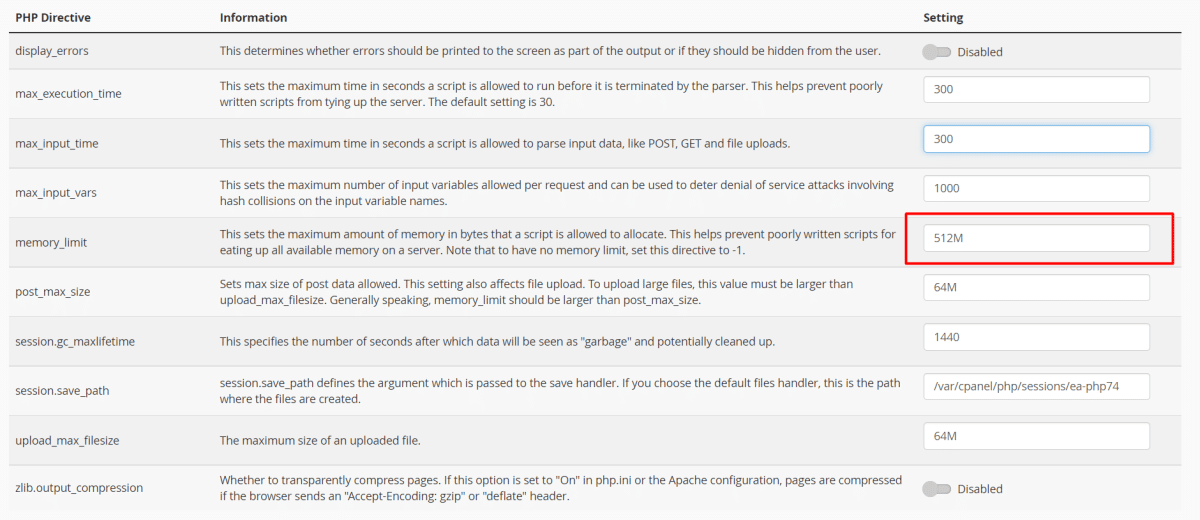
5. Contact Your Hosting Provider
If the above methods don’t work to increase WordPress memory, contact support. Professional hosting teams can:
- Increase server-level memory limits quickly
- Modify PHP configurations safely
- Upgrade your hosting plan if needed
- Provide custom solutions for your specific setup
Common Problems When You Increase WordPress PHP Memory Limit
Issue 1: Changes Don’t Take Effect
Solutions to try:
- Clear all caching systems completely
- Wait 15-30 minutes for server propagation
- Contact hosting provider about server-level restrictions
- Try alternative methods from the list above
Issue 2: Site Breaks After Changes
Emergency recovery steps:
- Restore backup files immediately
- Check syntax in modified files for typos
- Remove recently added code temporarily
- Contact hosting support if site remains down
Issue 3: Still Getting Memory Errors
Advanced troubleshooting:
- Deactivate plugins one by one to find culprits
- Switch to default theme temporarily
- Check for memory leaks in custom code
- Consider increasing memory limit further (1GB, 2GB)
Frequently Asked Questions about WordPress Memory Limit
What Causes WordPress Memory Exhausted Errors?
Memory exhausted errors occur when your memory limit WordPress allocation is insufficient for:
1. Running multiple plugins simultaneously
2. Processing large database queries
3. Handling high traffic volumes
4. Executing memory-intensive themes
How Often Should I Increase WordPress Memory Limit?
Increase WordPress memory limit when you experience:
1. Adding new plugins or themes
2. Performance issues or error messages
3. Site traffic increases significantly
4. Running memory-intensive operations like imports
Is it Safe to Increase WordPress Memory?
Yes, it’s safe to increase memory WordPress allocation within reasonable limits. However:
1. Don’t exceed your hosting plan’s limits
2. Monitor server performance after increases
3. Consider upgrading hosting if consistently hitting limits
4. Start with conservative increases (512M, then 1GB)
Can Increasing Memory Limit Slow Down My Site?
WordPress memory limit increase doesn’t directly slow down sites. However:
1. Very high limits may indicate underlying optimization issues
2. Poor-quality plugins can waste allocated memory
3. Server resources are finite and shared with other accounts
4. Focus on optimization alongside memory increases
What’s the Maximum WordPress Memory Limit I Can Set?
Maximum memory limits depend on your hosting plan:
– Shared hosting: Usually 512MB-1GB
– VPS hosting: 2GB-8GB typical
– Dedicated servers: Limited by physical RAM
– Managed WordPress: Varies by provider
Check with your hosting provider for specific limits and upgrade options.
Watch the video about How to Increase WordPress Memory Limit
Summary
Increasing WordPress memory limit is essential for optimal site performance. The wp-config.php method is most reliable for most users.
Always backup your files before making changes. Start with conservative memory increases like 512MB.
If manual methods don’t work, contact your hosting provider for assistance. They can implement server-level changes safely.
Remember to optimize your site alongside memory increases. Remove unused plugins and use efficient caching solutions.
Monitor your site’s performance after changes. This ensures your WordPress memory limit increase improves rather than hinders performance.
We have a list of WordPress hosting providers on our blog, and you can check the list. That might be helpful for you to choose the best hosting for your business.