How to Edit Menus in WordPress: The Quick and Easy Guide
Have you ever wanted to edit WordPress menus but weren’t sure how? Many users find the process of editing menus in WordPress to be difficult and confusing, but it doesn’t have to be!
The menu editor WordPress is a powerful tool that allows you to customize your site’s navigation structure to enhance user experience. The WordPress edit menu system offers powerful navigation-building capabilities for websites of all sizes.
We’re here to show you just how easy it can be with this quick and easy guide on how to edit menus in WordPress. With this simple, step-by-step approach, you’ll have your website’s WordPress navigation menu edited in no time at all.
It enables you to create WordPress menu pathways that are intuitive, helping visitors find exactly what they’re looking for.
- Key takeaways
- Steps to Creating and Editing Menu in WordPress
- How to Edit Menus in WordPress
- Bonus: Add Menu in a Few Clicks in Elementor with HT Menu Plugin
- Step 1: Install the HT Menu Plugin
- Step 2: Access the HT Menu Settings
- Step 3: Explore General Settings
- Step 4: Manage Menu Styles
- Step 5: Use Pre-Built Layouts (Optional)
- Step 6: Display the Mega Menu
- Step 7: Create a Custom Mega Menu (Optional)
- Common Issues When Editing WordPress Menus
- Frequently Asked Questions
- Final Words
Key takeaways
Steps to Creating and Editing Menu in WordPress
When managing your WordPress site, one of the most important features is the navigation menu. It helps visitors browse your pages and quickly find the content they need. Menus improve user experience and give your website a more professional feel.
Learning how to manage menus in WordPress is a fundamental skill for any site owner. With the WordPress menu system, you can easily create, edit, and rearrange links with just a few clicks. Whether you’re a beginner or experienced user, the process is simple to learn.
Menus help organize your content, highlight key pages, and adapt as your site grows. Regular updates to your category or custom menus keep your navigation structure aligned with your content strategy.
Let’s learn the steps you need to follow to create and edit menus in WordPress, so you can make your site easy to navigate and help your visitors find what they need.
Locating WordPress Menu Editor
To access the WordPress menu editor, begin by logging in to your WordPress dashboard. Once logged in, navigate to “Appearance” and then click on “Menus.”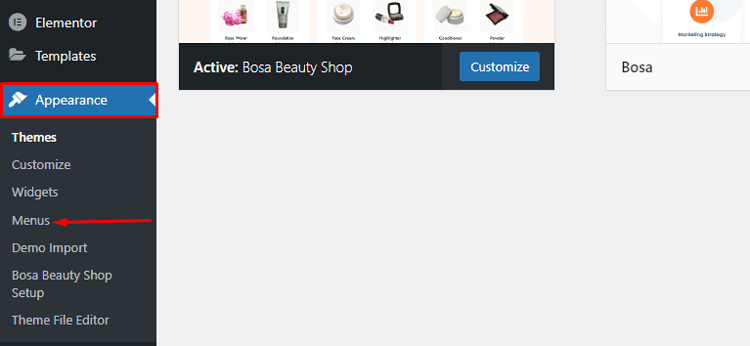
Upon reaching the Menus page, you might find a pre-existing menu that you can edit, or you can create a new one according to your needs.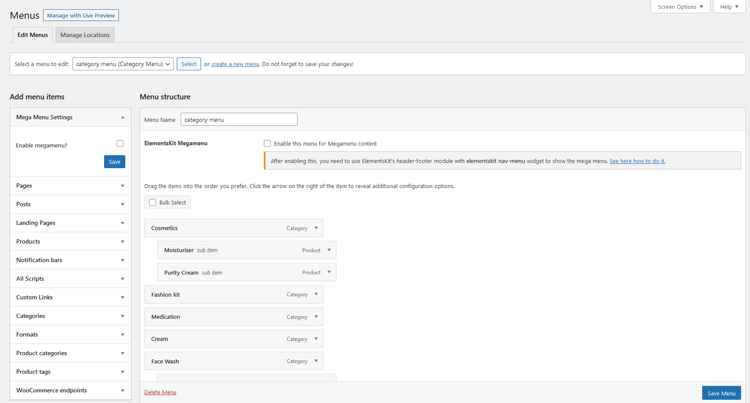
Alternatively, you can use the theme customizer screen to edit your menus, offering a live preview of your changes as you make them.
To do this, click on the “Manage with Live Preview” button on the Menus page, or go to “Appearance” → “Customize” and select the “Menus” option.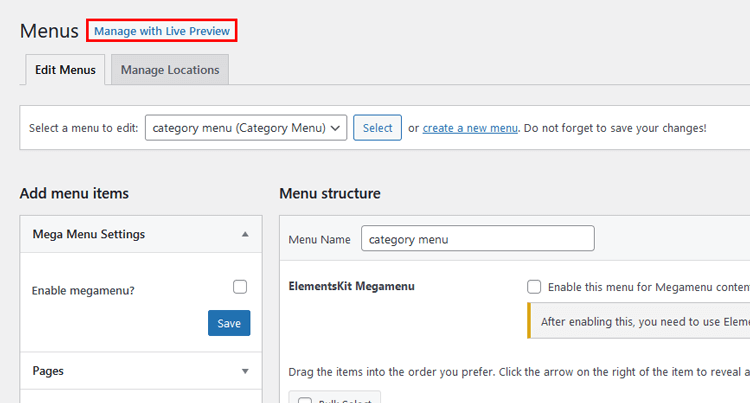
Both methods offer similar options when using the classic theme menu editor, so choose the one that suits your preference best. You can use the WordPress menu editor to manage your site’s navigation easily.
It helps you create a smooth experience for every user on your website. A well-organized menu keeps users engaged and helps them find content faster.
The WordPress menu editor includes several productivity features that many users overlook. Time-saving keyboard shortcuts can significantly speed up your workflow. You can also use the search function to find specific pages when building large menus quickly.
HT Mega Elementor Addons
The ultimate Elementor page builder addons to build stunning websites.
Creating Custom Menu in WordPress
To create a custom menu in WordPress, follow these steps.
First, navigate to the menu creation screen by clicking on the “Create a New Menu” link at the top of the page. If you already have a, you can skip this step.
However, if you haven’t created a menu yet, you will be automatically directed to the menu creation screen without the need to click anything. This streamlined process ensures a seamless experience for users.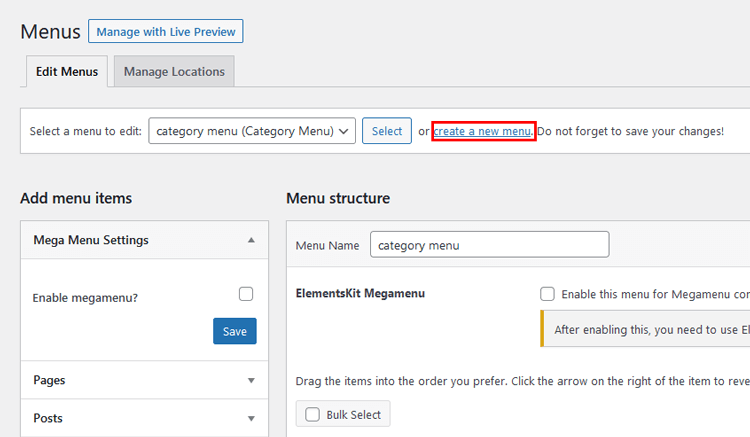
If you’re on the Live Preview screen, you can click the Create New Menu button anytime. Then, choose a name for your menu that explains its purpose and select where it should appear on your website.
Once you’ve completed these basic steps, you’re good to go and can begin adding items to your menu. 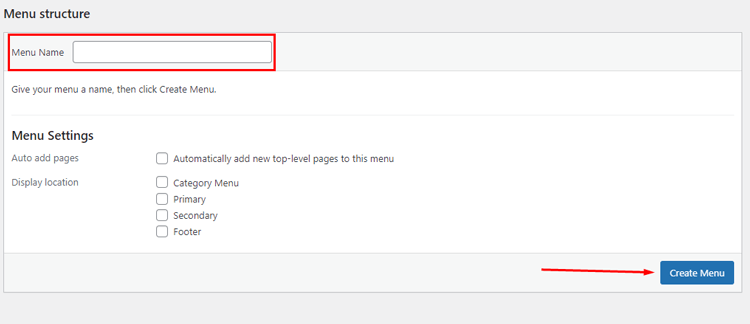
Effective menu customization in WordPress involves more than just adding pages. Consider your site architecture and user flow when organizing items.
For complex websites, consider creating separate menus for different user types or content categories, or even duplicate WordPress menu structures for different sections of your site.
How to Edit Menus in WordPress
The ability to edit WordPress menu transforms basic sites into professional platforms. To make changes to your existing menu, go to the “Appearance → Menus” screen.
If you only have one menu, it will already be on the page. For sites with multiple menus, use the dropdown at the top to choose one. Simply click on the “Select” button to load the menu you want to edit WordPress menu options.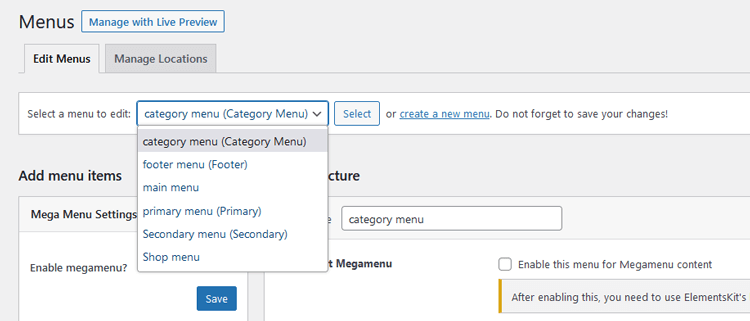
When you open the Menus screen using the Theme Customizer, you will find a list of your current menus at the top. Simply select the menu that you wish to open. 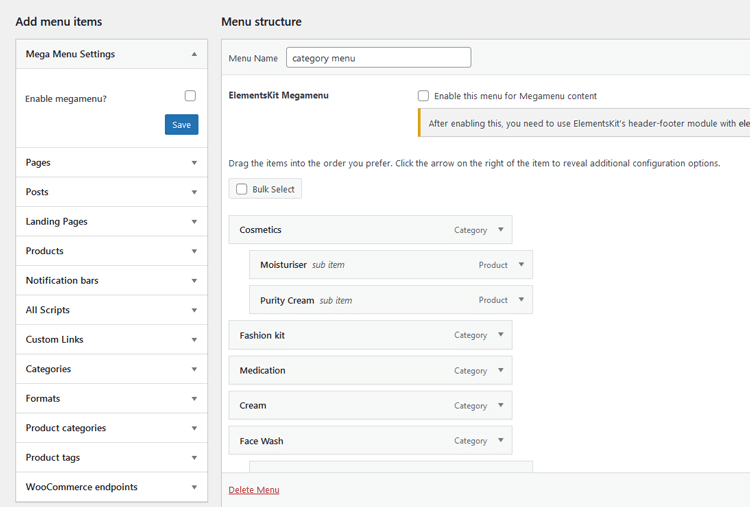
Adding Items to WordPress Menu
The main task of menu creation involves adding items to WordPress menu and customizing their functions. With this system, you can create nested dropdown menus, incorporate specific pages or posts, or add various other items to your navigation bar.
Adding Pages or Posts
To improve navigation on your site, let’s add menu links for easy access to your most important pages.
To access the “Add menu items” box, look on the left side of the screen. Within that box, you will see several tabs.
Click on the “Pages” tab, which contains three categories: “Most Recent,” “View All,” and “Search.”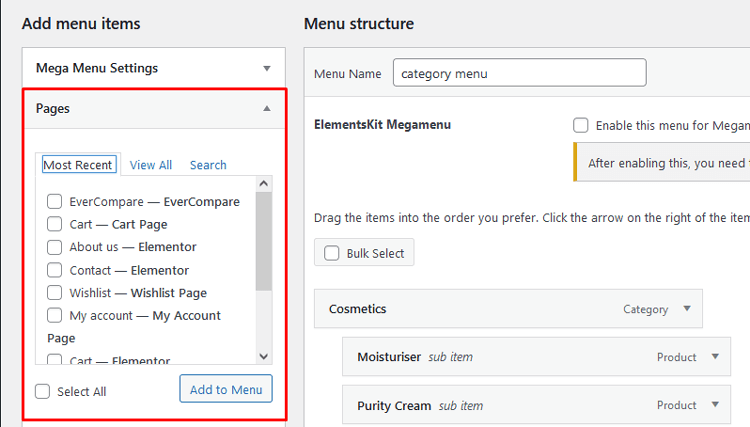
our recently accessed pages will appear in the “Most Recent” category. For sites with numerous pages, the “View All” tab might be overwhelming. In such cases, the “Search” tab offers a better way to locate specific pages you wish to add.
To include all displayed pages in your navigation menu, simply check the “Select All” box at the bottom.
After making your selections, finalize them by clicking “Add to Menu”. The right side of the screen will then display your newly selected pages.
To add blog posts to your menu, go to the “Posts” tab and select from your recent posts or search for specific ones. Then, click “Add to Menu“.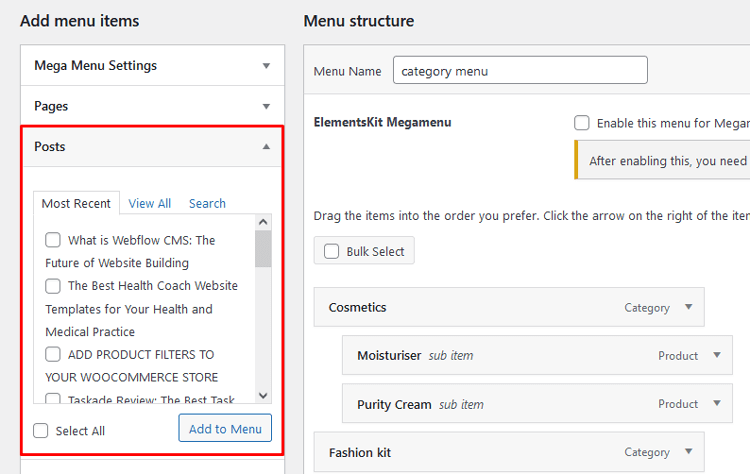
If you want to reorder menu items or to delete or rename menu items that you have added, there are two ways to do it.
Advanced options become available when working with WordPress edit menu items. These options prove particularly valuable when you want to make certain menu elements stand out, significantly enhancing navigation usability through small but important details.
Adding a Blog Category
If you want to link to a main category page from your blog you can. This helps visitors quickly reach the main category pages on your website. It also encourages them to keep reading and stay longer on your blog.
To add tags to menu or category, follow the same steps as adding a post or a page, but make sure to click on the “Categories” dropdown tab.
From there, you can choose from your frequently used categories, view the entire list, or search for the specific categories you want to add.
Once you’ve selected your desired categories, click “Add to Menu” and it will appear on the side just like a post or page.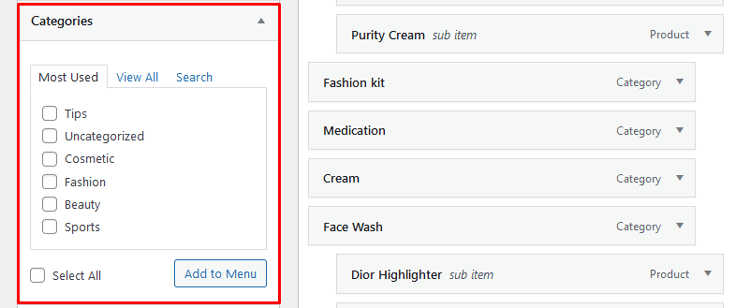
Adding a Custom Link
If a page does not fit any category you can add a custom link. You can also link your menu to an external site using this option: go to the “Custom Links” tab, insert the URL, set the menu text, and click “Add to Menu”. This will allow you to add custom links in navigation to any URL you would like.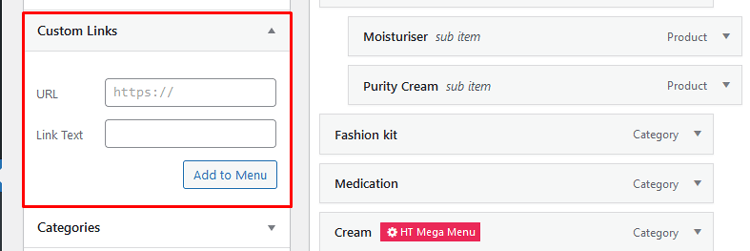
Adding Links that Open in a New Tab
If you add an external link to your menu make it open in a new tab. This helps visitors stay connected to your website while viewing other pages. If it opens in the same tab they may not return.
To find the “Open link in a new tab” option in the Menus interface, click on “Screen Options” at the top of the screen. Then, enable the “Link Target” checkbox.
After that, use the dropdown arrow on a menu item where you will see a new checkbox for “Open link in a new tab”. Tick it to activate the option.
Adding Dropdown Menu Item
Nesting items in a menu is crucial for making certain menu items appear as drop-down options when hovering. You can add submenu links as much as you need by creating submenus within submenus endlessly.
To nest items and create dropdown menus in classic themes, you have two options. The first one is to click and drag the desired item to the right until you see dotted lines moving along with it.
Repeat this process to nest more items. The second option is to access the menu item you want to move and click on the “Under [Menu Item Name]” link.
🚀 Supercharge Your Facebook Advertising with Pixelavo!
Unlock the full potential of your Facebook ads. Boost conversions, increase ROI, and reach new heights with Pixelavo’s powerful features.
Bonus: Add Menu in a Few Clicks in Elementor with HT Menu Plugin
Creating a menu in WordPress can be time-consuming, but with the help of the HT Menu plugin for Elementor, you can easily add social icons to menu and create a responsive menu settings with just a few clicks.
HT Menu is an add-on for the Elementor page builder in WordPress. It helps you create menus and mega menus with a drag and drop interface.
You can use Elementor templates to design columns. Then you can add menu widgets to build a mega menu.
Additionally, you can adjust the navigation menu width and sub-menu position as needed.
For site navigation, mega menus can be the most effective option at times. With this plugin, you can customize menu colors by adjusting the menu icon picker, icon color, badge, badge color, background color, and other settings to style WordPress menu with CSS.
We will now demonstrate how to easily add a menu using Elementor with the HT Menu plugin.
Step 1: Install the HT Menu Plugin
To get started, install the HT Menu plugin by going to “Plugins” and then “Add New” in your WordPress dashboard. Search for “HT Menu,” click “Install Now,” and then activate the plugin.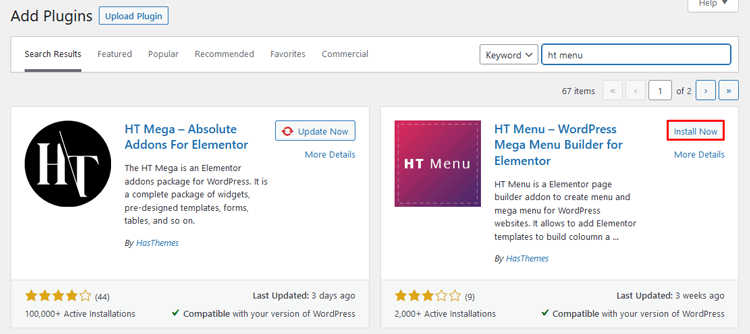
Step 2: Access the HT Menu Settings
After activating the HT Menu plugin, you will see a new option called “HT Menu” on the left side of your dashboard.
Click on “HT Menu” to access the plugin’s settings.
Step 3: Explore General Settings
Under the “General” tab, you can explore all the settings of the HT Menu add-on, including the feature available in the free and pro versions.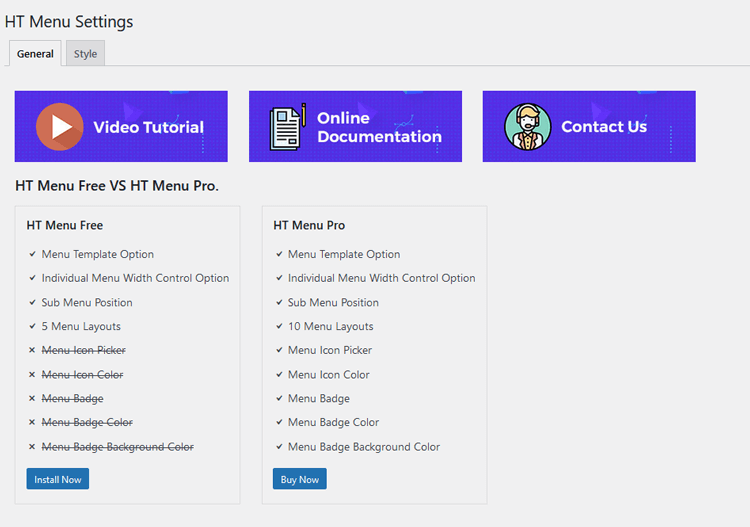
Step 4: Manage Menu Styles
Go to the “Style” tab. Here, you can manage menu styles. You can change the colors of menu items. Adjust the width of submenus and submenu background color. You can also change the colors of submenu items. Customize the mega menu width and background color.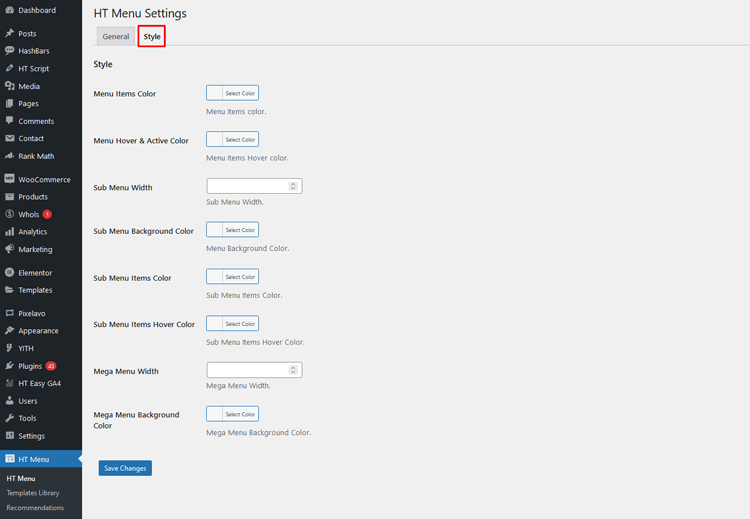
Step 5: Use Pre-Built Layouts (Optional)
HT Menu provides pre-built layouts in the template library for easy menu creation. Select Template Library and then you will find all the available pre-built layouts to help you change menu font size and create sticky navigation menu options.
Step 6: Display the Mega Menu
Go to “Appearance” and then “Menus” in your WordPress dashboard.
Click on “Screen Options” on the top right and enable “Mega Menu Settings.”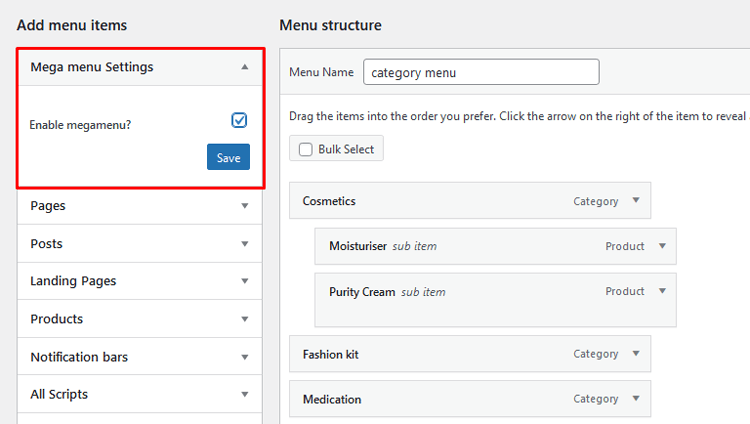
After enabling this option, you can enable the mega menu for specific menu items.
You can select a template for the mega menu from the pre-built layouts (if using) or create a custom one in the “Templates” section.
Adjust the width of the mega menu as desired.
Step 7: Create a Custom Mega Menu (Optional)
If you want to build a completely custom mega menu, go to “Templates” and click on “Add New.”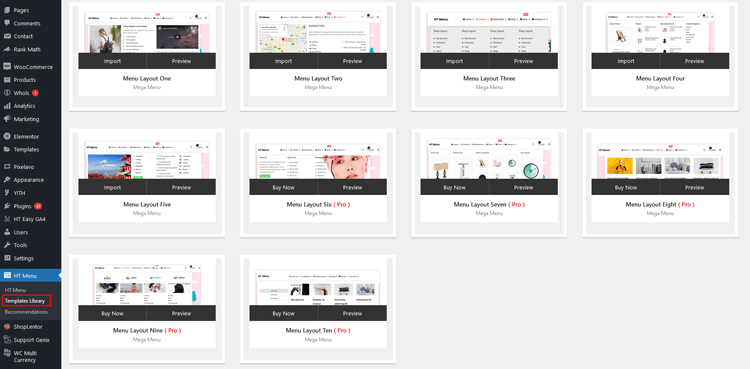
Create a new template and add elements, menu widgets, and content based on your requirements.
Common Issues When Editing WordPress Menus
When editing menus in WordPress, users often encounter common issues that can hinder customization. These are some of the challenges:
HT Mega Elementor Addons
The ultimate Elementor page builder addons to build stunning websites.
Frequently Asked Questions
Q: How do I create a menu in WordPress?
A: To create a menu in WordPress, go to your WordPress admin dashboard and navigate to “Appearance” and then “Menus.” In the “Menus” screen, click on “Create a new menu,” give it a name, and click the “Create Menu” button. You can then add pages, posts, custom links, and categories to your menu by selecting them from the left and clicking “Add to Menu.” After arranging the items, click “Save Menu” to make your menu live on your website.
Q: How do I add items to my WordPress menu?
A: To add items to your WordPress menu, access the “Menus” screen from the admin dashboard. On the left, you’ll find options like “Pages,” “Posts,” “Custom Links,” and “Categories.” Choose the item you want to add and click “Add to Menu.” The selected items will appear on the right side, where you can arrange their order and hierarchy using drag-and-drop. Don’t forget to save your changes.
Q: What is HT Menu Pro for WordPress?
A: HT Menu Pro is a powerful Mega Menu Builder plugin designed for WordPress, specifically for use with Elementor page builder. It allows users to create highly customizable and visually stunning mega menus with ease.
Q: How can I install and activate HT Menu in WordPress?
A: To install HT Menu, go to your WordPress dashboard, navigate to “Plugins” > “Add New,” and search for “HT Menu.” Once you find the plugin, click “Install Now” and then “Activate” to activate the plugin on your website.
Q: Can I use HT Menu Pro with Elementor page builder?
A: Yes, HT Menu Pro is designed to be fully compatible with Elementor page builder. You can create and customize mega menus using HT Menu Pro’s intuitive interface directly within Elementor.
Q: How do I create a mega menu with HT Menu Pro?
A: To create a mega menu with HT Menu Pro, first, make sure the plugin is installed and activated. Then, go to the Elementor editor and add a new section. From the Elementor widgets panel, drag the “HT Menu” widget into the section. Customize the mega menu layout, style, and content according to your preferences.
Q: Can I add widgets to my mega menu using HT Menu Pro?
A: Yes, HT Menu Pro allows you to add Elementor widgets to your mega menu. You can easily insert images, choose from a library of icons, and include Elementor widgets to create dynamic and engaging mega menus.
Q: How do I integrate my WordPress menus with HT Menu Pro?
A: After creating your mega menu using HT Menu Pro, you can integrate it with your existing WordPress menus. Go to “Appearance” > “Menus” in your WordPress dashboard, and select the HT Menu you created in the “Menu Settings” section for the desired menu location.
Q: Can I style my mega menu with different colors and fonts?
A: Absolutely! HT Menu Pro provides extensive styling options, allowing you to customize the colors, fonts, and overall appearance of your mega menu to match your website’s design and branding.
Q: Is HT Menu Pro mobile-responsive?
A: Yes, HT Menu Pro is fully mobile-responsive, ensuring that your mega menu looks and functions perfectly across different devices, including smartphones and tablets.
Q: Can I use HT Menu Pro on multiple websites?
A: Yes, you can use HT Menu Pro on multiple websites, provided you have the appropriate license or subscription for each site.
Q: Does HT Menu Pro offer customer support?
A: Yes, HT Menu Pro offers customer support to assist users with any questions or issues they may encounter while using the plugin. They also provide regular updates to ensure compatibility and performance.
Final Words
Working with menus on a WordPress site doesn’t have to be so difficult. With the right tools, such as HT Menu Pro, it can be done quickly and easily using simple drag-and-drop functionality. Not only do you get the advantage of speed and ease in customizing menus, but you also get the benefit of flexibility by being able to use elementor widgets as well.
We hope this guide has provided helpful advice and options for how to edit menus in WordPress with confidence. If you’re looking for an even more robust solution, take a look at HT Menu Pro – it’s the perfect plugin for menu management!