How to Add Images in WordPress: Easy Steps
Are you looking for an easy way to add images to your WordPress website? If so, you’ve come to the right place! In this blog post, we’ll show you a step-by-step Guide on how to add images in WordPress quickly and efficiently.
According to a study by HubSpot, content with relevant images gets 94% more views than content without images. This highlights the importance of incorporating visual elements into your WordPress posts for enhanced engagement.
Learning how to add images to WordPress significantly enhances the visual appeal of your content. Different themes handle adding images in WordPress uniquely across various layouts. The WordPress platform offers multiple methods to add images to WordPress posts.
Whether you’re a beginner or a more experienced user of WordPress, these instructions will help you get up and running in no time. So if you’re ready, let’s dive in and learn how to add images in WordPress with ease!
- Key Takeaways:
- Uploading an Image to WordPress: Basic Instructions
- How to Add Images in WordPress with Gutenberg or Block Editor
- Adding Images with Elementor
- Adding Multiple Images Through Media Library
- Image Editing on WordPress
- Tips and Tricks for Optimizing Your Images
- Frequently Asked Questions
- Wrapping Up
Key Takeaways:
- Learn how to add images to WordPress directly from your computer, media library, or via URL.
- Discover step-by-step methods for adding images to WordPress using the Gutenberg block editor and Elementor page builder.
- Explore basic image editing in WordPress, including resizing, cropping, and adding alt text.
- Understand how to create image galleries in WordPress and organize them into visually appealing layouts that engage visitors.
- Optimize images for faster loading to help your site run smoothly and enhance user experience.
- Improve image SEO with descriptive alt text and captions to boost your search engine visibility.
Uploading an Image to WordPress: Basic Instructions
Adding images to your WordPress website is important for creating engaging and exciting content. If you’re new to WordPress, you may wonder how to add images in WordPress posts or pages.
Luckily, there are several ways to do this. You can use the Gutenberg block or the classic editor. Both methods allow you to easily upload stunning images to your website.
The WordPress insert image feature works consistently across different browser types. When you add images in WordPress content becomes more engaging to readers. Many professionals add pictures in WordPress strategically throughout their content.
With our step-by-step instructions, you can add images quickly and easily. You can use them in blogs, galleries, or as featured images. There are many image options available in WordPress. It is now easier to make your website stand out. This helps you attract more visitors than ever before.
How to Add Images in WordPress with Gutenberg or Block Editor
The default WordPress editor is called the block editor or Gutenberg. It allows you to add content elements like images, paragraphs, and headings through blocks.
You can add images to WordPress using three methods:
- Uploading an image file from your local computer
- Selecting one from the Media Library
- Inserting it via a URL
We’ll cover each of these methods in this section.
To add an image to your post in WordPress, log in to your dashboard and create a new post. Then, use the Toggle Block Inserter button to insert the Image block into the post editor screen.
Alternatively, you can use the keyboard shortcut /images to add the Image block quickly.
Experts recommend strategies to add photos to WordPress website layouts effectively. You can add images on WordPress directly from stock photo websites.
The add image in the WordPress toolbar contains several customization options.
How to Add an Image from Local Computer
To add an image file from your computer, do the following:
Locate the “Upload” button on the “Image” block and click it.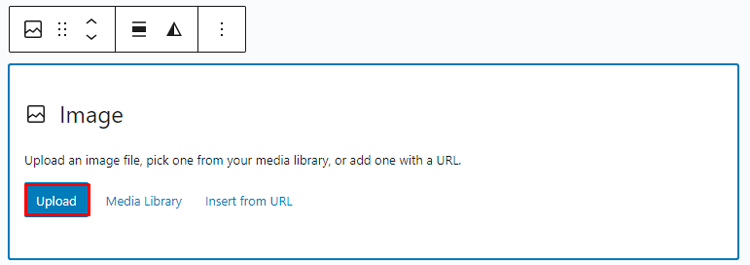
This should open up your computer’s files. Navigate to the folder where the image you want to upload is stored.
Select the image and click “Open”.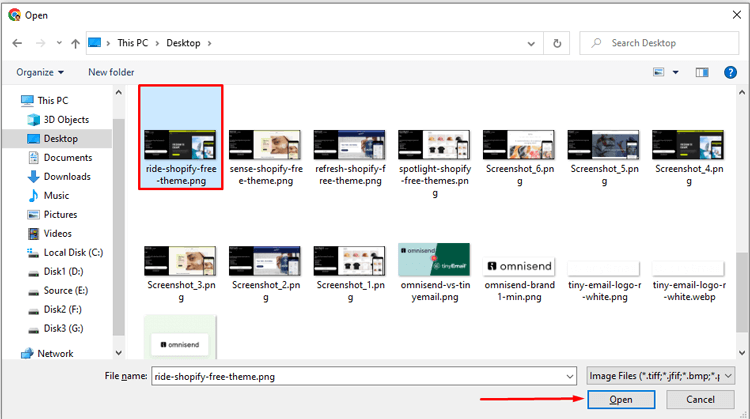
Remember to save your changes.
ShopLentor – WooCommerce Builder for Elementor & Gutenberg
A versatile page builder to build modern and excellent online stores with more than 100k Active Installations.
How to Insert an Existing Image from Media Library
To add pictures from the Media Library, here is what you can do:
Go to the Image block and click on the Media Library button.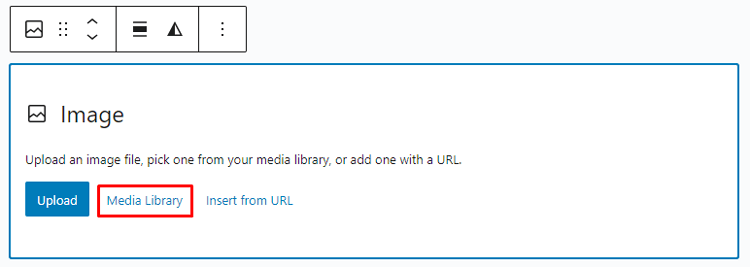
Choose the image you want from the Media Library and press Select.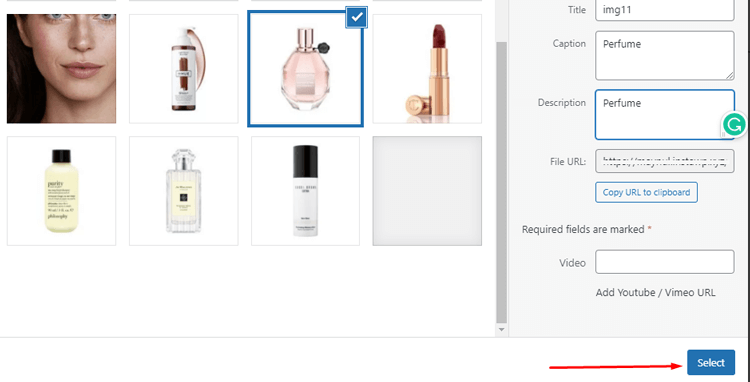
Save your changes.
How to Add Image Via URL
With the Image block function, you can effortlessly insert an image through a custom URL. Here are the simple steps to achieve this:
Click on the “Insert from URL” button, and a URL text field will appear.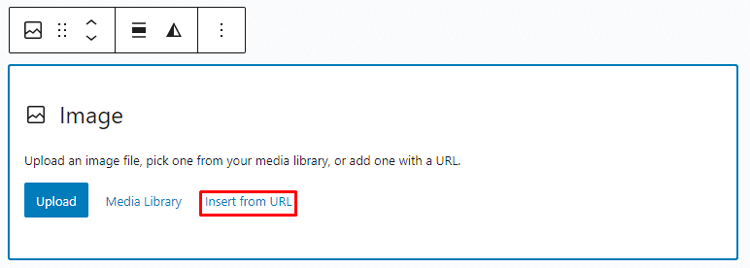
Find an image that you want to use and copy its URL address.
Right-click on the image and select “Copy image address.”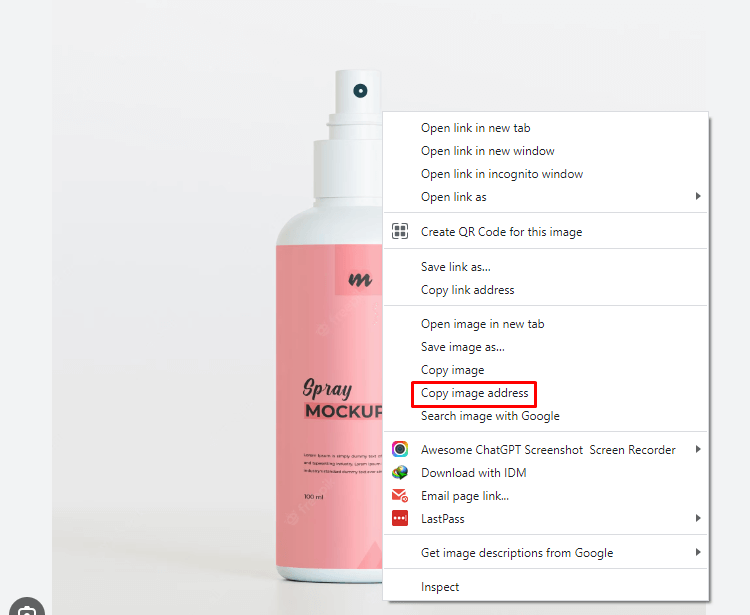
Next, Return to the block editor, paste the URL into the field, and click “Apply” or hit “Enter” on your keyboard. 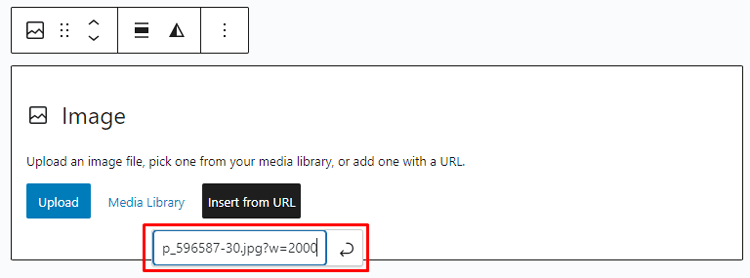
Finally, save your changes.
You can add a featured image or post a thumbnail in WordPress.
Follow these steps to do it:
Open the block settings panel in the block editor by clicking the gear icon between the Publish button and the three dots menu.![]()
From settings, Go to the Post tab and find the Featured image section. Click on the Set featured image area.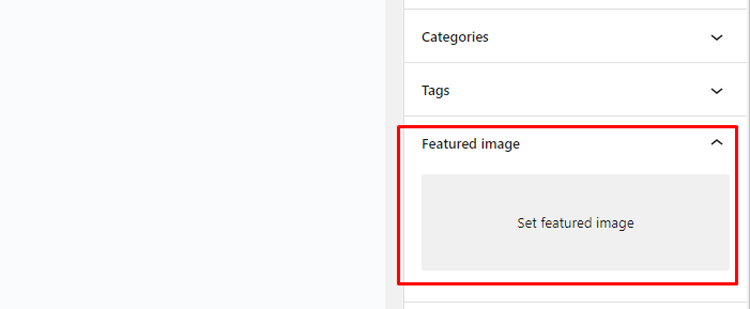
You can upload a new image or select an existing one in the Media Library window. Once you’ve chosen an image, click Set featured image.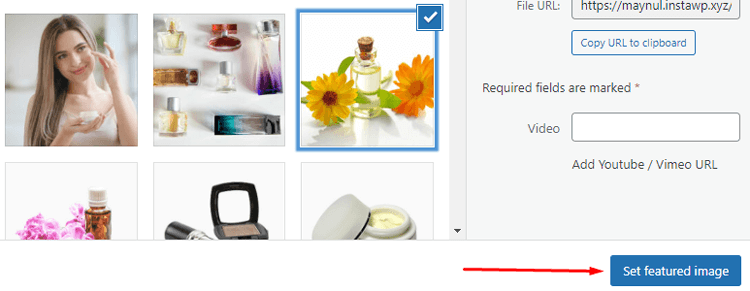
Save your changes.
You can use the Gallery block in the Gutenberg editor to insert images in an organized and visually appealing way.
To add multiple images using the Gallery block, click the block inserter button and search for it.
Once you find it, press Enter to add the gallery block to your page or post.
Adding Images with Elementor
To add images with Elementor, you can follow these steps:
- Once the editor is open, search for the “Image” widget in the left-side panel. You can find it under the “Basic” or “General” category. Drag and drop the “Image” widget onto the desired section of your page.
If you want to explore more Elementor image widgets, try HT Mega Elementor addons. It offers various widget styles and types for displaying images. This plugin includes a wide range of image widgets. These help you showcase pictures and galleries in a stunning way.
Some remarkable image widgets include image comparison, image magnifier, image justify, image masonry, image grid, scroll image, image marker, etc.
- After adding the Image widget, you’ll see the content and settings options in the left-side panel. In the content tab, you can choose to either upload a new image or select one from your media library.
- If you want to use an image from your media library, click on the “Media Library” tab, and select the image you want to use.
- Customize the image settings as per your requirements. You can adjust the size, alignment and add captions if needed. Additionally, you can add links to the image by specifying the URL in the “Link” field.
- To further enhance the image, you can explore the various styling options available in the Style and Advanced tabs. These settings allow you to change the image’s appearance, such as adjusting borders, shadows, animations, etc.
- Another method to upgrade your image is by changing its background. There are several online tools that can help you to change photo backgrounds online. These applications typically provide various background options or allow you to upload your own.
Elementor simplifies the process of how to add images to WordPress with drag-and-drop capabilities. Custom image widgets enhance your ability to add images in WordPress. The platform handles image placement differently than traditional website builders.
Adding Multiple Images Through Media Library
The WordPress Media Library is a storage location for various media types, including videos, images, audio, and documents. It allows users to upload multiple images simultaneously.
To upload images to the Media Library, please follow the steps below.
- Go to the WordPress dashboard and click “Media” then “Library”.
- On the Media Library screen, click “Add New”.
- Select the images you want to upload from your computer by clicking “Select Files”. Alternatively, you can drag and drop them into the provided field.
- Wait for the upload process to complete.
- You can now add the uploaded images to any page or post on your website.
Media Library management helps you add images to WordPress blog posts more efficiently. Creating categories for images improves organization when adding images in WordPress. The bulk selection tool streamlines how to add pictures on WordPress.
Image Editing on WordPress
In this section, we’ll demonstrate how to use WordPress features that allow editing of images, including resizing and adding details.
Editing Image Size in WordPress
Easily adjust the size and dimensions of your images using the Media Library. Simply follow these simple steps:
- In the Image Settings or Attachment Details window, locate the “Scale Image” section on the right side of the screen. Be aware that you can only scale images down.
- Choose new dimensions for the image, then click “Scale” to confirm the changes.
To optimize your WordPress images for faster webpage loading and improved user experience, you can customize their sizes. Follow these steps:
- Go to the WordPress admin dashboard and choose Settings → Media.
- On the Media Settings screen, you can adjust the image max width and height values according to your preference.
- Please save the changes you have made.
Editing Image Details in WordPress
WordPress allows you to edit image details such as alternative text, description, and caption. We will now guide you on how to add these details to your images. Please follow the instructions below.
- To add details to an image in WordPress, first, go to the dashboard and open the Media Library.
- Select an image and open the image settings window. From there, you can add details like Alternative Text, Title, Caption, and Description.
HT Mega Elementor Addons
The ultimate Elementor page builder addons to build stunning websites.
Tips and Tricks for Optimizing Your Images
Optimizing images in WordPress is essential for a smooth and fast website. It helps reduce load times and improves overall site performance. You can use simple tips to make your images lighter. These methods help save space and use fewer resources.
Here are some tips and tricks to help you optimize your images:
Resize and compress images:
Before uploading images to WordPress, resize them to the appropriate dimensions for your website layout. Large, high-resolution images can significantly slow down your site.
Additionally, compress your images to reduce their file size without sacrificing quality. You can use image editing tools like Photoshop or online compression tools like TinyPNG or Optimizilla.
Use the correct file format:
Choose the appropriate file format for your images. For photographs and complex images, use JPEG format, which offers a good balance between quality and file size. For images with transparency or simple graphics, use PNG format. Avoid using BMP or TIFF formats as they have larger file sizes.
Optimize alt text:
Add descriptive alt text to your images. Alt text not only provides accessibility for visually impaired users but also helps search engines understand the content of your images. Include relevant keywords in the alt text, but ensure it accurately describes the image.
Enable lazy loading:
Implement lazy loading for your images in WordPress. Lazy loading ensures that images are only loaded when they come into the viewport, reducing the initial page load time. There are plugins available, such as “Lazy Load by WP Rocket” or “Lazy Load for Videos,” that can help you implement this functionality.
Leverage caching:
Implement a caching mechanism on your WordPress site, such as using a caching plugin like “WP Super Cache” or “W3 Total Cache.” Caching stores static versions of your web pages, including images, which reduces the server load and speeds up subsequent page loads.
Consider a CDN (Content Delivery Network):
Utilize a CDN to deliver your images faster to users across the globe. A CDN stores your images on servers located in different regions. This ensures they are delivered from the server closest to the user’s location, reducing latency and improving load times.
Optimize thumbnails:
WordPress generates thumbnail images for various purposes, such as featured images, post thumbnails, or gallery thumbnails. Make sure to optimize these thumbnails by following the above techniques. Smaller thumbnail sizes will improve the performance of your WordPress site, especially on archive or category pages.
By implementing these tips, you can optimize your images in WordPress. This improves your website’s performance and user experience. Don’t forget to check the results after optimization to ensure images still look appealing while loading quickly
Frequently Asked Questions
Q: How do I add images to my WordPress website?
A: Adding images to WordPress is simple. In the post or page editor, click on the “Add Media” button, upload your image, and insert it into your content.
Q: Can I add multiple images at once in WordPress?
A: Yes, WordPress allows you to select and upload multiple images simultaneously using the “Add Media” button. Select multiple files from your computer and click the “Upload” button.
Q: What is the recommended image size for WordPress?
A: The recommended image size depends on your theme and the area where you want to display the image. However, it’s generally advised to optimize your images for web by resizing them to an appropriate dimension (e.g., 1200px wide for a full-width image) and compressing them to reduce file size.
Q: How can I optimize images for better website performance?
A: To optimize images in WordPress, resize them to the correct dimensions. Compress images without losing quality to maintain performance. Use an image optimization plugin and enable lazy loading to load images only when visible on the screen.
Q: Can I edit images within WordPress?
A: Yes, WordPress has built-in basic image editing features. When inserting or editing an image, you can crop, rotate, and flip the image, as well as adjust brightness, contrast, and other basic settings.
Q: How can I add captions and alt text to my images?
A: When inserting an image, WordPress provides fields to add captions and alt text. Captions are displayed below the image, while alt text provides a textual description for accessibility and SEO purposes.
Q: Can I add images to widget areas in WordPress?
A: Yes, you can add images WordPress to widget areas. Use the image widget or custom HTML widget to insert the image code.
Q: How can I align images within my content?
A: WordPress provides alignment options for images, including left, center, and right alignments. You can set the alignment when inserting or editing the image.
Q: What image formats are supported in WordPress?
A: WordPress supports commonly used image formats such as JPEG, PNG, GIF, and BMP. JPEG and PNG formats are most commonly used for web images.
Q: How can I display images in a gallery format in WordPress?
A: WordPress offers a built-in gallery feature for creating image galleries. You can select multiple images and customize display options. Simply click the “Create Gallery” button, then choose the desired images for your gallery.
Wrapping Up
In conclusion, adding images to your WordPress site can be a great way to enhance the visual appeal and provide additional information.
When adding images in WordPress, image size is crucial. You should also be aware of potential copyright issues.
Using proper image sizes improves site performance. Avoiding copyright infringements protects you legally. Overall, knowing how to add images enhances your site’s presentation and interactivity.
If you need expert assistance, don’t hesitate to seek professional support. Start enhancing your website today by adding images, videos, and diverse media types. Boost your site’s appeal and engagement for a better user experience! Get started now!