How to Edit Header in WordPress: A Complete Step-by-Step Guide for 2025
The header of a WordPress website is not only the first thing visitors see, but it also plays a crucial role in establishing your brand identity and creating a positive user experience. However, many website owners struggle to customize and edit their headers to suit their unique needs.
In this comprehensive guide, we will provide you with detailed instructions on how to edit header in WordPress, empower you to make impactful changes, and enhance the overall look and feel of your website.
Whether you’re a beginner or an experienced developer, this guide covers everything from basic WordPress header customization using the theme customizer to advanced methods using Elementor and HT Mega Addons.
- Understanding the WordPress Header: Foundation for Your Website
- Definition and Importance of the Header
- Key Functions of a WordPress Header
- Components of the WordPress Header
- Customizing the Header Using Theme Customizer
- How to Access the WordPress Theme Customizer
- Understanding Header Options in Theme Customizer
- Edit Your WordPress Header with Theme Customizer: Step-by-Step
- Important Note on Theme Changes
- Creating and Editing Header using Elementor Page Builder and HT Mega Addons
- What is HT Mega Addons for Elementor?
- Why Use HT Mega for Header Customization?
- Installing and Configuring HT Mega for Header Editing: Step-by-Step
- Step 2: Activate the Theme Builder Module
- Step 3: Create the Header Template from Scratch or Choose the Predesigned Templates
- Step-4: Setting the Header Template as the Default Header in the Website
- Step-5: Setting the Header Template as an Individual Page Template
- Editing the Header via Custom Code (Recommended for Developers)
- Before You Begin: Important Developer Warning
- Accessing the Theme File Editor
- Making Code Changes to Your Header
- Customizing Your header.php File
- Saving Your Code Changes
- Reverting Code Changes if Issues Occur
- Important Note
- Advanced Header Customization Techniques
- Implementing Sticky Headers
- Creating Responsive Headers
- Adding Custom Fonts to Your Header
- Implementing Animation and Hover Effects
- Creating Multi-Level Dropdown Menus
- Mobile-First Header Design
- Frequently Asked Questions
- Conclusion
Understanding the WordPress Header: Foundation for Your Website
The WordPress header is a fundamental aspect of your WordPress site’s identity, serving as the first point of contact for your audience. Customizing your WordPress header allows for a consistent branding experience across the entire WordPress website, enhancing user navigation and providing immediate recognition for your brand.
Appropriately editing the header and footer in WordPress can significantly impact the overall aesthetic and functionality of your WordPress site. Your header is more than just decorative; it’s a critical component of your website’s user experience and conversion strategy.
Definition and Importance of the Header
In WordPress, the header refers to the top section of a web page that typically contains site branding, navigation menus, and important information. It is one of the most prominent and crucial parts of a website’s layout.
The header often includes elements like:
- Site title or logo
- Contact information
- Search bar
The WordPress header is more than just a design element; it serves as the backbone of a website’s usability and brand image. The header’s structure and content can significantly influence how users navigate and perceive your site. It houses your logo and navigation menu, providing a roadmap to your site’s content and promoting brand recognition.
Furthermore, a well-organized and visually appealing header can enhance user experience, encouraging visitors to explore your website more thoroughly. Think of your header as your website’s welcome sign, it should be inviting, informative, and aligned with your brand values.
Key Functions of a WordPress Header
The header serves several important purposes in web design and user experience:
Branding and Recognition
Your header prominently displays your site’s logo or name, helping visitors identify and remember your brand. Consistent branding across your header builds trust and professionalism.
Navigation and Accessibility
The main menu within the header provides easy access to different sections of your website. It’s where visitors can find links to important pages like the homepage, about us, services, blog, and contact. A well-structured navigation menu reduces bounce rates and improves time-on-site.
Enhanced User Experience
An organized and well-designed header improves user navigation and helps visitors quickly find what they’re looking for, enhancing their overall experience on your site. Users should be able to understand your site’s purpose and structure within seconds of landing on your page.
Contact and Information Access
Many headers include contact details, such as phone numbers, email addresses, or live chat widgets, making it convenient for users to get in touch. This direct accessibility can increase lead generation and customer support effectiveness.
Visual Appeal and First Impressions
A visually appealing header can set the tone for your website’s design and create a positive first impression on visitors. Your header design influences how professional and trustworthy your website appears to potential customers.
Components of the WordPress Header
The WordPress header typically consists of various components, which can vary depending on the theme and plugins you’re using. Understanding these components helps you customize your header effectively. Here are the common components:
Site Title and Logo
This is the visual representation of your brand. It can be your logo or the name of your website, which can also serve as a link to the homepage. Most WordPress themes allow you to upload a custom logo through the theme customizer or WordPress customization interface.
Navigation Menu:
The main menu is a list of links that lead to different sections of your website. It can include primary links to essential pages and secondary links to subpages or categories. Multi-level menus (dropdowns) are common in modern WordPress header designs.
Contact Information:
Some headers include contact details like a phone number, email address, or physical address to make it easy for visitors to contact you. This is particularly important for service-based businesses and local enterprises.
Search Bar
A search bar allows users to search for specific content on your site. It’s particularly useful for websites with a lot of content, such as blogs, news sites, or online stores.
Social Media Icons
If your site has social media profiles, you can display icons that link to your social media accounts. This encourages social sharing and helps build your social presence.
Call-to-Action (CTA) Buttons
Headers may include buttons that encourage visitors to take specific actions, such as signing up for a newsletter, making a purchase, or requesting a quote. These CTAs can significantly impact conversion rates.
Additional Widgets and Elements
Depending on your theme and plugins, you can add various widgets to the header, such as a weather widget, a currency converter, a language switcher, or an announcement bar.
Header Image or Background
Some headers feature a background image or color that adds visual appeal to the top section of the website. This can include gradient overlays, patterns, or full-width images.
Login/Register Links
For websites with user accounts, headers may include links for users to log in or register, streamlining the user journey.
Sticky Header
Some themes feature a sticky header that stays visible at the top of the screen as users scroll, making navigation easier to access. This enhances usability and reduces navigation friction.
The WordPress header is a dynamic and customizable part of your website that plays a significant role in user engagement and overall design. It’s essential to choose a theme and configure your header to align with your website’s goals and user experience.
HT Mega Elementor Addons
The ultimate Elementor page builder addons to build stunning websites.
Customizing the Header Using Theme Customizer
The WordPress theme Customizer, a built-in WordPress header editor, offers more than just basic header customization options. It empowers you to customize various aspects of your website, including the footer, typography, colors, menus, and more, all without touching a line of code.
How to Access the WordPress Theme Customizer
To access the WordPress theme Customizer, navigate to your dashboard and click on “Appearance” > “Customize.”
On the left, you’ll find a menu of options, while the right displays a preview of your website.
In the Customizer, you’ll find header options that may be visible immediately or in a sub-menu, such as the Layout options.
In the Customizer, you’ll find header options that may be visible immediately or nested in a sub-menu, such as the “Header” or “Layout” options. The exact location depends on your active theme.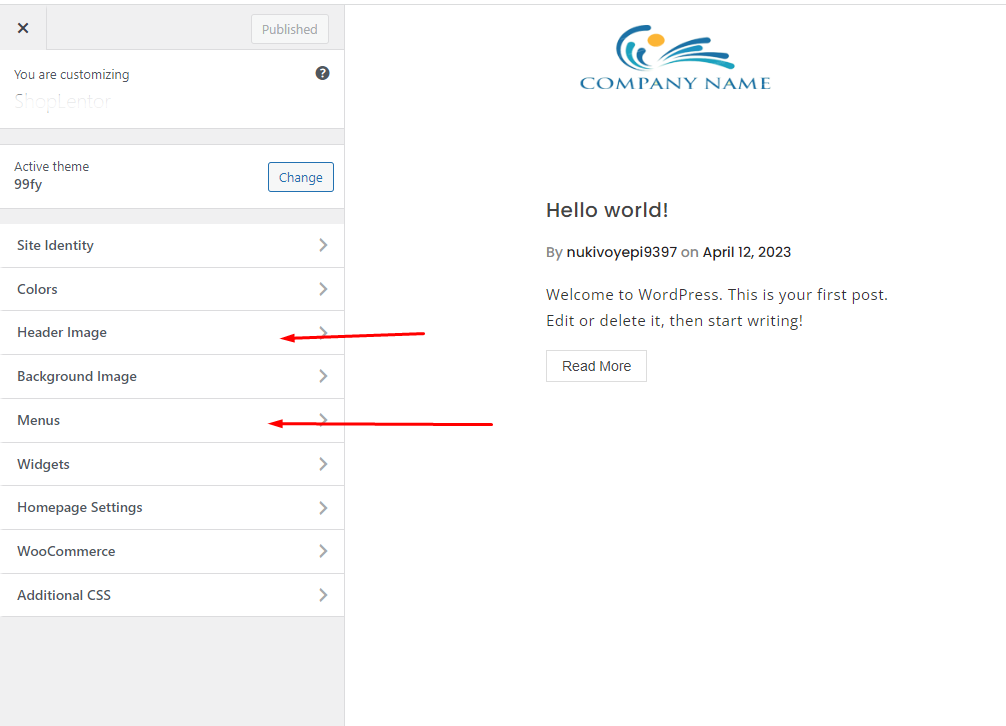
Once you’re satisfied with your header configuration, remember to save the changes to your theme header by clicking on the “Publish” button located at the top of the Customizer.
Please keep in mind that any modifications made using the WordPress theme Customizer will exclusively affect your currently active theme header. If you decide to switch to a different theme, you’ll need to edit the WordPress header once again.
Understanding Header Options in Theme Customizer
The header options in your WordPress theme will vary depending on which theme you’re using. For instance, most modern WordPress themes offer options like:
- Changing the logo – Upload or select your site logo
- Header color customization – Change background and text colors
- Logo size and positioning – Adjust how your logo displays
- Header layout – Choose between different header styles (full-width, boxed, etc.)
- Sticky header – Enable a sticky header that stays visible while scrolling
- Typography options – Change fonts and text sizes for header elements
Edit Your WordPress Header with Theme Customizer: Step-by-Step
Step 1: Navigate to Appearance > Customize
- Click on “Customize” to open the theme customizer
Step 2: Find Header Options
- In the left panel, look for sections like “Header,” “Identity,” “Site Identity,” or “Design”
Step 3: Customize Logo and Site Identity
- Upload your site logo by clicking “Select Logo”
- Choose your site title and tagline
- Adjust logo size and display options
Step 4: Modify Header Colors and Styles
- Change the header background color
- Adjust text and link colors for better contrast and readability
- Modify hover states for links
Step 5: Configure Navigation Menu
Step 6: Preview Changes
- The right side of the screen shows a live preview
- Test your changes on different pages
- Check mobile responsiveness
Step 7: Publish Your Changes Once you’re satisfied with your header configuration, remember to save the changes to your theme header by clicking on the “Publish” button located at the top of the Customizer.
Important Note on Theme Changes
Please keep in mind that any modifications made using the WordPress theme Customizer will exclusively affect your currently active theme header.
If you decide to switch to a different theme, you’ll need to edit the WordPress header once again from scratch, as customizations are theme-specific and won’t transfer to a new theme.
Creating and Editing Header using Elementor Page Builder and HT Mega Addons
For users seeking more advanced customization options without coding, combining Elementor (a popular WordPress page builder) with HT Mega Addons provides a powerful and flexible solution.
HT Mega is a comprehensive Elementor page builder add-on that comes with tons of features, relieving users of the hassle of installing too many plugins for additional functionality.
What is HT Mega Addons for Elementor?
HT Mega is a powerful plugin designed to enhance your Elementor experience and website functionality. One of its key features is the “Theme Builder” module that enables you to create templates for various sections of a web page, including:
- Header templates
- Blog page layouts
- 404 error page designs
- Search results page designs
- Archive page templates
- Single post/product page templates
The best part? You can access this powerful theme builder feature available on the free version of the plugin, making it accessible to WordPress users at any budget level.
Why Use HT Mega for Header Customization?
Using HT Mega with Elementor for header editing offers several advantages:
- No coding required: Drag-and-drop interface makes customization easy.
- Pre-built templates: Start with professionally designed header templates.
- Full customization: Override default headers on specific pages or globally.
- Responsive design: Mobile-friendly header templates included.
- Advanced widgets: Access to HT Mega’s collection of custom Elementor widgets.
- Time-saving: Pre-made templates get you up and running quickly.
Installing and Configuring HT Mega for Header Editing: Step-by-Step
Let’s walk through exactly how to edit header in WordPress using HT Mega and how you can leverage this plugin to create or edit your website header. Follow these detailed steps to get started.
Step 1: Download and Install the Plugin
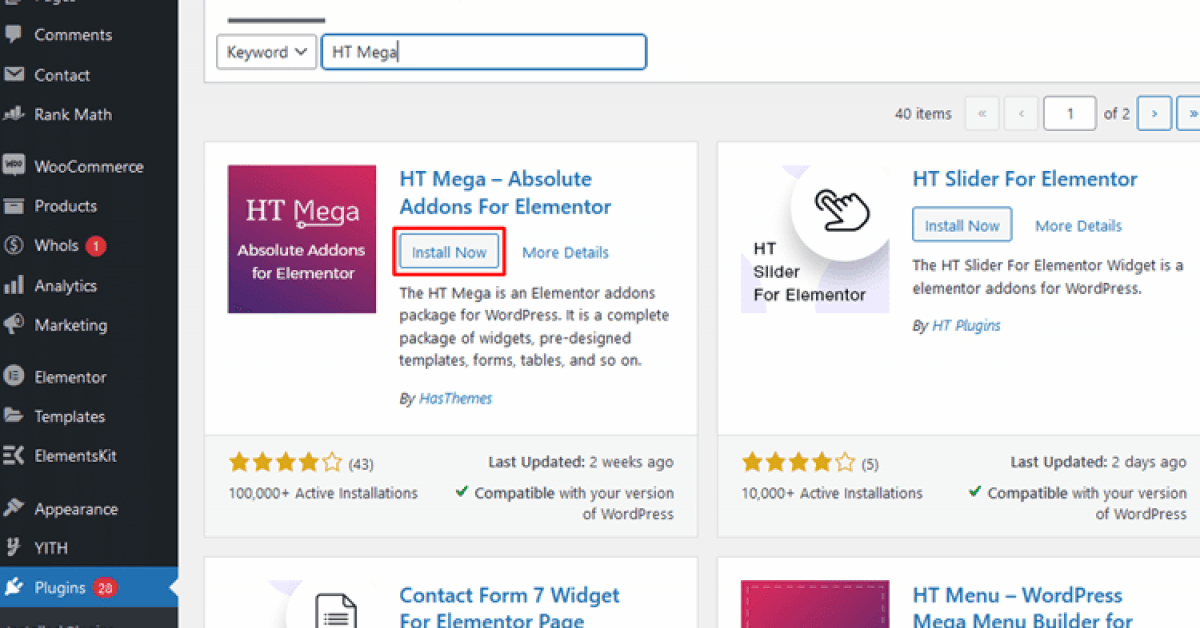
Method 1: Install from WordPress Plugin Directory (Recommended)
- Access your WordPress site dashboard
- Click on “Add New Plugin”
- In the search bar, type “HT Mega“ to find the plugin
- After installation completes, click “Activate” to activate the plugin
Method 2: Manual Upload from WordPress Repository
If you prefer to download the plugin file manually:
- Download the HT Mega plugin file from the WordPress plugin repository
- In your WordPress dashboard, go to the “Plugins” section and click “Add New Plugin”
- Click on it, choose the HT Mega plugin file you downloaded, and upload it
- Finally, activate the plugin after installation is complete
After activation, you should see “HT Mega” appear in your WordPress dashboard menu.
Step 2: Activate the Theme Builder Module
- In the Modules section, you’ll find the ‘Theme Builder’ module.
- Activate it by clicking on the toggle/switch next to it.
The Theme Builder module is now active and ready to use for creating header templates.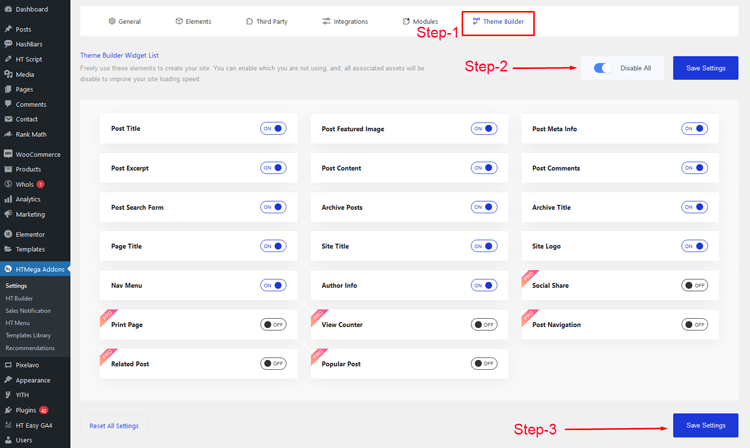
Step 3: Create the Header Template from Scratch or Choose the Predesigned Templates
You now have two options: create a completely custom header template from scratch or leverage HT Mega’s pre-designed templates as a starting point. Both approaches work well, depending on your design skills and time availability.
Creating a Header Template from Scratch
Access Elementor Templates: Begin by navigating to your WordPress dashboard and finding “Elementor” in the menu. From there, go to “Templates” and then select “Saved Templates.”
Add a New Template: On the “Saved Templates” page, locate and click the “ADD NEW” button at the top of the screen. This action will trigger a pop-up.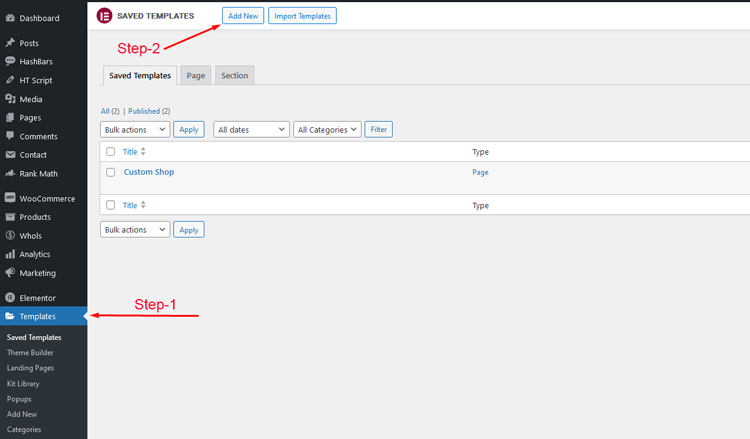
Template Type Selection: In the pop-up, you’ll be prompted to choose the type of template you want to create. Since we are focusing on the header section, select ‘section’ as the ‘Type of template.’ Also, provide a name for your template.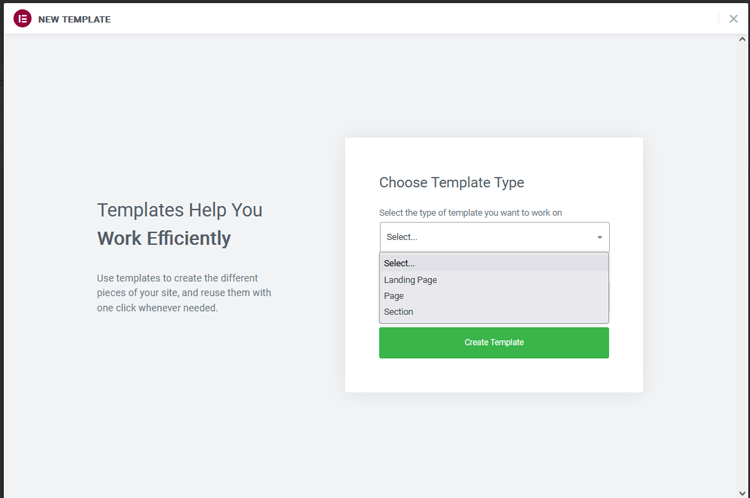
Building the Header Manually: After these selections, you’ll enter the Elementor edit screen. Here, you have two choices. You can either manually craft your header template by clicking the “+” icon, selecting a structure, and adding necessary Elementor widgets for the header, such as:
- Logo widget
- Search widget
- Spacer widgets
These widgets are readily available in HT Mega and standard Elementor.
Customize Your Design
Use Elementor’s design controls to customize:
- Colors and backgrounds
- Typography (fonts, sizes, weights)
- Spacing and padding
- Responsive design for different devices
- Hover effects and animations
Save Your Template
Once satisfied with your design, click “Update” to save your custom header template.
Using HT Mega’s Pre-Made Header Templates
For a faster approach, HT Mega provides a collection of professionally designed header templates:
Using Pre-Made Templates: Alternatively, you can opt for pre-made templates offered by HT Mega. To access them, go to the “Add Section” area within the Elementor edit screen and click on the HT Mega icon.![]()
Exploring Pre-Made Templates: A new page will appear, presenting a variety of blocks and pages. In the blocks section, you’ll find a collection of header templates that come bundled with the HT Mega plugin.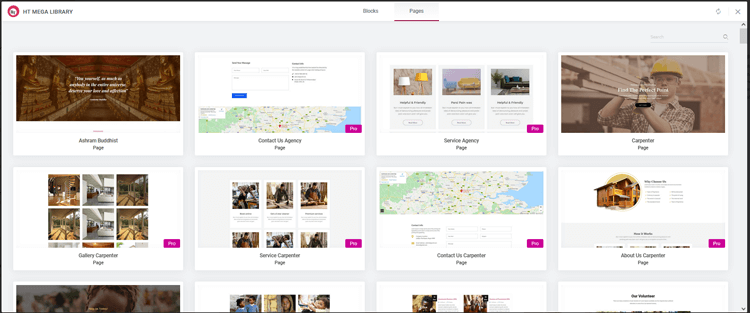
Selecting a Pre-Made Template: Choose the pre-made header block that best suits your needs and click ‘Insert.’
Customize the Pre-Made Template: Once inserted, you can personalize the pre-made template to align with your design preferences:
- Change logos and site titles
- Modify colors and typography
- Add or remove elements
- Adjust spacing and layouts
Save Your Customized Template: After customizing, click the ‘Update’ button to save your header template
By following these steps, you can effortlessly create or select your header template, whether you prefer to design it from scratch with complete creative freedom or leverage the convenient pre-made templates provided by HT Mega for faster implementation.
Step-4: Setting the Header Template as the Default Header in the Website
Now that you’ve created or customized your header template, you need to set it as your website’s default header so it appears on all pages (unless overridden for specific pages).
Navigate to HTMega Addons: Once in the dashboard, locate the “HT Mega Addons” menu.
Access HT Builder: Within the “HTMega Addons” menu, find and select “HT Builder.”
HT Builder Settings: You’ll now be on the HT Builder Settings page. This is where you can designate templates for specific sections of your website, such as the header, footer, search page, and 404 page.
Choose Header Template: To set your custom template as the global header, click on “Header Template.”
Select Your Custom Template: In the Header Template section, choose the template you’ve previously customized.
Save Changes: After selecting your preferred header template, make sure to click the ‘Save Changes’ button.
Preview Your Webpages: To ensure that your chosen header template is now the website’s header, go ahead and preview your webpages. 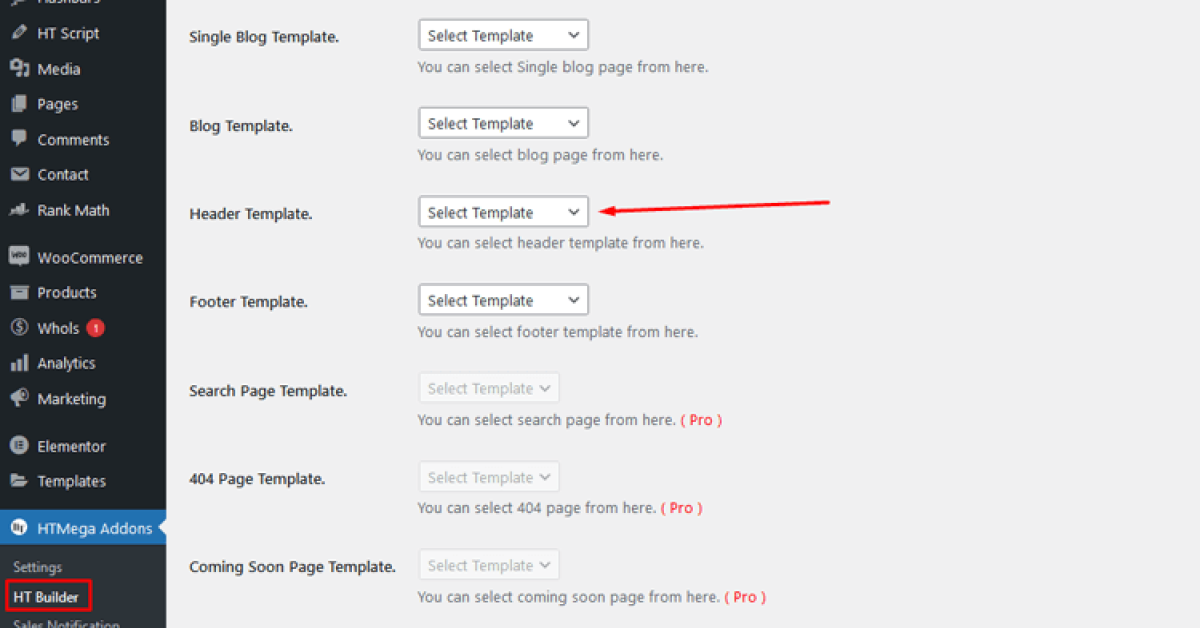
Step-5: Setting the Header Template as an Individual Page Template
If you want to designate a different header template for a specific page (rather than using the global default), follow these steps:
Access the Page in Elementor: Navigate to the specific page you want to customize. Click “Edit with Elementor” to open it in the Elementor editor.
Locate the Elementor Editor Panel: Once you’re on the Elementor edit screen, find the Elementor editor panel. This panel is usually situated on the left or right side of the screen.
Find the Settings Icon: Within the Elementor editor panel, look for the settings icon (usually a gear or cog symbol). This is typically located in the lower section of the panel. Click on it to reveal additional page options
Access HT Header Footer Settings: Among the options that appear, you’ll find “HT Header & Footer”. Click on this option to access the header template settings for this specific page.
Select Header Template: Among the options, you’ll find “HT Header & Footer.” Click on this option to access the header template settings for the specific page.
Choose Your Template: In the HT Header & Footer settings, you can now select a header template from the available options. Choose the one that suits your page’s design needs. You can also disable the header for this specific page if needed.
Save Your Page: Click “Update” to save the page with its custom header settings
By following these steps, you can easily set a custom header template for a particular page using Elementor’s HT Header and footer settings, giving you complete flexibility to have different headers for different sections of your site.
Editing the Header via Custom Code (Recommended for Developers)
Customizing your WordPress Header doesn’t have to be limited to using the WordPress theme Customizer. There’s an alternative method that offers greater flexibility, especially if you’re comfortable with coding.
Before You Begin: Important Developer Warning
This method is intended for developers only. If you’re not a WordPress developer, it’s best to avoid the ‘Theme Editor’ option. Improper code edits can break your website. Always back up your site before making code changes.
Accessing the Theme File Editor
If you have a good grasp of HTML and CSS, you can easily customize your WordPress Header right from your dashboard.
- When you first access the “Theme File Editor,” you will receive a “Heads Up” warning message
- This precaution is in place to prevent non-programmers from inadvertently making changes to theme code
- To proceed, click on “I Understand”
Making Code Changes to Your Header
After confirming you understand the risks:
- You’ll be redirected to the Theme File Editor where you can view lines of theme code that can be modified
- On the right side, you’ll see the “Theme Files” section listing all your theme’s PHP files
- Locate the header.php file – This file is specifically designed for your header and is what you’ll edit
- Click on header.php to open it in the editor
Customizing Your header.php File
The header.php file contains all the code that renders your website’s header. You can customize it to:
- Modify header structure and layout
- Add custom HTML elements
- Insert custom CSS classes for styling
- Modify logo display and positioning
Saving Your Code Changes
- Once you have finished editing the theme code, review your changes carefully
- This action will save your edited theme code
Important: After making changes, immediately check your website to ensure:
- The header still displays correctly
- All elements load properly
- No error messages appear
- The layout looks as intended
Reverting Code Changes if Issues Occur
If your changes break your site:
- Return to Appearance > Theme File Editor
- Open header.php again
- Undo your changes or revert to the original code
- Click “Update File” to save
Important Note
It is important to note that this functionality is primarily intended for developers. If you encounter issues or don’t feel comfortable editing code, consider using the visual methods (Theme Customizer or HT Mega with Elementor) instead.
HT Mega Elementor Addons
The ultimate Elementor page builder addons to build stunning websites.
Advanced Header Customization Techniques
Beyond the basic methods outlined above, consider these advanced techniques to take your WordPress header to the next level:
Implementing Sticky Headers
A sticky header remains visible at the top of the screen as users scroll down your page. This enhances navigation accessibility. Most WordPress themes include sticky header options in the customizer, or you can use CSS:
.site-header { position: sticky; top: 0; z-index: 1000; }
Creating Responsive Headers
Ensure your header looks great on all devices:
- Adjust logo size for mobile devices
- Test on multiple devices and screen sizes
Adding Custom Fonts to Your Header
Use Google Fonts or custom fonts to make your header typography stand out:
- In Theme Customizer, look for Typography settings
- Select from Google Fonts library
- Adjust font sizes for readability
- Ensure sufficient contrast between text and background
Implementing Animation and Hover Effects
Using HT Mega or custom CSS, add subtle animations:
- Fade-in effects when the page loads
- Smooth transitions for color changes
- Scroll-triggered animations
Creating Multi-Level Dropdown Menus
WordPress supports multi-level menus (submenus). To create dropdown navigation:
- Test on mobile devices for accessibility
Mobile-First Header Design
Design your header with mobile users in mind:
- Prioritize essential elements on mobile
- Test on various mobile devices and browsers
Frequently Asked Questions
How to edit header in WordPress?
To customize the header in WordPress, you can typically use one of the following methods:
1. Go to your WordPress dashboard, navigate to “Appearance” > “Customize,” and look for header customization options.
2. Use a page builder or theme editor to modify the header layout, design, and content.
3. Edit the header.php file in your theme using code (for advanced users).
The best method depends on your technical skill level and customization needs.
What should I do if I don’t see the Customizer option in my dashboard?
If you don’t see the WordPress Customizer option in your dashboard, it’s likely that you are using a block-enabled theme (like WordPress’s native block theme). In this case, you will need to use Full Site Editing (FSE) instead of the traditional customizer.
This opens the block-based site editor:
1. To access Full Site Editing:
2. Go to Appearance > Editor
3. Look for Header sections to customize
Contact your theme’s support if you need specific guidance.
Can I add elements such as logos and menu options to my header?
Yes, absolutely! Depending on your theme’s capabilities, you can add various elements to your header using the Customizer, page builders, or code. This includes:
1. Logos and site icons
2. Navigation menus
3. Search functionality
4. Contact information
5. Social media icons
6. Call-to-action buttons
7. Additional custom elements
However, not all themes offer the same level of customization, so it’s important to choose a theme that fits your desired design aesthetic. Themes like those from reputable developers or those specifically designed for high customization typically offer more header modification options.
Can I change the header image/logo?
Yes, you can change the header image or logo. In the WordPress Customizer:
1. Go to Appearance > Customize
2. Look for “Site Identity” or “Header” section
3. You’ll find options to upload a new header image or replace the logo
4. Adjust the logo’s size and position with available controls
Some themes may provide additional settings for customizing the logo’s size, position, and display options across different page types.
What is HT Mega Addons for Elementor, and how can it help me edit my WordPress header?
HT Mega Addons for Elementor is a powerful plugin designed to enhance your website’s functionality, including the header. It provides a wide range of custom widgets and modules that can be easily integrated into your WordPress header using the Elementor page builder.
With HT Mega Addons, you can:
1. Design and edit your header with complete visual control
2. Incorporate elements like logos, menus, icons, and more
3. Use pre-built header templates as starting points
4. Create multiple header variations for different pages
5. Implement advanced responsive design
6. Access professional-quality header designs without coding
Are there pre-built header templates available in HT Mega Addons?
Yes, HT Mega Addons offers a variety of pre-designed header templates that you can use as a starting point. These templates are fully customizable, so you can modify them to suit your needs. This feature can save you time when designing your header.
Can I create a custom header design with HT Mega Addons for Elementor?
Yes, HT Mega Addons allows you to create fully custom header designs. You can use its modules, including header builder elements, to design a unique header layout that aligns with your website’s branding and style. Elementor’s drag-and-drop interface makes it simple to arrange and edit header elements visually.
How often should I update my header design?
There’s no universal rule, but consider updating your header when:
1. Your brand identity changes
2. You launch new products or services
3. Navigation structure becomes outdated
4. Design trends evolve significantly
5. User feedback suggests improvements
6. Your business goals shift
Regular reviews (quarterly or annually) can help keep your header fresh and aligned with current best practices.
Conclusion
To summarize, learning how to edit header in WordPress can seem intimidating if you don’t have much experience with HTML and CSS or don’t feel comfortable jumping into a code editor. However, relying on simple drag-and-drop features or built-in customization tools makes this process much more achievable. You can always tweak your design and add new elements as you get familiar with them.
Fortunately, modern WordPress solutions give you all the flexibility that you need to customize your site’s header according to your unique business goals. This article has highlighted the breadth of possibilities available for customizing headers in WordPress, from simple logo adjustments and menu modifications using the theme customizer to full-page header designs showcasing featured content areas, advanced navigation menus, and custom widgets.