Meta Pixel Conversion Tracking, CAPI & Server-Side Tracking for WordPress (2026)

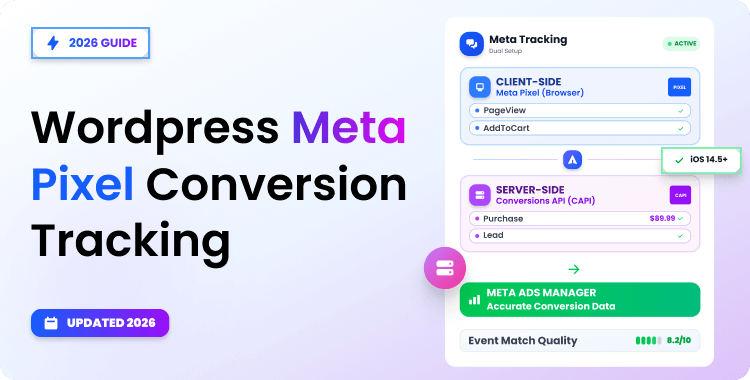
Meta Conversion API (CAPI) is Meta’s server-side tracking solution that sends conversion events directly from your WordPress server to Meta, bypassing browser limitations. In WordPress, Meta Pixel Conversion Tracking means combining browser- and server-side events to provide more reliable data.
Combined with Meta Pixel, CAPI ensures more accurate conversion data for ad optimization despite ad blockers and privacy restrictions. Setting up server-side tracking on WordPress is straightforward with plugins like Pixelavo.
Quick Answer: Meta Conversions API (CAPI) sends conversion events from your WordPress server directly to Meta, rather than relying on a visitor’s browser. It is commonly paired with Meta Pixel so that browser-side and server-side events work in parallel. When the same event is sent through both methods, a shared event_id lets Meta deduplicate it so the conversion is not counted twice.
Imagine your WooCommerce store processed 120 orders last week. Stripe confirms it. This is where Meta Pixel conversion tracking becomes critical.
But Meta Ads Manager only shows 74 conversions. Your reported ROAS looks weak, campaigns are throttled, and the algorithm can’t optimize because it’s working with incomplete data.
This gap between actual conversions and reported conversions is a common problem for stores relying only on browser-based pixel tracking. iOS App Tracking Transparency, ad blockers, Safari’s tracking protections, and browser privacy controls can all reduce the reliability of browser-only conversion measurement.
The Meta Conversion API for WordPress addresses this by sending event data directly from your server — the CAPI event itself is sent from your server rather than directly from the visitor’s browser.
When you pair CAPI with Meta Pixel, you get both client-side and server-side coverage. The result is more complete data, better Event Match Quality, and campaigns that can optimize more effectively on what’s actually happening in your store.
This guide covers everything from what the pixel tracking code actually is, how server-side tracking works on WordPress, how to set up CAPI step by step, which events to track, how deduplication prevents double-counting, and how to troubleshoot common issues.
Table of Contents
Pixel vs Meta Conversion API vs Server-Side Tracking
Meta Pixel is a JavaScript snippet that runs in the visitor’s browser. When someone views a product or completes a purchase, the pixel fires an event to Meta. This is client-side tracking; it depends entirely on the browser executing the script.
Meta Conversion API (CAPI) sends the same types of events, but from your WordPress server directly to Meta’s servers. This is server-side tracking. Because the CAPI event is sent from the server rather than the visitor’s browser, it isn’t blocked by ad blockers, tracking prevention features, or cookie restrictions.
“Server-side tracking” is the broader industry term. CAPI is specifically Meta’s implementation of it. Google has its own (GA4 + server-side GTM), and other ad platforms have their equivalents. If you want to understand how Pixel and Google Analytics differ in how they handle tracking, see our Facebook Pixel vs Google Analytics comparison.
When both Pixel and CAPI are active, Meta uses event deduplication, matching events by a shared event_id to count each conversion only once. This is the recommended setup in 2026: browser events catch what they can, server events fill the gaps, and deduplication prevents inflated numbers.
For WordPress store owners, the practical takeaway is straightforward: install a plugin that handles both Pixel and CAPI, connect your credentials, and you get end-to-end Meta Pixel Conversion Tracking on WordPress.
What Is the Meta Pixel Tracking Code?
The Meta Pixel tracking code is a JavaScript snippet you place on your website to track visitor actions and send that data to Meta. It has two parts:
- Base code: This loads on every page and fires a default PageView event. It initializes the pixel with your unique Pixel ID.
- Event code: These are additional snippets that fire on specific actions like Purchase, AddToCart, Lead, or CompleteRegistration.
In a manual setup, you’d paste the base code into your WordPress site’s <head> section — either by editing your theme header or using a code snippet plugin. Each event would then require extra JavaScript on the relevant pages (product pages, thank-you page, checkout, etc.).
The Problem with Manual Code on WordPress:
- If Pixel code is added directly to theme files, a theme update or template change can remove or overwrite it, breaking tracking silently.
- You get zero Conversion API (server-side) integration.
- Managing event code across dozens of WooCommerce pages is error-prone.
- No built-in deduplication, Advanced Matching, or event testing.
This is exactly why most WordPress users skip manual code and use a dedicated plugin like Pixelavo instead. The plugin automatically injects the tracking code, manages events through a dashboard, and adds CAPI on top — no code editing needed.
What the Tracking Code Enables?
Once installed (manually or via plugin), the Meta Pixel tracking code powers several key capabilities:
- Conversion tracking: Measure specific actions (purchases, signups, leads) that result from your Meta Ads.
- Retargeting audiences: Build custom audiences from people who visited specific pages, added items to cart, or abandoned checkout.
- Lookalike audiences: Let Meta find new users who behave similarly to your existing customers, expanding your reach.
- Cross-device attribution: When combined with CAPI and Advanced Matching, Meta may be able to associate conversions when strong matching signals are available across devices.
- Ad optimization: Meta’s algorithm uses pixel data to show your ads to people most likely to convert.
If you need help choosing the right plugin for your pixel setup, check out our guide to the best Meta Pixel plugins for WordPress.
How to Get Your Meta Pixel Tracking Code
Before setting up CAPI, you need a Meta Pixel. Here’s how to create one and get your tracking code:
Step 1: Access Meta Events Manager
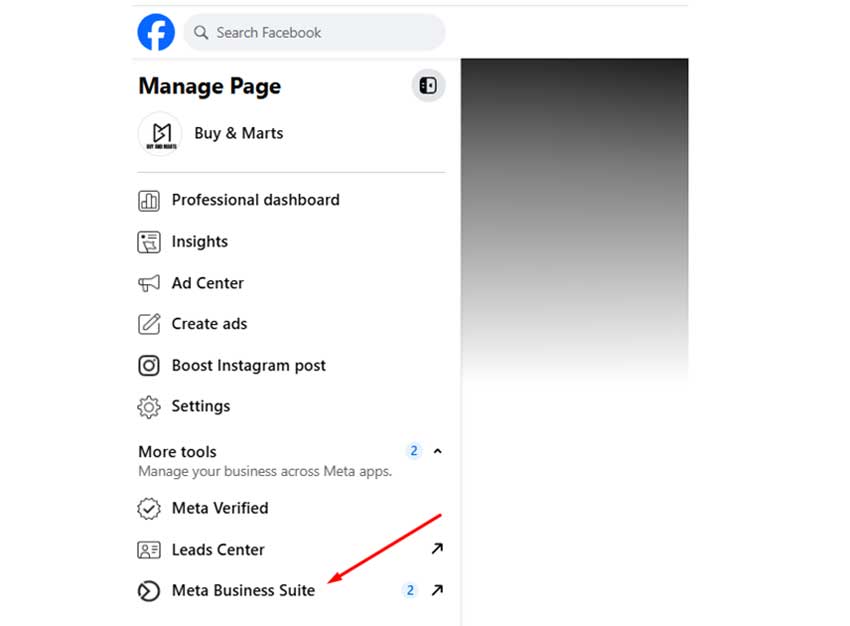
Log in to your Meta Business account from your Facebook account.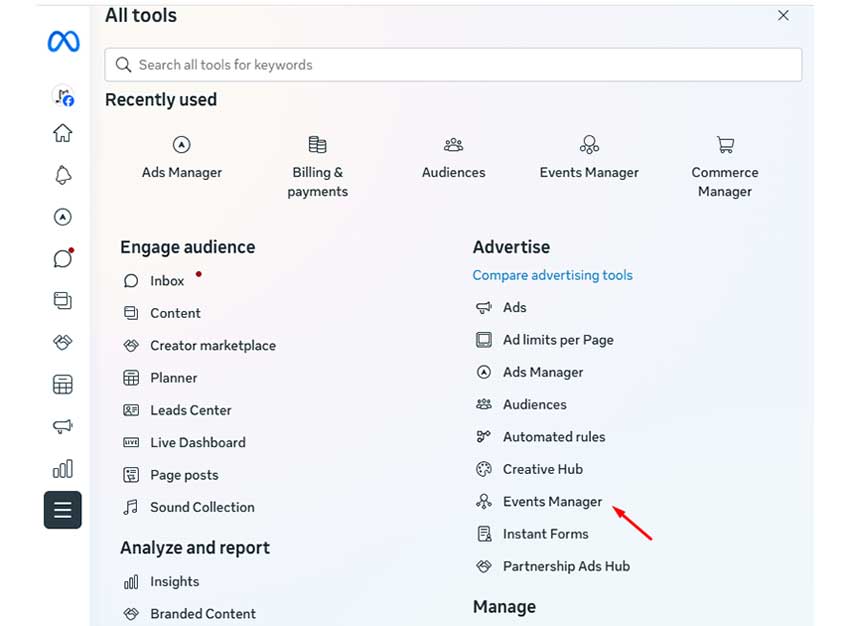
From the left-side menu “All Tools”, click Events Manager.
Step 2: Create a New Pixel
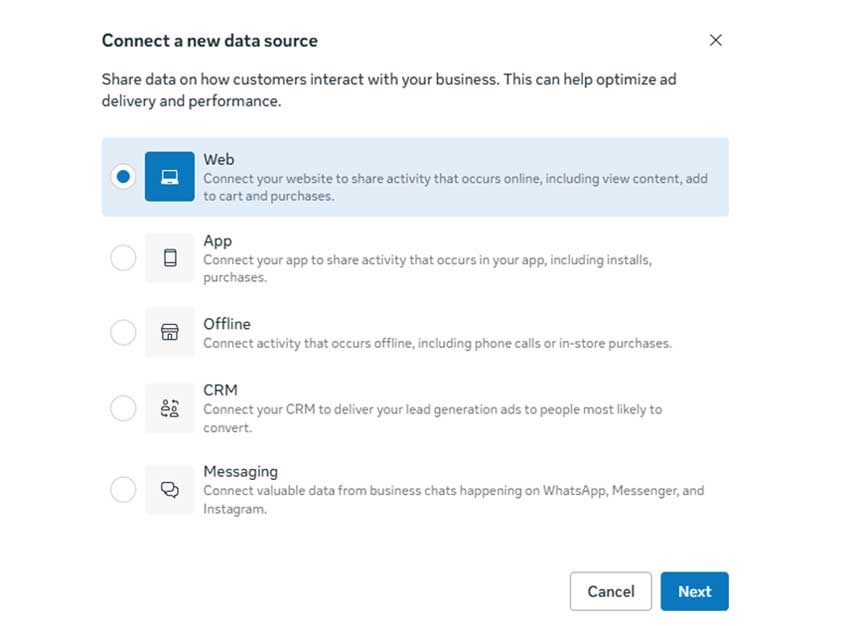
Click “Connect Data Sources” → select “Web” → choose “Meta Pixel.” Give your pixel a descriptive name (e.g., your store name) and click “Create Pixel.”
Step 3: Copy Your Pixel ID
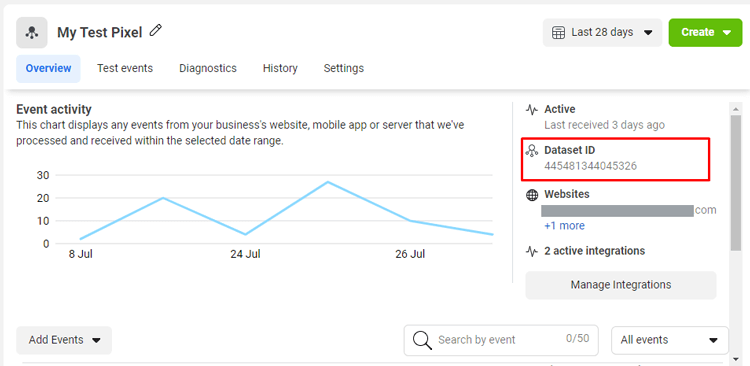
In Events Manager, go to Data Sources and select your pixel. On the right side of the details panel, you’ll see your Pixel ID — a 15–16 digit number. Copy it. You’ll need this for both manual installation and plugin setup.
Step 4: Get Your Conversion API Access Token
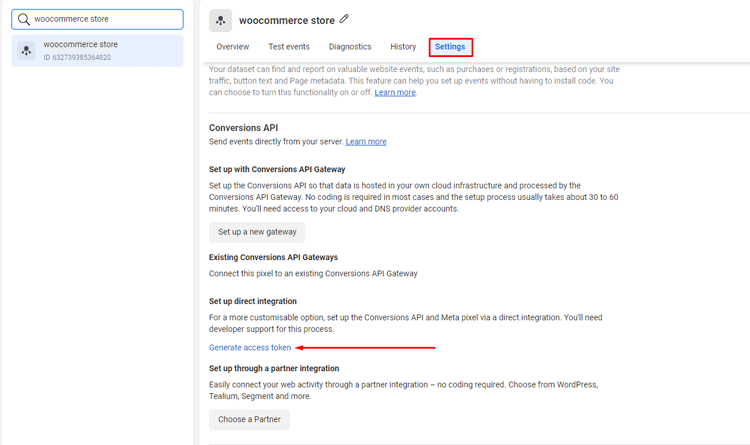
Still on your pixel’s page, click the Settings tab. Scroll down to the “Conversions API” section and click “Generate access token.”
Copy this token – it’s required for server-side tracking. This process is similar to generating tokens on other Meta platforms; if you’ve ever followed steps to get an Instagram access token, the flow will feel familiar.
At this point, you have everything needed: Pixel ID + CAPI access token. The next step is connecting them to your WordPress site.
How to Set Up Meta Conversion API on WordPress (Step-by-Step)
For most WordPress users, a plugin-based setup is easier to maintain than custom code. In the walkthrough below, we’ll use Pixelavo as the example, but the general flow applies to any CAPI-ready plugin.
These steps give you a clean Meta Pixel Conversion Tracking setup that Meta can use for optimization.
Step 1: Install a CAPI-Ready Plugin (Pixelavo)
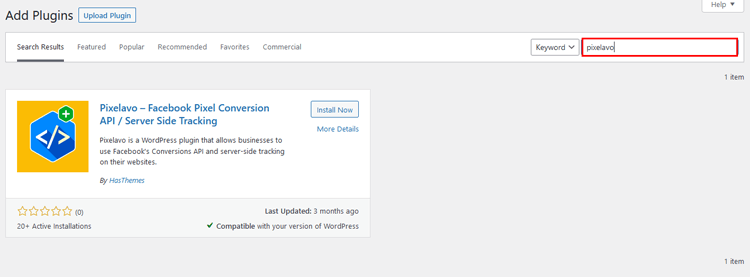
In your WordPress dashboard, go to Plugins → Add New. Search “Pixelavo.” Click Install, then Activate. A new “Pixelavo” menu appears in your sidebar.
Step 2: Connect Pixel ID and Conversions API Token
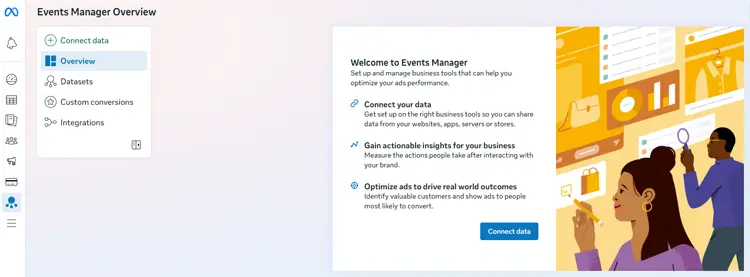
In Meta Events Manager, open Datasets and select the dataset connected to your website. Choose Web as the data source and continue.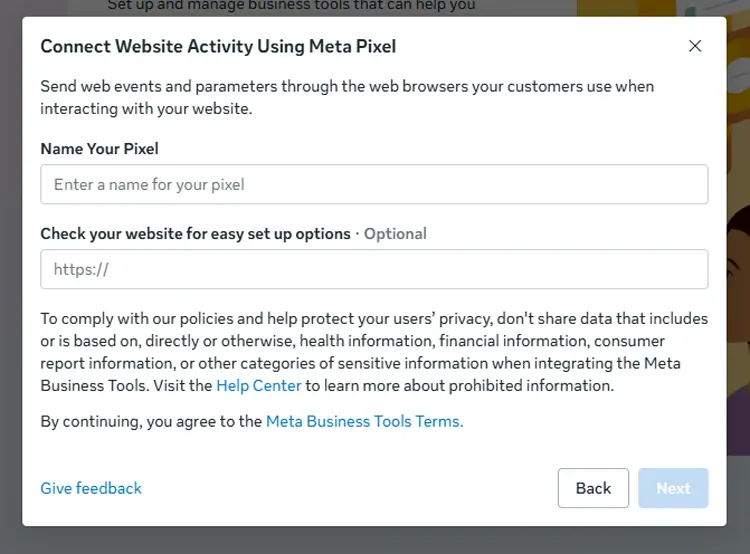
Meta may first show a Connect Website Activity Using Meta Pixel setup window. If you have already configured your Pixel, close that window to return to the Set up Web Events screen.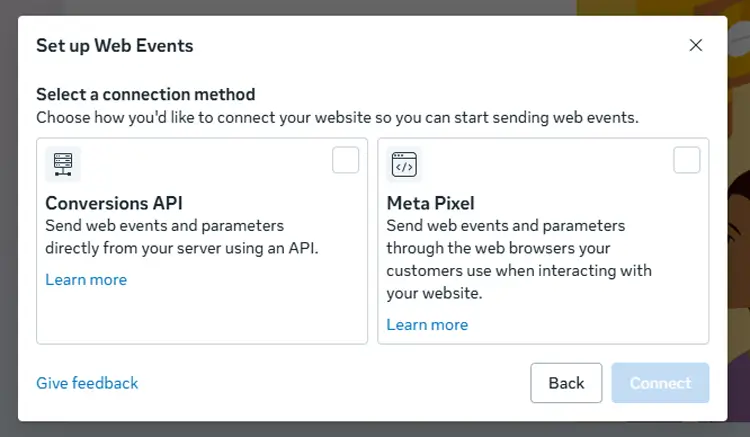
From there, select Conversions API as the connection method and continue through the setup flow. Follow Meta’s prompts to complete the server-side connection and generate or configure the access credentials required by your WordPress plugin.
Step 3: Enable Server-Side Events
In Pixelavo’s settings, configure which events should fire via CAPI. For WooCommerce stores, prioritize Purchase, AddToCart, and InitiateCheckout.
Pixelavo Pro adds Refund, Subscription, and CustomizeProduct events.
Step 4: Turn On Event Deduplication
Pixelavo automatically handles deduplication by assigning matching event_id values to both browser and server events. Verify this is active in your settings. If using another plugin, confirm it supports event_id-based deduplication – without it, you’ll double-count conversions.
Step 5: Test Events in Meta Events Manager
Go to Events Manager → Test Events tab. Enter your site URL and click “Open Website.” Add a product to the cart, initiate checkout, or complete a test purchase. Both browser and server events should appear. If only one type shows, revisit Steps 2-4.
Which Conversion Events Should You Track with CAPI?
For accurate Meta Pixel Conversion Tracking, not all events carry equal weight. Focus CAPI tracking on the events that directly impact ad optimization and audience building.
Priority events for WordPress/WooCommerce stores:
- Purchase: The most critical event. Must include value, currency, and content_ids. Without revenue data, Meta can’t optimize for ROAS.
- AddToCart: Signals high intent. Include content_ids, value, and quantity.
- InitiateCheckout: Captures users entering the checkout flow.
- Lead / CompleteRegistration: Essential for service businesses or stores collecting signups.
- Subscribe: If you sell subscriptions via WooCommerce Subscriptions, track creation, renewal, and cancellation events (Pixelavo Pro).
Why sending value and currency matters:
Meta’s bidding algorithms use purchase value to optimize for the highest-value conversions. Sending events without value is like asking Meta to optimize blindly; it’ll chase volume, not revenue.
How CAPI Improves Event Match Quality (EMQ):
EMQ measures how well Meta can match your events to real Facebook/Instagram users. Server-side events can include hashed user data – email, phone number, name that browser events often miss (especially for non-logged-in visitors).
When events include accurate customer matching parameters, CAPI can improve EMQ. Better matching data may help Meta associate server events with users more reliably, which can improve attribution and optimization signals over time.
Example Event Payload
| Event | Required Data | Recommended Extra Data |
| Purchase | value, currency, content_ids | email, phone, order_id, coupon |
| AddToCart | content_ids, value, quantity | content_name, content_type |
| Lead | — | email, phone, first_name, last_name |
| InitiateCheckout | value, currency | num_items, content_ids |
After enabling CAPI and Advanced Matching, monitor Event Match Quality in Events Manager. Improvements depend on the customer information available, the event configuration, and Meta’s ability to match that data.
How Server-Side Tracking Works on WordPress
Understanding what happens under the hood helps you troubleshoot faster and make better plugin choices.
When a visitor completes an action on your WooCommerce store – say, finishing a purchase – WordPress fires a set of PHP hooks (like WooCommerce_thankyou).
A CAPI-ready plugin listens for these hooks and, when triggered, makes an API call from your server to Meta’s Conversions API endpoint with the event data.
This server-to-server communication is the core of server-side tracking on WordPress. The visitor’s browser is not involved at all in sending the CAPI event. That’s why ad blockers and cookie restrictions don’t affect it.
For a broader view of how ecommerce conversion tracking works, see our guide to ecommerce tracking in Google Analytics, the measurement concepts are closely related.
Plugin-based Approach (Pixelavo, PixelYourSite, etc.)
Easiest for most stores. The plugin handles hook listening, data formatting, token authentication, and API calls. You configure it through the WordPress dashboard, with no server infrastructure to manage.
GTM Server-side Container Approach
For high-volume stores or multi-channel setups (Meta + Google + TikTok + Pinterest all needing server-side tracking), a dedicated Google Tag Manager server container, typically hosted on Google Cloud, centralises all server-side events in one place. This is more powerful but requires a developer to set up and maintain, plus additional server infrastructure and ongoing hosting costs that vary with traffic and hosting setup.
Which approach to choose:
- Running Meta Ads only → plugin-based is simpler and cheaper.
- Running ads across 3+ platforms with high volume → GTM server-side is worth the investment.
- Either way, the tracking accuracy improvement is significant.
If you’re also setting up GA4 conversion tracking on the same WordPress site, our guide to GA4 conversion tracking for WordPress walks through a parallel setup.
How to Avoid Double-Counting with Pixel + CAPI
Running both browser Pixel and server-side CAPI means the same event (e.g., a Purchase) gets sent twice to Meta, once from the browser, once from the server. Without deduplication, Meta counts it as two purchases.
How Deduplication Works
Both the Pixel event and the CAPI event must include the same event_id. When Meta receives both, it matches them by event_id and counts the conversion only once. Matching browser and server versions of the same event are treated as a single conversion through deduplication. If the browser event never arrives, the server event may still provide the conversion signal.
How to Enable It in Practice:
- In Pixelavo, deduplication is handled automatically. The plugin generates matching event_id values for Pixel and CAPI events.
- If using another plugin, check its documentation for event_id or “deduplication” settings and confirm it’s active.
- If you’ve manually implemented CAPI via custom code, you need to generate and pass the same event_id in both your JavaScript Pixel fbq(‘track’, …) call and your server-side API request.
Best Practices:
- Use only one CAPI plugin at a time. Running Pixelavo and the official Meta plugin simultaneously will cause duplicate server events.
- Use the same event names in both Pixel and CAPI (e.g., “Purchase” in both, not “purchase” in one and “Purchase” in the other).
- Test each event type individually in Events Manager’s Test Events tool before launching campaigns.
Video Presentation: How to Set Up Facebook Pixel on WordPress Using Pixelavo Plugin
Common Conversion API & Server-Side Tracking Issues
Browser and CAPI Events Double-Counted
- Symptom: Purchase count in Events Manager is roughly 2× your actual order count.
- Cause: Deduplication is not active, or two CAPI plugins are running simultaneously, or event_id values don’t match between Pixel and CAPI.
- Fix: Confirm only one CAPI plugin is active. Check that your plugin’s deduplication setting is enabled. In Events Manager, filter events by “Processing Method”: if you see separate “Browser” and “Server” entries for the same event without dedup, your event_id setup needs fixing.
CAPI Events Not Showing in Events Manager
- Symptom: Browser events appear, but no server events show up, even after enabling CAPI in your plugin.
- Cause: Invalid or expired access token, incorrect Pixel ID in the CAPI configuration, server firewall blocking outbound API calls to Meta’s endpoint, or PHP timeout on your hosting.
- Fix: Regenerate your access token in Events Manager and re-paste it. Verify the Pixel ID matches exactly. Ask your host whether outbound HTTPS requests to graph.facebook.com are allowed. Check your server’s PHP error log for timeout or connection errors.
Low Event Match Quality After CAPI Setup
- Symptom: EMQ score stays “Poor” or “OK” even with CAPI active.
- Cause: Server events are being sent without user parameters (email, phone, name). CAPI alone doesn’t guarantee good EMQ; user data quality matters.
- Fix: Enable Advanced Matching in your plugin. Pixelavo Pro hashes and sends user data (email, phone, first/last name) automatically for logged-in WooCommerce customers. For guest checkouts, ensure your plugin captures the billing email and phone from the order data and includes them in the CAPI payload.
Purchase Events Missing Value or Currency
- Symptom: Purchase events appear in Events Manager but show no revenue value, breaking ROAS reporting and value-based bidding.
- Cause: Plugin not configured to pass WooCommerce order total and currency, or a currency mismatch between WooCommerce settings and the event payload.
- Fix: In your plugin’s WooCommerce event settings, confirm that Purchase events include value (order total) and currency (e.g., USD, BDT). Verify your WooCommerce → Settings → General → Currency matches what’s being sent. Test with a real or test order and check the event details in Events Manager.
Test Events Work, But Live Reporting Looks Incomplete
- Symptom: Test Events in Events Manager show browser and server events correctly, but live conversion reporting seems lower than expected.
- Potential causes: Event parameters incomplete on live orders, attribution window differences, consent restrictions preventing tracking for some visitors, event processing delays, or a domain/dataset mismatch.
- Fix: Review event payloads in Events Manager’s event detail view for live events. Confirm your domain is verified under your dataset. Check whether a consent plugin is blocking events for unconsented visitors — this is expected behavior, not a bug.
Frequently Asked Questions
Do I still need Meta Pixel with CAPI?
Yes. Meta recommends running both together. The Pixel handles real-time browser events, CAPI covers what browsers miss, and deduplication prevents double-counting.
Is server-side tracking allowed under GDPR?
Yes, but you still need user consent before tracking. CAPI changes how data is sent (server vs browser), not whether consent is required. Use a cookie consent plugin alongside CAPI.
Does CAPI improve my ROAS immediately?
Not overnight. CAPI improves data accuracy, which helps Meta’s algorithm optimize better over 1–2 weeks. Expect gradual improvement as the system receives more complete conversion data.
Can I set up CAPI without a developer?
Yes. Plugins like Pixelavo handle CAPI through the WordPress dashboard — you just need your Pixel ID and an access token from Meta Events Manager. No code editing required.
How do I know if CAPI is working?
In Meta Events Manager, go to Test Events, browse your site, and check if events show “Server” as the processing method. You can also filter the Overview tab by connection method to see the split between browser and server events.
Conclusion
Browser-only Meta Pixel Conversion Tracking is no longer enough. Between ad blockers, iOS privacy changes, and cookie restrictions, Meta Pixel alone can miss a significant chunk of your actual conversions. That gap directly undermines your ad performance, reporting accuracy, and ability to scale.
The fix is running Meta Pixel + Conversion API together, client-side and server-side tracking working in parallel with deduplication keeping your data clean. This is what Meta recommends, and it’s the standard for any WordPress or WooCommerce store serious about Meta Ads in 2026.
If you want a straightforward way to set up CAPI and server-side tracking on WordPress without touching code, give Pixelavo a try. The free version covers Pixel + CAPI integration.
Pixelavo Pro features add Advanced Matching, advanced WooCommerce events, and multiple pixel support for stores that need more depth.