Meta Pixel for WordPress & WooCommerce: Complete Setup & Plugin Guide (2026)
Meta Pixel (formerly Facebook Pixel) is a tracking code that helps WordPress and WooCommerce store owners measure ad performance, track conversions, and build retargeting audiences. You can install it using a plugin like Pixelavo or by adding code manually. Pairing Meta Pixel with the Conversion API (server-side tracking) ensures accurate data even with ad blockers and privacy restrictions.
Key Takeaways
- Accurate tracking requires both Meta Pixel and CAPI
- Plugins like Pixelavo simplify WooCommerce event tracking
- Manual code install increases technical risk and maintenance
- Advanced Matching boosts attributed conversions by ~10%
- Test every event in Meta Events Manager before launching ads
A common pattern in WooCommerce stores is this: you spend $3,000/month on Meta Ads, but Events Manager only reports half the purchases your payment gateway confirms. Your ROAS looks terrible. Meta’s algorithm can’t optimize because it’s missing conversion data, and campaigns get stuck in the “learning phase” and never exit.
This isn’t hypothetical. After iOS 14.5 rolled out App Tracking Transparency, browser-based tracking took a serious hit. Ad blockers strip out pixel scripts. Safari’s Intelligent Tracking Prevention limits cookie lifespans. The result? WordPress store owners lose visibility into 20–40% of their actual conversions.
The fix isn’t complicated, but it does require getting three things right: a properly installed Meta Pixel, the Conversion API sending server-side events, and a WordPress plugin that handles both without conflicting with your theme or cache setup.
This guide walks you through the complete process – from creating your pixel to choosing the right plugin, setting up WooCommerce event tracking, enabling CAPI, and troubleshooting common issues.
What Is Meta Pixel (Formerly Facebook Pixel)?
Meta Pixel is a snippet of JavaScript that loads on your website and sends visitor actions (page views, add-to-carts, purchases) back to Meta’s ad platform. It’s the foundation of conversion tracking, retargeting, and audience building for Facebook and Instagram ads.
Meta rebranded it from “Facebook Pixel” to “Meta Pixel” in early 2022 when the parent company changed its name. The functionality stayed the same, but the terminology across Events Manager, Business Suite, and documentation now uses “Meta Pixel.”
There’s an important distinction to understand: Meta Pixel is client-side tracking; it runs in the visitor’s browser. The Conversion API (CAPI) is server-side; it sends event data directly from your WordPress server to Meta. In 2026, running both together is the recommended setup because browser tracking alone misses events blocked by privacy tools.
For WordPress users, the practical difference is simple: you’ll install a plugin that handles the pixel code and optionally connects to CAPI using an access token.
🚀 Supercharge Your Facebook Advertising with Pixelavo!
Unlock the full potential of your Facebook ads. Boost conversions, increase ROI, and reach new heights with Pixelavo’s powerful features.
How to Add Meta Pixel to WordPress (Step-by-Step)
Follow these six steps to get Meta Pixel running on your WordPress site using Pixelavo.
Step 1: Create Your Meta Pixel in Events Manager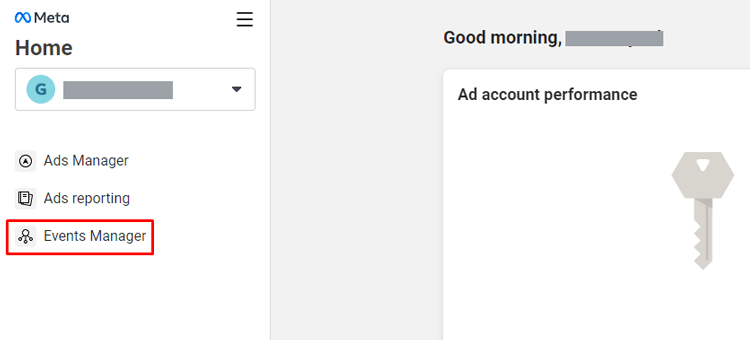
Log into your Meta Business account. Navigate to Events Manager and click “Connect Data Sources.” Select “Web,” then choose “Meta Pixel.” Give your pixel a name (e.g., your store name) and click “Create Pixel.”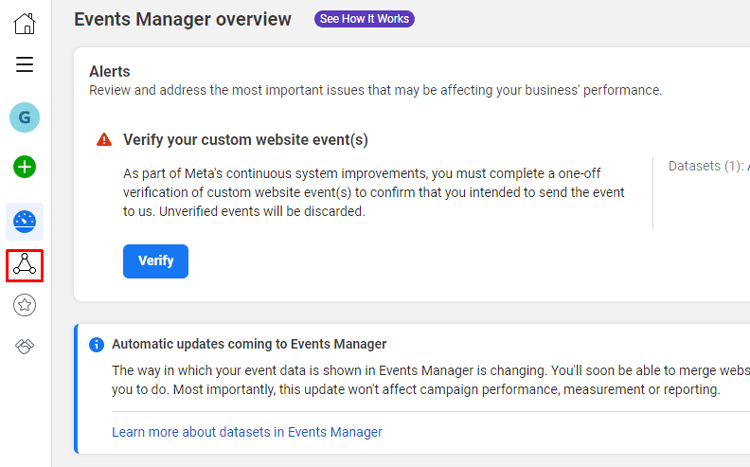
Step 2: Find Your Pixel ID![]()
In Events Manager, go to Data Sources in the left menu. Select your pixel from the list. On the right side of the details panel, you’ll see your Pixel ID – a 15–16 digit number. Copy it.
Step 3: Get Your Conversion API Access Token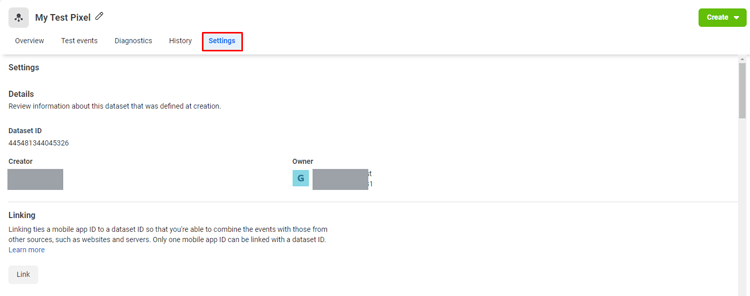
Still in Events Manager, select your pixel and click the “Settings” tab.
Scroll down to the “Conversions API” section. Click “Generate access token.” Copy the token; you’ll paste it into your plugin.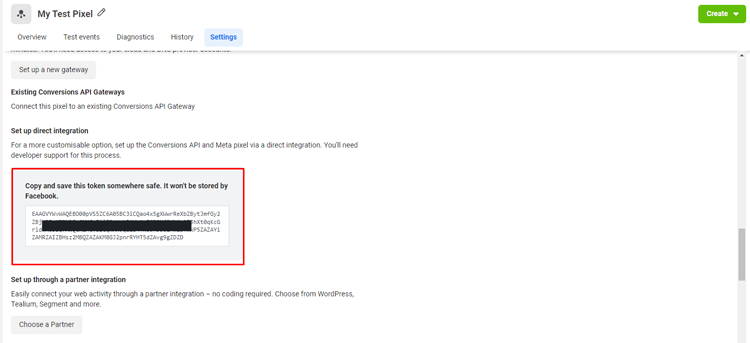
Step 4: Install Pixelavo Plugin on WordPress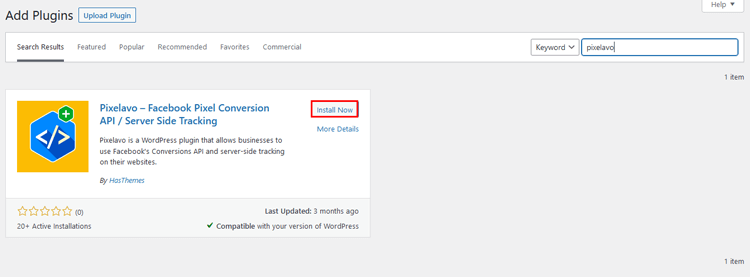
Go to your WordPress Dashboard → Plugins → Add New. Search for “Pixelavo.”
Click “Install Now,” then “Activate.” A new “Pixelavo” menu appears in your dashboard sidebar.
Step 5: Add Your Pixel ID and CAPI Token in Pixelavo![]()
Open the Pixelavo menu and click “Add New Pixel.” Enter a name, paste your Pixel ID, and choose which pages the pixel should run on (default is all pages).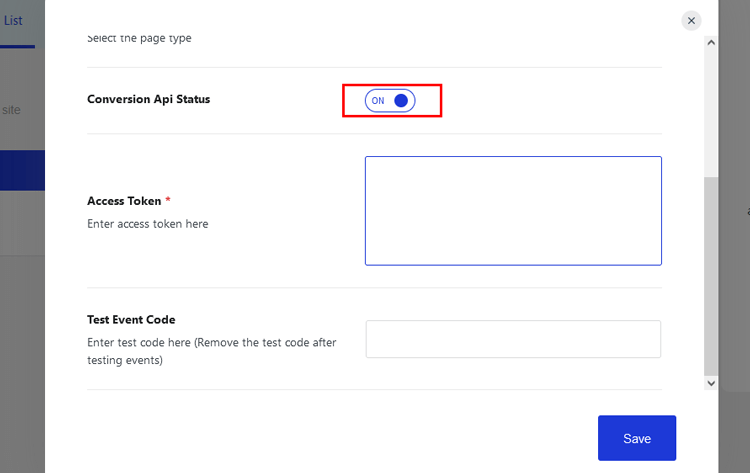
To enable server-side tracking, set the Conversion API status to “Active” and paste your access token. Click “Save.”
Step 6: Test Events in Meta Events Manager
Go back to Events Manager and open the “Test Events” tab. Enter your website URL and click “Open Website.” Browse a few pages, add a product to cart, and complete a test action. Events should appear in real time. If they do, your setup is working correctly.
Best Meta Pixel Plugins for WordPress & WooCommerce
Pixelavo
Pixelavo is a dedicated Meta Pixel plugin built by HasThemes that combines pixel tracking, Conversion API support, and AI-powered ad tools in one package. The free version covers standard event tracking, CAPI integration, product feed generation for Dynamic Ads, and form submission tracking for popular plugins like Contact Form 7 and Fluent Forms.
Pixelavo Pro unlocks advanced WooCommerce events, multiple pixel support, and Advanced Matching.
Key Features:
- Conversion API (CAPI) with one-click setup
- WooCommerce events: Purchase, AddToCart, InitiateCheckout, Refund (Pro)
- Multiple pixel support for separate ad accounts (Pro)
- AI Ad Copy Generator and AI Marketing Consultant (free, BYOK)
- Product Feed for Dynamic Product Ads
- Exclude specific user roles from tracking
Pros:
- Only free plugin combining CAPI + AI ad tools + pixel tracking
- Clean, intuitive interface — no coding required
- Active development with regular updates
Cons:
- Advanced WooCommerce events require Pro upgrade
- Focused exclusively on Meta — no GA4 or TikTok tracking
Best For: WooCommerce store owners who want an all-in-one Meta Pixel solution with CAPI and don’t need multi-platform tracking in a single plugin.
Pricing: Free / Pro from $99/year
PixelYourSite
PixelYourSite is a well-established tracking plugin that supports Meta Pixel, Google Analytics 4, and Google Ads in a single dashboard. It automatically tracks key user actions and integrates with both WooCommerce and Easy Digital Downloads. The plugin also supports Facebook Conversion API, making it a solid choice for store owners running ads across multiple platforms.
Key Features:
- Meta Pixel + GA4 + Google Ads tracking in one plugin
- Facebook Conversion API support
- WooCommerce and Easy Digital Downloads integration
- Automatic tracking of searches, form submissions, and comments
- Custom event configuration
Pros:
- Multi-platform tracking from a single plugin
- Strong WooCommerce event support out of the box
- Mature plugin with a large user base
Cons:
- Steeper learning curve for beginners
- Higher price point — starts at $160/year
Best For: Marketers and agencies managing Meta Ads alongside Google Ads/GA4 who need unified tracking from one plugin. Ideal if you also use Google Analytics.
Pricing: Starter $160/year, Advanced $199/year, Agency $550/year
Meta Pixel for WordPress (Official)
This is Meta’s own free plugin, designed to install the pixel and enable Conversion API with minimal configuration. It supports standard events like Lead, ViewContent, AddToCart, InitiateCheckout, and Purchase. The plugin connects your marketing data directly to Meta’s systems for improved ad targeting and lower cost per action.
Key Features:
- Official Meta integration — always compatible with latest API
- Conversion API support built in
- Standard eCommerce event tracking
- Works with most popular WordPress plugins
Pros:
- Completely free with no upsells
- Direct, official support from Meta
- Simple setup for basic tracking needs
Cons:
- Limited customization for WooCommerce-specific events
- No advanced matching, multiple pixels, or product feed support
Best For: Small sites or blogs that need basic Meta Pixel tracking without advanced WooCommerce requirements or multi-pixel setups.
Pricing: Free
WPCode
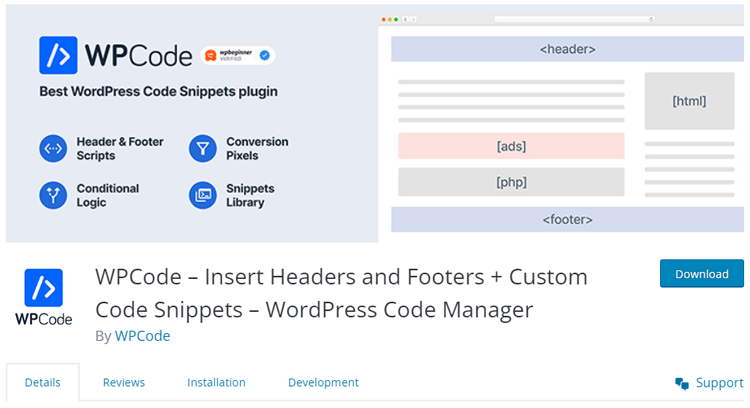
WPCode is primarily a code snippet manager that lets you insert tracking codes, scripts, and custom CSS into your site’s header, footer, or body. Its Conversion Pixels addon adds one-click event tracking for Meta, Google Ads, Pinterest, and TikTok. It’s not a dedicated pixel plugin, but a flexible tool for managing multiple tracking scripts.
Key Features:
- Insert any tracking code in header, footer, or body
- Conversion Pixels addon for Meta, Google Ads, Pinterest, TikTok
- WooCommerce integration via the addon
- Code snippet library with pre-built templates
- Conditional logic for where scripts load
Pros:
- Multi-platform pixel management in one place
- Useful beyond just Meta — handles any code snippet
- Good for developers who want granular control
Cons:
- Meta-specific features require paid addon
- Not as streamlined as dedicated pixel plugins for non-developers
Best For: Developers and technical users who manage multiple tracking scripts across platforms and prefer a code-first approach.
Pricing: Basic $49/year, Plus $99/year, Pro $199/year, Elite $399/year
Pixel Cat
Pixel Cat (formerly Facebook Conversion Pixel) focuses on custom conversions, visitor retargeting, and remarketing optimization. It provides standard Facebook Pixel event tracking, automatic audience retargeting based on page views, and time delay triggers for pixel events. The plugin also supports AMP pages and Advanced Matching.
Key Features:
- Standard Facebook Pixel event tracking
- Automatic retargeting audiences based on pages visited
- Time delay and dynamic triggers for events
- AMP page integration
- Exclude pixel from specific pages
Pros:
- Simple, focused interface — easy for beginners
- AMP support is uncommon among pixel plugins
- Free Lite version available
Cons:
- No Conversion API (CAPI) support
- Limited WooCommerce event depth compared to competitors
Best For: Bloggers and content sites focused on retargeting and remarketing who don’t need deep WooCommerce conversion tracking or CAPI.
Pricing: Lite (Free), Personal $79/year, Business $129/year, Elite $199/year
Plugin Comparison Table
| Feature | Pixelavo | PixelYourSite | Meta Pixel (Official) | WPCode | Pixel Cat |
| Free Version | Yes | Yes (limited) | Yes | Yes (limited) | Yes (Lite) |
| Conversion API (CAPI) | Yes | Yes | Yes | Via addon | No |
| WooCommerce Events | Yes (Pro) | Yes | Basic | Via addon | Limited |
| Multiple Pixels | Yes (Pro) | Yes (Pro) | No | No | No |
| Advanced Matching | Yes (Pro) | Yes (Pro) | No | No | Yes |
| AI Ad Tools | Yes (Free) | No | No | No | No |
| Product Feed | Yes | Yes (Pro) | No | No | No |
| Starting Price | Free / $99/yr | $160/yr | Free | $49/yr | Free / $79/yr |
How to Track WooCommerce Conversions Accurately
Getting Meta Pixel installed is the first step. Making sure it tracks the right WooCommerce events with correct data is where the real value lies.
Here are the key events every WooCommerce store should track:
- Purchase: Fires on the thank-you page after a completed order. Must include value (order total), currency, and content_ids (product IDs). This is the most critical event for Meta Ads optimization.
- AddToCart: Triggers when a customer clicks “Add to Cart.” Should pass content_name, content_ids, value, and quantity. If your theme uses AJAX add-to-cart (no page reload), confirm your plugin supports it — not all do.
- ViewContent: Fires on individual product pages. Pass content_name, content_type (set to “product”), and value. This powers retargeting for product-level Dynamic Ads.
- InitiateCheckout: Fires when the checkout page loads. Helps Meta identify high-intent users.
- Search: Triggers when a visitor uses your site’s search bar. Pass search_string to capture what they’re looking for.
- ViewCategory: Fires on product category/archive pages. Useful for broad retargeting segments.
In WooCommerce stores we’ve configured, enabling value-based Purchase events improved Meta Ads bidding stability within the first week. The algorithm needs real revenue data to optimize for ROAS — without it, you’re essentially asking Meta to guess.
WooCommerce-specific notes:
- Variable products: Make sure your plugin passes the specific variation ID, not just the parent product ID. Incorrect content_ids break Dynamic Ads product matching.
- AJAX carts: Themes that add items without a page reload need JavaScript-based event firing. Pixelavo Pro and PixelYourSite handle this natively.
- Subscription tracking: If you sell subscriptions via WooCommerce Subscriptions, Pixelavo Pro tracks Created, Renewed, and Cancelled subscription events — helpful for LTV-based ad optimization.
Meta Pixel vs Conversion API (CAPI)
Meta Pixel tracks actions in the visitor’s browser (client-side). The Conversion API sends the same event data from your server (server-side). They serve the same goal — getting conversion data to Meta — but through different paths.
Why does this matter? Browser-based tracking is increasingly unreliable. Ad blockers strip out pixel scripts entirely. Apple’s App Tracking Transparency lets users opt out of cross-app tracking. Safari’s ITP caps cookie lifespans. The net effect: Meta Pixel alone can miss 20–40% of actual events.
Server-side tracking through CAPI bypasses these browser limitations because the data goes directly from your WordPress server to Meta’s servers. No browser involvement means no ad-blocker interference.
When should a WordPress store implement CAPI? Immediately, if you’re running Meta Ads. There’s no downside to enabling it. Meta uses event deduplication (matching events by event_id) to avoid double-counting when both Pixel and CAPI fire for the same action.
How to enable CAPI on WordPress:
- Via Pixelavo: Toggle the Conversion API status to “Active” in your pixel settings and paste your access token. That’s it — the plugin handles server-side event sending automatically.
- Via Meta’s official plugin: Built-in CAPI support, but limited event customization.
- Via GTM server-side container: More technical. Requires setting up a server-side Google Tag Manager instance, typically hosted on Google Cloud or a similar platform. Best for large stores with a dedicated dev team.
The practical result of running Pixel + CAPI together: better Event Match Quality scores in Events Manager, fewer “lost” conversions, and more stable ad performance because Meta’s algorithm has complete data to work with.
Common Meta Pixel Errors and Fixes
Duplicate PageView or Purchase Events
Symptom: Events Manager shows 2× the expected event count for PageView or Purchase.
Cause: Multiple plugins firing the same event (e.g., both Pixelavo and the official Meta plugin installed), or Pixel and CAPI both sending events without deduplication configured.
Fix: Use only one pixel plugin at a time. If using CAPI alongside browser Pixel, ensure your plugin supports event deduplication via event_id matching. Pixelavo handles this automatically.
Pixel Not Firing at All
Symptom: No events appear in Events Manager or the Test Events tool, even after browsing your site.
Cause: Incorrect Pixel ID, plugin not activated, page caching serving a stale version without the pixel code, or JavaScript errors on the page blocking the pixel script from loading.
Fix: Double-check your Pixel ID in the plugin settings. Clear all cache layers — plugin cache (WP Super Cache, W3 Total Cache), CDN cache (Cloudflare, etc.), and server-level cache. Open your browser’s developer console and check for JS errors.
Event Mismatch
Symptom: Add-to-cart shows as ViewContent in Events Manager, or Purchase doesn’t fire at all on the thank-you page.
Cause: Plugin misconfigured (wrong event assigned to wrong trigger), WooCommerce template overrides interfering with event hooks, or AJAX cart actions not supported by your pixel plugin.
Fix: Review event mapping in your plugin’s settings. Make sure each WooCommerce action (add to cart, checkout, purchase) has the correct Meta event assigned. Test each action individually using the Test Events tool.
Low Event Match Quality (EMQ)
Symptom: EMQ score shows “Poor” or “OK” instead of “Good” or “Great” in Events Manager.
Cause: Not enough user parameters (email, phone, name, location) being sent with events. This limits Meta’s ability to match website actions to Facebook/Instagram users.
Fix: Enable Advanced Matching in your plugin. Pixelavo Pro supports this — it passes additional hashed user data (email, name, phone) with each event. For logged-in WooCommerce customers, this data is captured automatically. Also ensure CAPI is active, as server-side events can include richer user parameters.
Frequently Asked Questions
How do I verify Meta Pixel works?
Open Meta Events Manager, go to the Test Events tab, enter your site URL, and browse your site. If events appear in real time, your pixel is correctly installed and firing.
Can I add multiple Meta Pixels?
Yes. Plugins like Pixelavo Pro support multiple pixels on one WordPress site, letting you track different ad accounts or campaigns separately.
Is Conversion API required for tracking?
Not technically required, but strongly recommended. CAPI provides server-side data that browser tracking alone misses due to ad blockers and privacy restrictions.
Does Meta Pixel slow down WordPress?
A properly implemented pixel adds minimal load. Lightweight plugins like Pixelavo load the pixel script asynchronously, so it doesn’t block page rendering or affect Core Web Vitals.
Do I need coding skills for setup?
No. Plugins like Pixelavo handle everything through the WordPress dashboard — you just need your Pixel ID and optionally a CAPI access token. No code editing required.
Conclusion
Accurate conversion tracking is non-negotiable for any WordPress or WooCommerce store running Meta Ads in 2026. Between browser privacy restrictions and evolving platform requirements, relying on a basic pixel install alone leaves too much data on the table.
The combination of Meta Pixel + Conversion API + a plugin that handles WooCommerce events properly gives you the most complete and reliable tracking setup. It’s what Meta recommends, and it’s what keeps your ad campaigns optimizing on real data instead of guesswork.
If you want a straightforward way to get Pixel, CAPI, and WooCommerce events working together, give Pixelavo a try. The free version covers pixel setup and CAPI. The Pro version adds advanced WooCommerce events, multiple pixels, and Advanced Matching for stores that need more depth.