How to Add a Facebook Pixel to WordPress: Step-by-Step Guide
Are you looking to add a Facebook Pixel to your WordPress website, but don’t know how? Don’t worry, you’re not alone! In this guide, we will walk you through the steps of How to Add a Facebook Pixel to WordPress quickly and easily.
We’ll go over exactly what a Facebook Pixel is and why it’s important for your website. With our step-by-step instructions, you’ll be able to start utilizing the power of Facebook Pixel tracking on your WordPress site in no time.
- What is a Facebook Pixel and Why it’s Important
- How to Add a Facebook Pixel to WordPress: Steps
- How to Set up Facebook Pixel
- Facebook Pixel ID
- Get Conversion API Access Token
- How to add Facebook Pixel to WordPress with the Pixelavo plugin
- Frequently Asked Questions
- Wrapping It Up – How to Add a Facebook Pixel to WordPress Easily and Quickly
What is a Facebook Pixel and Why it’s Important
The Facebook pixel is a JavaScript code that plays a vital role in measuring, optimizing, and audience building for your Facebook ad campaigns. When running Facebook ads, it’s crucial to use a pixel to track conversions. It allows you to track conversions and monitor user actions resulting from your ads.
By installing the pixel on your website, you can gain insights into the effectiveness of your Facebook ads and optimize your campaigns accordingly. It’s important to note that the pixel can be used on various website-building platforms, including WordPress.
Using the Facebook pixel can help businesses make informed decisions based on data, reach potential customers with targeted ads, and increase conversion rates, resulting in a better return on investment. The Facebook pixel tracking code enables you to monitor the activities that users perform on your website following a click on a Facebook Ad. With Facebook pixel data, it’s possible to create different audiences based on user actions on your website.
The Facebook Pixel is important for several reasons:
- It provides valuable analytics on website visitors, complementing other analytics tools like Google Analytics.
- It enables retargeting of ads to specific website visitors, allowing for personalized advertising based on their interactions.
- It offers insights into the demographics and behaviors of website visitors, allowing for targeted marketing campaigns.
- It supports the use of Dynamic Product Ads and remarketing on platforms like Instagram. By creating and implementing a Facebook Pixel, businesses can leverage these benefits to optimize their ad campaigns, reach the right audience, and achieve higher conversion rates.
Whether you’re a small business owner or a digital marketer, integrating the Facebook pixel can significantly enhance the performance of your advertising efforts.
🚀 Supercharge Your Facebook Advertising with Pixelavo!
Unlock the full potential of your Facebook ads. Boost conversions, increase ROI, and reach new heights with Pixelavo’s powerful features.
How to Add a Facebook Pixel to WordPress: Steps
Now that you know what a Facebook Pixel is, we’ll show you how to add a Facebook Pixel to WordPress website. Follow this step-by-step guide:
How to Set up Facebook Pixel
Here is a step-by-step guide on how to add Facebook pixel WordPress:
Step 1: Access your Pixel by visiting facebook.business.com and then from the homepage navigating to the “Business Manager” tab. From the drop-down menu, select “Pixels.”
Step 2: After that, you’ll be taken to your pixel page and Press the “Create a Pixel” button to make your own Facebook pixel.
Step 3: To generate your unique Facebook pixel, you need to give it a name and then click on the “Create Pixel” button.
Step 4: The Facebook pixel creation process is complete. Now that you have your pixel, you have a range of options available to you. You can choose to email, share, or simply view the code. To easily access your pixel, just follow the steps outlined below.
Facebook Pixel ID
To find your Pixel ID, follow these steps:
Log in to your Facebook business account and go to the “Events Manager” section from the left-side menu.
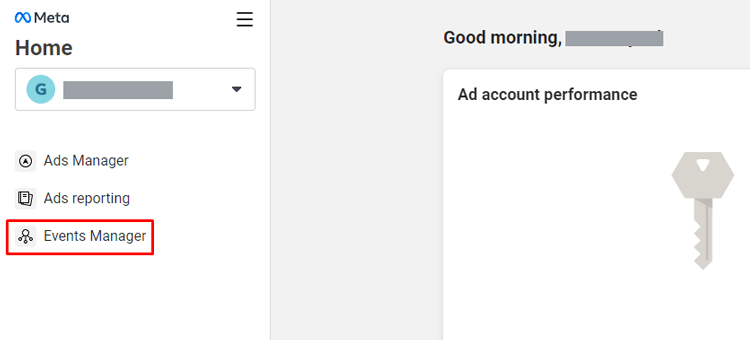
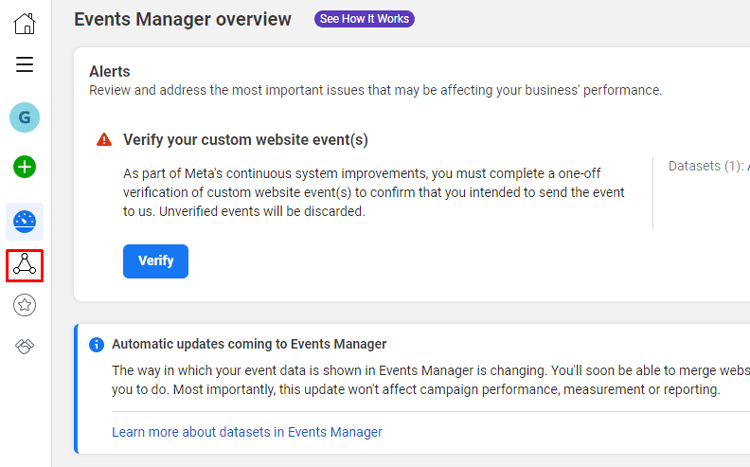
Choose the “Data Sources” option, which can be found either in the left-side menu or on the card in the content area.
Select the specific pixel you want to work with from the list on the left side to access its details.
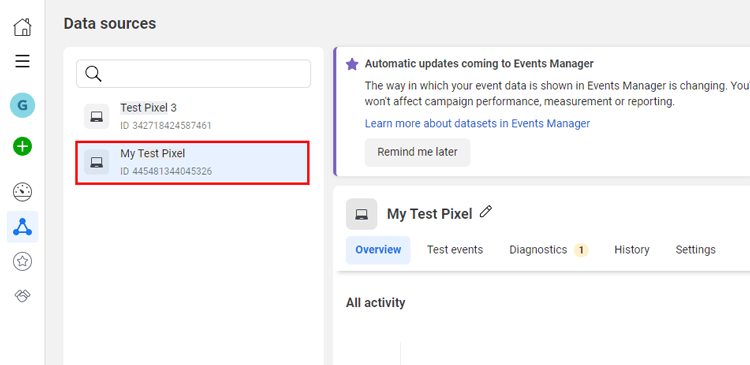
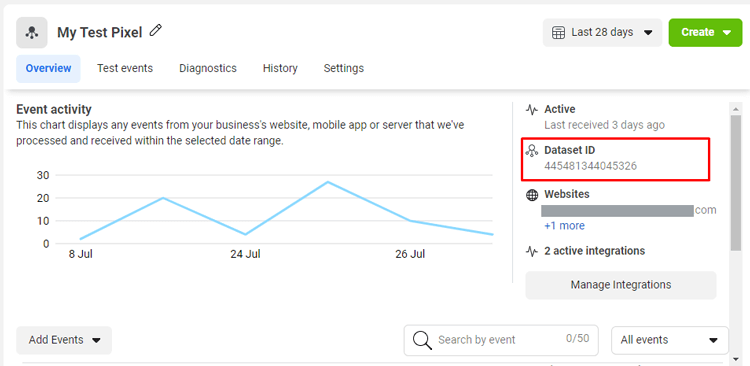
On the right side of the page, you will find the Pixel ID. You can easily locate and copy it from there.
Get Conversion API Access Token
To find the Conversion API access token, follow these steps:
Log in to your Facebook business account and navigate to the “Events Manager” section from the left-side menu.

Choose the “Data Sources” option, which can be found either in the left-side menu or on the card in the content area.

Select the specific pixel you want to work with from the list on the left side to access its details.

Click on the settings menu to access the pixel settings.
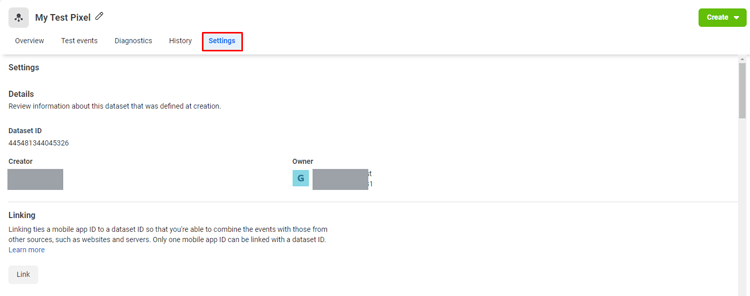
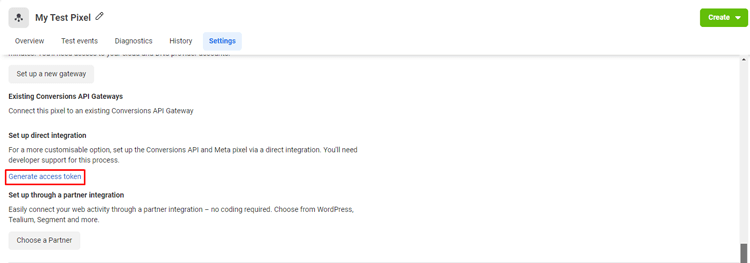
Scroll down to the bottom of the page until you find the “Generate access token” button. Click on it to generate an access token.
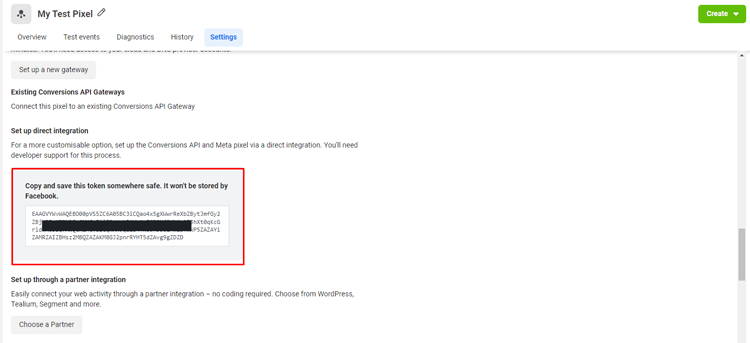
Once you click the “Generate access token” button, an access token will be generated for you to use.
How to add Facebook Pixel to WordPress with the Pixelavo plugin
If you’re looking for a more convenient way to add the Facebook Pixel to your WordPress website, the Pixelavo plugin is an excellent option. With Pixelavo, connecting your Facebook pixel to your online store becomes quick and effortless. This plugin streamlines the entire process, eliminating any complexities or time-consuming tasks.
What is Pixelavo Plugin and Why You Should Use it?
Pixelavo is a versatile plugin designed to streamline the process of connecting your Facebook pixel to your online store. With Pixelavo, you can gather valuable insights about your website visitors and use that information to create personalized Facebook ads, driving more traffic and sales to your online store.
Pixelavo offers a user-friendly interface with advanced tracking capabilities, custom audience creation, and powerful retargeting tools. Optimize your Facebook campaigns, increase conversions, and take your marketing to the next level.
It offers a range of features and benefits that make it an essential tool for your Facebook marketing campaigns. Here’s why you should use Pixelavo:
Quick and easy setup:
Pixelavo simplifies the process of integrating your Facebook pixel with your website. It provides seamless integration with WordPress, allowing you to connect your pixel with just a few clicks.
Advanced tracking capabilities:
With Pixelavo, you can track various events on your website, such as purchases, leads, and page views. This data helps you understand the effectiveness of your Facebook ads and optimize your campaigns accordingly.
Custom audience creation:
Pixelavo allows you to create custom audiences based on the actions users take on your website. This enables you to target your ads to specific segments of your audience, increasing the relevance and effectiveness of your campaigns.
Retargeting tools:
By utilizing the Pixelavo WordPress plugin, you can retarget users who have shown interest in your products or services. This helps you stay top-of-mind and bring potential customers back to your website, increasing the chances of conversion.
Improved campaign optimization:
With the insights provided by Pixelavo, you can make data-driven decisions to optimize your Facebook advertising campaigns. You can identify which ads and targeting strategies are generating the best results, allowing you to allocate your budget more effectively.
User-friendly interface:
Pixelavo is designed to be user-friendly, making it accessible to both beginners and experienced marketers. You don’t need any coding knowledge to use Pixelavo WordPress Plugin, and the intuitive interface makes it easy to navigate and utilize its features.
In summery, some remarkable key features of Pixelavo include:
- Multiple pixel support for tracking data across different ad accounts or campaigns
- Exclusion of bouncing visitors to prevent triggering events prematurely
- Custom event tracking for specific actions valuable to your business
- Automatic event matching for easy conversion tracking
- Real-time event tracking for quick insights
- Advanced matching for improved retargeting and campaign reach
- Additional user information parameters for precise audience targeting
- Additional purchase information parameters for targeted custom audiences.
- Exclusion of team members for accurate data
- Product feed creation for Dynamic Product Ads and Custom Audiences
Overall, Pixelavo is a valuable plugin for integrating your Facebook pixel with your online store. It empowers you to track events, create custom audiences, and optimize your Facebook ads, leading to better campaign performance and increased conversions.
Whether you’re a small business owner or a digital marketer, Pixelavo can enhance your Facebook marketing efforts and help you achieve your business goals.
🚀 Supercharge Your Facebook Advertising with Pixelavo!
Unlock the full potential of your Facebook ads. Boost conversions, increase ROI, and reach new heights with Pixelavo’s powerful features.
Steps to Easy Add Facebook Pixel to WordPress with Pixelavo
Pixelavo makes adding a Facebook Pixel to your WordPress website simple and easy, even if you’re not tech-savvy. Their user-friendly platform provides step-by-step guidance, so you can have your Facebook Pixel up and running in no time. Check out our guide on how to do that.
Installing and Activating Pixelavo
To install and activate Pixelavo:
Open the WordPress dashboard and select the “Plugins” option. Click on “Add New” in the Plugins menu.
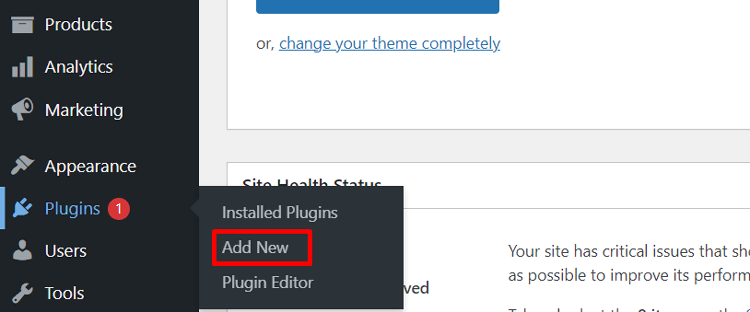
Enter “Pixelavo” in the search bar and hit enter.
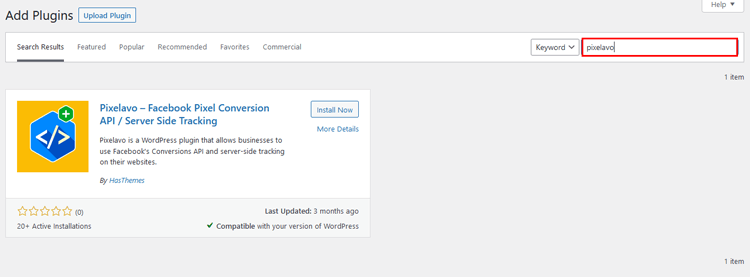
Once you see the “Pixelavo” plugin, click on the “Install Now” button.
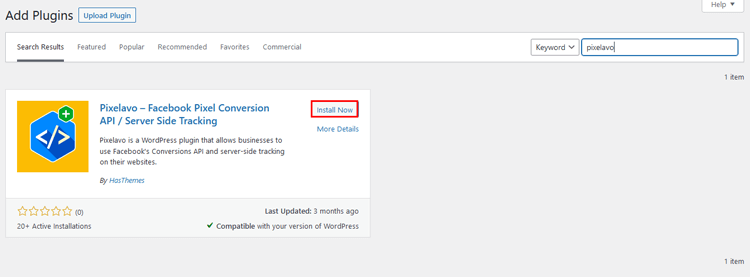
Once installation is complete, click on the “Activate” button to activate Pixelavo.
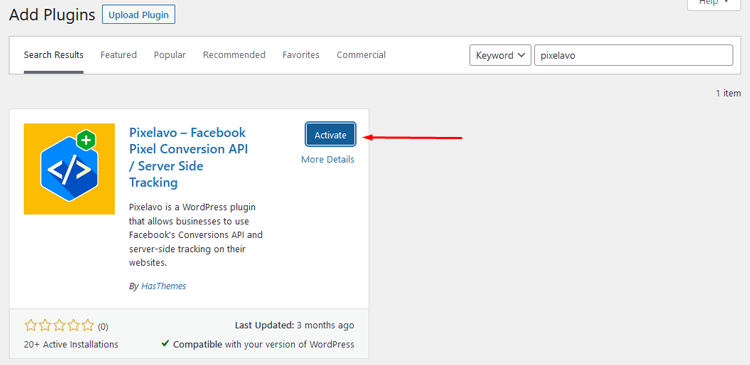
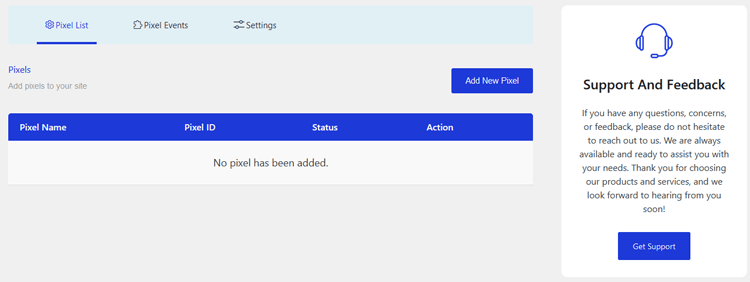
After activation, you will see a new “Pixelavo” menu
Adding Facebook Pixel
To add a pixel, follow the steps below:
Step 1:
Go to the WordPress dashboard and select either the “Pixelavo” menu or the “Pixels” submenu located under the “Pixelavo” menu.
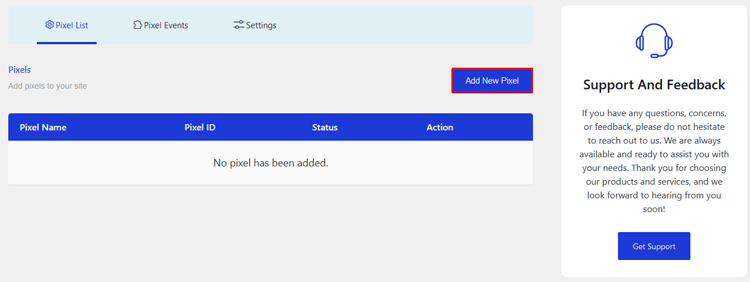
Click the “Add New Pixel” button, which will open a pop-up form for adding a new pixel.
Step 2:
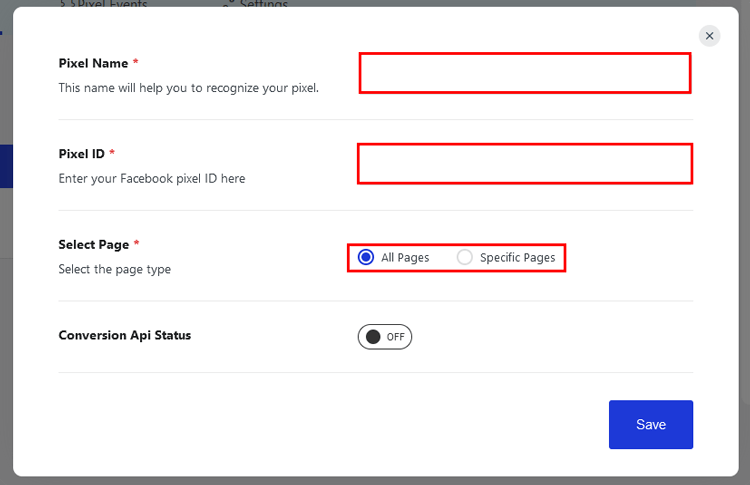
- Give a name to your pixel.
- Enter the pixel ID, and refer to the instructions to locate it.
- Choose which page(s) you want your pixel to run on, including specific pages if preferred. By default, it will run on all pages.
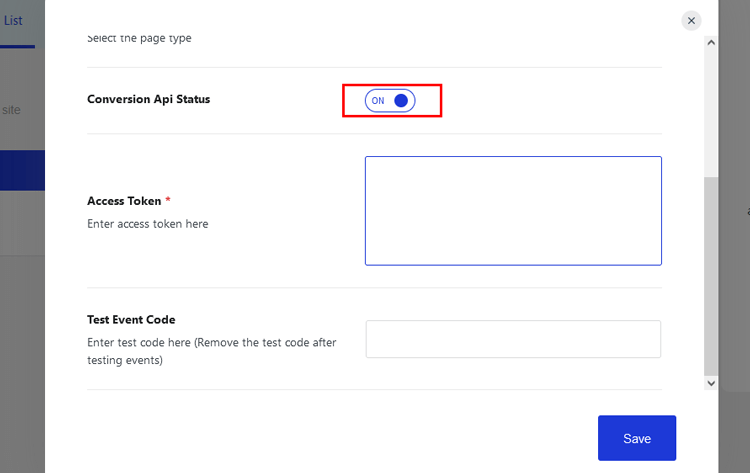
- To add Conversion API, make sure the status is set to “Active”.
- Enter your conversion API access token by referring to the instructions provided.
- Use the event test code to run tests.
- Save your pixel by clicking the “Save” button.
Frequently Asked Questions
Q1: How to add a Facebook Pixel to WordPress website?
To install Facebook Pixel to your WordPress website, you can use a plugin like Pixelavo. Follow these steps:
1. Install and activate the Pixelavo plugin from the WordPress dashboard.
2. Access the Pixelavo menu and click on “Add New Pixel.”
3. Provide a name for your pixel and enter your pixel ID.
4. Choose the pages where you want the pixel to be active.
5. Enable the Conversion API and enter your access token.
6. Save the pixel configuration.
Q2: Are there any additional features or pro options available with Pixelavo?
Yes, Pixelavo offers pro features such as multiple pixel support, WooCommerce integration, advanced matching, exclusion of bouncing visitors, and additional user information and purchase details for better ad targeting and audience building.
Q3: Where can I find my Facebook Pixel ID?
To find your Facebook Pixel ID, access your Facebook Business account and go to the Events Manager. Select the desired pixel and locate the Pixel ID on the right side.
Q4: What is the Conversion API, and why is it important?
The Conversion API is a Facebook feature that allows you to send events directly from your server to Facebook, ensuring more accurate tracking and data collection. It is important for enhanced tracking and optimization of your advertising campaigns.
Q5: Can I test the events after adding the Facebook Pixel WordPress?
Yes, you can test the events by entering the event test code in the Pixelavo plugin settings. This helps ensure that the events are firing correctly and being tracked accurately.
Q6: Can I add multiple Facebook Pixels to my WordPress website?
Yes, you can add multiple Facebook Pixels to your WordPress site by using a plugin like “Pixelavo”. This allows you to track different events and audiences separately.
Q7: Is it necessary to have a Facebook Ads account to add a Facebook Pixel WordPress?
Yes, you need to have a Facebook Ads account to create and generate a Facebook Pixel. The pixel is associated with your Facebook Ads account, and you can manage it through the Facebook Ads Manager.
Q8: Is Pixelavo easy to install and use?
Yes, Pixelavo is designed to be user-friendly and can be easily installed and activated from the WordPress dashboard. It provides a simple interface for configuring your Facebook Pixel settings and offers seamless integration with your website.
Wrapping It Up – How to Add a Facebook Pixel to WordPress Easily and Quickly
Learning how to add a Facebook Pixel to WordPress can seem like a daunting task, especially if you’re new to Facebook ads. However, the truth is that it’s actually a straightforward process that anyone can learn with a little bit of guidance. By following these simple directions, you’re now well on your way to marketing success with Facebook pixels.
Tracking and understanding customer behavior is invaluable for any business website, and the SEO benefits of monitoring clicks and visitors provided by a Facebook pixel are too good to ignore. So get in there and get your pixel set up on WordPress to start tracking all of the valuable insight coming from your online customers.
By implementing this powerful tool, you’re sure to see a significant increase in engagement which will turn into profits as well as long-term success for your website. And remember – if you ever stumble upon any roadblocks when attempting to add a Facebook Pixel to WordPress, help forums or professionals such as website designers or developers will be quick to offer assistance.
So don’t be intimidated by setting up the pixel – it’s worth it in the end!


