How to Add a Popup on WordPress WooCommerce Site: A Comprehensive Guide
Are you looking to boost conversions, gather email subscribers, or provide important information to your website visitors?
Adding a popup on your WordPress WooCommerce site can be an effective way to achieve these goals.Popups have proven to be highly effective in engaging users.
According to a study, the average popup conversion rate is 3.09%, with the top-performing popups reaching rates as high as 9.28%. When implemented correctly, they can help you grow your email list, promote special offers, or drive traffic to specific pages.
Popups are attention-grabbing and can be customized to match the design of your website, making them a valuable tool for any online business.
This comprehensive guide will show you how to add a popup on WordPress WooCommerce site and how it could benefit your business. So, let’s get started!
Key Takeaways:
- Understand how pop-ups can boost conversions, collect emails, and provide key information.
- Learn the benefits of WooCommerce popups for sales, special offers, and personalization.
- Follow a step-by-step guide to adding popups using the ShopLentor plugin.
- Learn to create and customize popup templates using Elementor to match your site’s design.
- Explore advanced customization options, including triggers, conditions, and dismissal settings.
- Discover how to use popups strategically to enhance engagement without overwhelming visitors.
- Learn to track pop-up performance and optimize designs using analytics for better results.
ShopLentor- WooCommerce Builder for Elementor & Gutenberg
A versatile page builder to build modern and excellent online stores with more than 100k+ Active Installations.
Table of Contents
What are Popups and Their Benefits
Before diving into the step-by-step guide on adding a popup to your WordPress WooCommerce site, let’s first talk about what pop-ups are and how they can benefit your website.
Popups are small windows that appear on top of your site’s content with a specific message or call-to-action. They can be used for various purposes, such as promoting a sale, collecting email addresses for your newsletter, or even providing important information to your visitors.
Here are some benefits to consider:
- Grab your visitors’ attention: With so much online content, capturing your visitors’ attention can be challenging. A well-designed popup can grab their attention and encourage them to act.
- Increase conversions: By providing a clear and compelling message through a popup, you can increase the chances of converting your website visitors into customers or subscribers.
- Personalization: Targeted and personalized popups allow you to display relevant content to specific audiences based on their behavior or interests.
- Collect valuable data: Popups can also collect valuable data from your visitors, such as email addresses, which can be used for email marketing campaigns.
What Is a WooCommerce Popup?
A WooCommerce popup is a type of popup specifically designed for websites using the WordPress WooCommerce platform. It allows site owners to display targeted messages or promotions to their visitors, which is essential to increase conversions and sales.
These popup WooCommerce can be customized and triggered based on specific actions or behaviors of the website visitor. They are essential for any eCommerce business looking to improve its marketing and sales strategy.
Recommended Blogs for You:
👉 What are Popup Builders? A Beginner’s Guide
👉 How to Add Popup in WordPress: A Step-by-Step Guide
👉 How to Edit Menus in WordPress: The Quick and Easy Guide
Why You Need to Create a WooCommerce Popup?
Creating a WooCommerce popup is crucial for several reasons. Here are a few compelling reasons to do so:
- Promote sales and special offers: Popups can be used to promote limited-time sales or exclusive discounts, encouraging visitors to purchase.
- Increase email subscribers: To boost your subscribers, entice them with something valuable in exchange for their email address. Utilize popups effectively to expand your email list.
- Provide important information: Popups in WooCommerce can also display important information or updates to your visitors, such as changes in store policies or new product launches.
- Improve user experience: Customizing popups for specific audiences enhances the site experience and creates a more personalized visitor journey.
How to Add a Popup on a WordPress WooCommerce Site?
Adding a popup to your WordPress WooCommerce site may sound complicated, but it is quite simple if you use a popup plugin.
With the ShopLentor popup WooCommerce module, adding captivating popups to your WooCommerce Store has never been easier. Its intuitive interface makes creating and customizing popups a breeze, elevating your website to new levels of engagement and interactivity.
Let’s learn how to add a popup on WordPress WooCommerce site with the ShopLentor pop-up module. Follow these steps to get started:
Install and Activate ShopLentor
To set up ShopLentor on your WordPress site, ensure it is installed and activated.
You can install the plugin by navigating to the WordPress Dashboard and going to Plugins > Add New.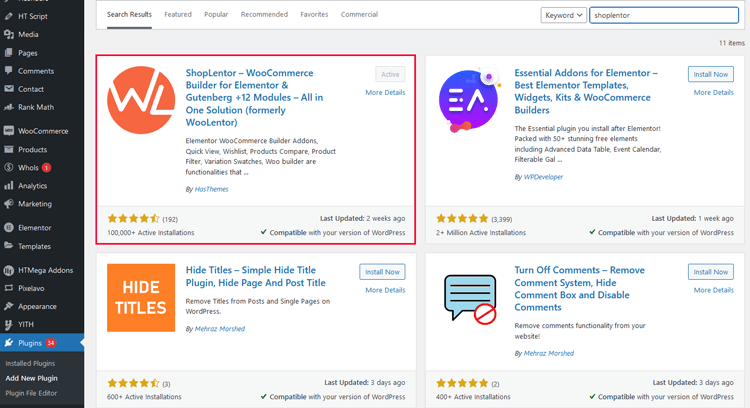
Go to ShopLentor Setting
Open the settings page of ShopLentor by navigating to ShopLentor > Settings. Then, to access the module, open the “Module” tab.
Enable Popup module
To enable Popup Builder, select it from the list and enable the module. Finally, click on the “Save Changes” button.
Create Popup Templates
Creating a popup template with the Popup Module is simple. Start by heading to the Template Builder and clicking on “Add New.” This will bring up a window called “Template Settings,” where you’ll need to fill in a few fields.
Then, give your template a name in the “Name” field. Then, select “popup” as the template type in the “Type” field. Finally, choose Elementor in the “Select Editor” field to design your template.
That’s it! With these easy steps, you can easily create as many popup templates as you need.
Recommanded Blogs for You
👉 Best Elementor Popup Addons 2026: Modal Widgets & Plugins Compared
👉 10 Essential Tips for Creating an Email Popup
👉 How to Add Popup in WordPress: A Step-by-Step Guide
Customize Popup Module
To customize your popup template, choose a design by clicking ‘Sample Design’ and save your selection by clicking ‘Save Settings.’ Then, access the Elementor edit screen by clicking ‘Edit with Elementor’ to easily modify the layout with your image and text.
For more customization, go to the popup settings option in Elementor. Customize popup behavior and timing with condition settings. Set multiple conditions to control when and where your popups appear precisely. Apply conditions globally or exclusively to specific pages for granular control.
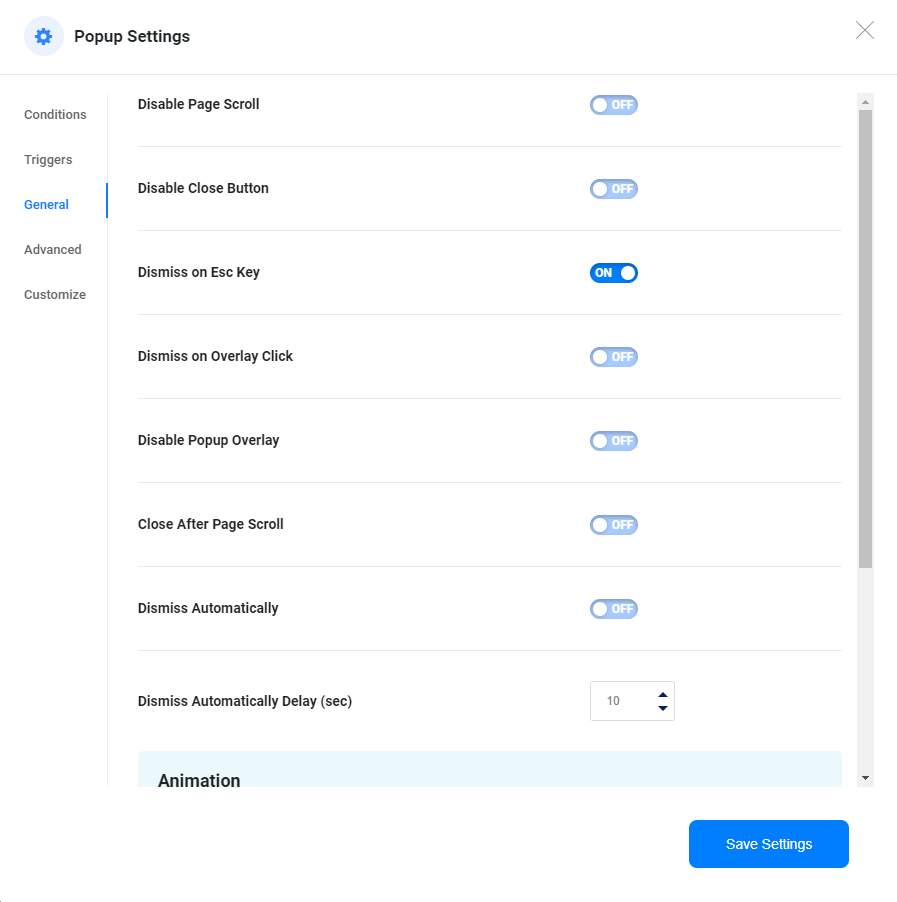
The trigger settings allow you to control when popups appear, with options like page load, scroll, click, inactivity, or exit intent. The general settings section offers various customization options for behavior. You can disable page scrolling or the close button. Additionally, you can enable dismissal using the ESC key.
The Pro version offers enhanced features:
- Dismissing on overlay click
- Disabling the popup overlay
- Auto-closure after page scroll
- Automatic dismissal with delay
- Setting a duration for automatic closure
- Displaying popups based on URL conditions
- Device-specific enable/disable
- Browser visibility control And more.
You can also customize the visual appearance of your pop-ups with ease. Adjust positioning, dimensions, and more. Save and publish to incorporate multiple pop-ups effortlessly. Create as many as you need for your website.
Enhance your popup by utilizing the ‘Save Settings’ button, which offers five unique options for fine-tuning: Conditions, Triggers, General, Advanced, and Customize. This allows you to optimize your settings precisely, ensuring an improved user experience while maintaining the original intent.
ShopLentor- WooCommerce Builder for Elementor & Gutenberg
A versatile page builder to build modern and excellent online stores with more than 100k+ Active Installations.
Frequently Asked Questions
How Can I Integrate a Popup with WooCommerce Products or Services?
Use popups to highlight discounts, limited-time offers, or new product launches to encourage purchases. Offer exclusive deals or content in exchange for visitors’ email addresses, integrating with WooCommerce to manage subscriptions and customer lists.
Can I add multiple popups to my site?
Yes, you can add multiple popups to your WordPress WooCommerce site. However, it is recommended to use them strategically and avoid overwhelming your visitors with too many popups.
Are popups annoying for website visitors?
When used correctly, popups can provide valuable information and promotions to visitors without being too intrusive. Make sure your popup is well-designed and relevant to your audience.
Can I schedule when the popup will appear on my site?
Yes, most popup plugins allow you to schedule when the popup will appear on your site. This can be useful for promoting time-sensitive offers or events.
How can I create popups in WordPress without coding?
Numerous WordPress plugins offer visual popup builders, allowing you to create and customize popups without coding skills. These WordPress popup plugins usually offer drag-and-drop interfaces for easy design.
Can I track the success of my popups?
Yes, most WordPress popup plugins offer statistics or analytics to track your popups’ performance and effectiveness in achieving your goals. This can help you make adjustments and improve your overall strategy.
Final Word
Adding a popup to your WordPress WooCommerce site can greatly benefit your website and business. Following this comprehensive guide to adding a popup from start to finish, you should feel confident.
You now have all the information needed to learn how to add a popup on a WordPress WooCommerce site.
With ShopLentor’s easy-to-use popup module, you can create eye-catching and effective popups without hassle.
So why wait? Install and activate ShopLentor today, and start utilizing the power of popups on your site!
Use popups ethically, prioritize user experience, and create value while enhancing your site’s impact!
Why not explore some creative and user-friendly popup designs to enhance your website’s user engagement?
Take the next step to elevate your site’s performance and captivate your audience!”