
How to Set up Facebook Pixel for WooCommerce: Step by Step
Have you ever wished to be able to easily track the progress of your eCommerce store? With the help of Facebook Pixel, a free and powerful tool, you can now do so with ease. This article will provide step-by-step guidance on how to install Facebook Pixel for WooCommerce and leverage its features for increased sales and conversions.
So, if you are ready to explore the world of analytics and have a better understanding of your customers’ buying behavior – read on!
- What is Facebook Pixel/Meta Pixel?
- Difference Between a Pixel and a Cookie
- Importance of using Facebook Pixel in WooCommerce
- Prerequisites for Setting up Facebook Pixel for WooCommerce
- How to Generate a Facebook Pixel
- Step-by-step Guidelines on how to install Facebook Pixel for WooCommerce store
- Frequently Asked Questions
- Final Thoughts
What is Facebook Pixel/Meta Pixel?
If you’re running an online WooCommerce store, you might have heard of Facebook Pixel, but what is it exactly? Facebook Pixel or Meta pixel is a piece of code that you add to your website, allowing Facebook to track user activity, conversion tracking, and collect Facebook pixel data for Facebook advertising and targeting purposes.
When someone visits your WooCommerce site, the pixel sends information back to Facebook, including what pages they visited and which products they viewed.
If you install Facebook Pixel WooCommerce on your WooCommerce site, you can gain valuable insights into user behavior and ensure that your advertising budget is being spent in the most effective way possible.
Difference Between a Pixel and a Cookie
When it comes to tracking user activity and collecting data from websites, you may have heard of both pixels and cookies. But what exactly are they and how do they differ? While they may seem similar, they serve different purposes.
As discussed earlier, a pixel is a small piece of code that tracks user behavior on a website. It’s commonly used to measure Facebook advertising performance and target specific audiences.
On the other hand, a cookie is a small text file that gets stored on a user’s device to remember their preferences and login information.
As they can also be used to track user behavior, cookies are generally less accurate than meta pixels. While both can improve user experiences, they serve different functions altogether.
When it comes to Facebook pixel integration on your WooCommerce site, it can be a powerful tool for targeted Facebook advertising and reaching potential customers. So, if you’re planning to install Facebook pixel WooCommerce, don’t confuse it with adding a cookie to your website.
🚀 Supercharge Your Facebook Advertising with Pixelavo!
Unlock the full potential of your Facebook ads. Boost conversions, increase ROI, and reach new heights with Pixelavo’s powerful features.
Importance of using Facebook Pixel in WooCommerce
Adding WooCommerce Facebook Pixel holds great significance for your marketing efforts. With WooCommerce’s Facebook pixel integration Event Tracking, you gain access to crucial data such as:
- Visitor Actions: Tracking clicks on “Buy Now” or “Add to Cart” buttons.
- Checkout Process: Monitor shipping details input during checkout.
- Account Creation: Record account sign-ups during checkout.
- Ordering Process: Capture the entire customer ordering journey.
- Product Interest: Note when visitors show interest in specific products.
- Search Behavior: Understand how users search for products.
- Purchase Completion: Track purchases and “Thank You” page views.
With this data, you can achieve the following benefits:
- Create precise remarketing audiences.
- Optimize ad campaigns for targeted audiences.
- Monitor conversions and assess ad campaign effectiveness.
Prerequisites for Setting up Facebook Pixel for WooCommerce
To set up Facebook Pixel tracking for WooCommerce, there are several prerequisites you should have in place:
Facebook Business Account
Ensure you have a Facebook Business account. If you don’t have one, you can create it from the Facebook Business Manager.
Facebook (Meta) Pixel
Generate a Facebook Pixel code from your Facebook Business Manager account. This Facebook pixel code will be the tracking code you’ll integrate with your WooCommerce store.
WooCommerce Plugin
Make sure your WooCommerce plugin is installed and activated on your WordPress website.
Facebook Ad Account
Connect your Facebook Pixel to a Facebook Ad account if you intend to use the data for Facebook advertising purposes.
By having these prerequisites in place, you’ll be well-prepared to integrate WooCommerce Facebook Pixel and start gaining valuable insights into your WooCommerce store’s performance and customer behavior.
How to Generate a Facebook Pixel
Creating a Facebook Pixel is an essential step as it allows you to gather valuable data about user interactions on your website. This Facebook pixel data can be used to optimize your ad campaigns and better understand your audience.
You don’t have to be a coding expert to begin utilizing the Facebook Pixel WooCommerce plugin and establish visitor tracking for your online store. Simply follow the straightforward steps elaborated below to get started.
In this section, we will explore the process of creating a Retargeting Pixel and the fundamental configuration steps for Facebook Pixel.
To begin, access your Facebook Business Manager account and log in. Once logged in, navigate to the Facebook Ads panel and click on “Pixels” under the “Measure & Report” section. On the Facebook Pixel page, click the “Create a Pixel” button.
Now, enter a name for your Pixel and your website’s URL. After that, click the “Create” button in the pop-up window.
With these steps, you’ve successfully created your Facebook Pixel.
🚀 Supercharge Your Facebook Advertising with Pixelavo!
Unlock the full potential of your Facebook ads. Boost conversions, increase ROI, and reach new heights with Pixelavo’s powerful features.
Step-by-step Guidelines on how to install Facebook Pixel for WooCommerce store
In this tutorial, we will show you how you can easily add Facebook pixels using a modern and user-friendly Facebook pixel WooCommerce plugin named Pixelavo.
For a simplified integration of Facebook Pixel into your WordPress website, turn to the Pixelavo plugin—a seamless solution that effortlessly links your Facebook pixel with your online store. Streamlining the process, Pixelavo offers an intuitive interface with advanced tracking, custom audience creation, and potent retargeting tools.
Elevate your Facebook campaigns, boost conversions, and refine your marketing strategies with ease. Key features include:
- Support for multiple pixels,
- Preventing premature triggers,
- Custom event tracking,
- Automatic event matching for simplified conversion tracking,
- Real-time insights,
- Advanced retargeting, and more.
Pixelavo empowers you to optimize your online presence and harness the full potential of Facebook Pixel. Follow these straightforward steps to effortlessly integrate Facebook Pixel into your WordPress site using Pixelavo.
How to Install Pixelavo
Here’s how to install and activate Pixelavo plugin:
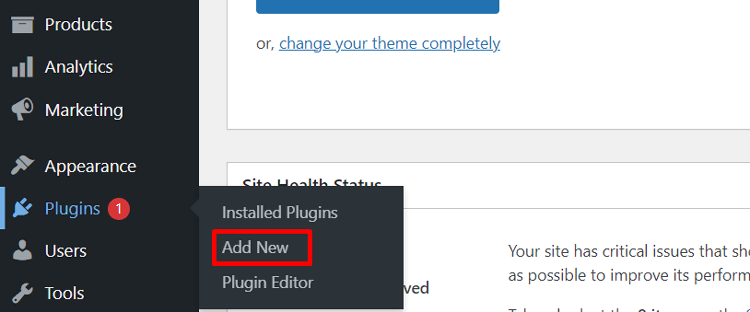
1. Navigate to your WordPress dashboard and select “Plugins.”
2. Click on “Add New” within the Plugins menu.
3. Enter “Pixelavo” in the search bar and press enter.
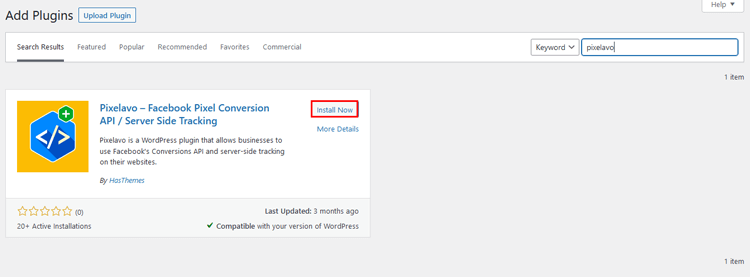
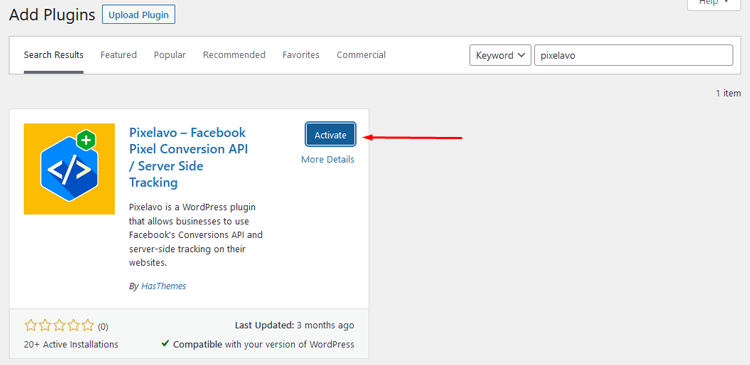
4. Once the “Pixelavo” plugin appears, click “Install Now.” After installation, click “Activate” to activate Pixelavo.
5. Upon activation, you’ll notice a new “Pixelavo” menu.
How to Add a Pixel with Pixelavo
To seamlessly incorporate a Facebook Pixel, follow these steps:
Step 1:
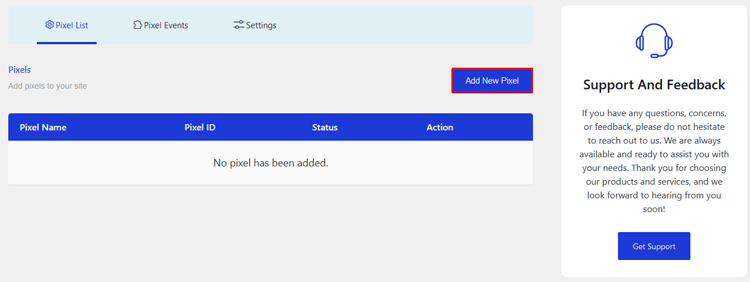
Access Pixelavo Menu Open your WordPress dashboard and choose either the “Pixelavo” menu or the “Pixels” submenu within the “Pixelavo” category.
Step 2:
Create a New Pixel Click the “Add New Pixel” button to initiate the process. This will trigger a pop-up form, guiding you through pixel setup.
Step 3:
Configure Pixel Details
1. Assign a name to your pixel for easy identification.
2. Input your pixel ID, referring to provided instructions for its location.
3. Determine the page(s) for pixel activation, including specific pages if desired (default is all pages).
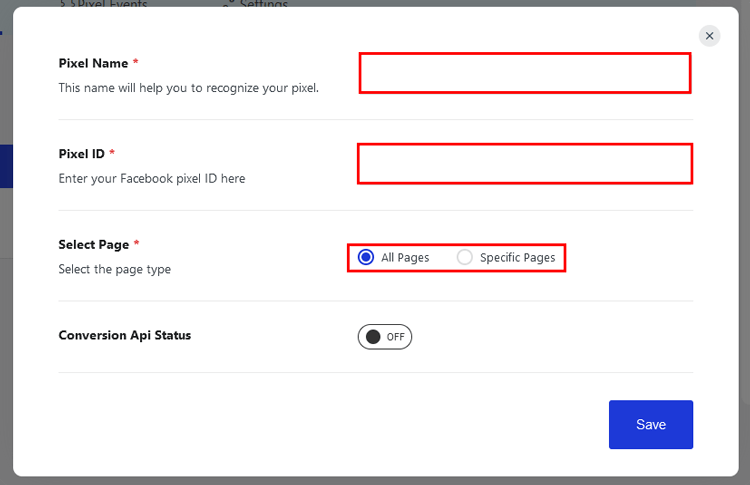
4. Set the status to “Active” if you intend to enable Conversion API.
5. Follow the instructions to insert your Facebook Conversion API access token.
6. Employ the event test code to conduct tests ensuring proper functionality.
7. Click the “Save” button to save your configured pixel.
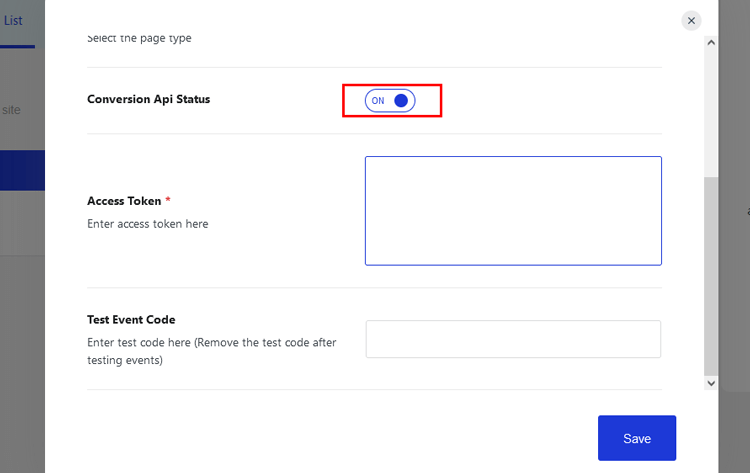
By following these steps, your Facebook Pixel will be effectively integrated into your WordPress site using Pixelavo, enabling comprehensive tracking and enhanced marketing capabilities.
Frequently Asked Questions
Q1: What is Facebook Pixel?
Facebook Pixel is an analytics tool that allows you to measure the effectiveness of your advertising by understanding the actions people take on your website.
Q2: Why is it important to use Facebook Pixel for WooCommerce?
Facebook Pixel helps you track conversions from Facebook ads, optimize ads based on collected data, build targeted audiences for future ads, and remarket to people who have already taken some kind of action on your website.
Q3: What are the prerequisites for setting up Facebook Pixel for WooCommerce?
You need to have a Facebook account and a WooCommerce website setup. You also need to have the ability to update your website’s code or have a Facebook Pixel integration/plugin like Pixelavo installed on your website.
Q4: How to generate a Facebook Pixel?
You can create a Facebook Pixel in your Facebook Ads Manager. Once created, you can either install the pixel manually on your website or use plugins like Pixelavo to make the process easier.
Final Thoughts
Setting up your Facebook Pixel for WooCommerce is an essential step in optimizing your e-commerce business. It allows you to track website visitors, create audiences, measure conversions, track sales, and analyze user behavior. With this Facebook pixel data, you can develop targeted campaigns that result in higher revenue growth over time.
You now have a basic understanding of how to install Facebook Pixel for WooCommerce. We hope this step-by-step guide has provided a clear understanding; With the Pixelavo Facebook pixel WordPress plugin, one can easily add Facebook Pixel WooCommerce in less than a few minutes and enjoy all the benefits it offers.
However, keep in mind that monitoring your Facebook pixel WooCommerce performance needs attention from time to time to get maximum optimization out of it. Besides that, ensure that you are also using other strategies like SEO to drive organic as well as paid traffic to make your presence felt on the web.
So take advantage of all that the platform has to offer and discover success by integrating Facebook Pixel for WooCommerce. Install the Pixelavo Facebook pixel WordPress plugin today!


