WooCommerce Product Import: A Beginner’s Guide [Error-Free!]
Are you struggling with importing products into your WooCommerce store? Worry no more! In this article, we will give you a detailed guide on WooCommerce product import so you can import WooCommerce products in a hassle-free, risk-free, and error-free way!
In addition to the free, manual method consisting of the five steps above, we’ll also recommend you a ‘pro’ way on how to import products to WooCommerce.
Let’s dive right in!
How To Do WooCommerce Product Import?
📝 NOTE: Before we show you how to import products into WooCommerce, you should export WooCommerce products under CSV files (if you have any).
WooCommerce product export will help you back up your data in case of item overlapping or any issues that might arise during the WooCommerce product import process.
#Method 1: Manually do WooCommerce product import
A techie who lives and breathes WordPress and WooCommerce? Then let us show you a detailed guide on manually importing products to your WooCommerce store.
Step 1: Prepare a properly-formated CSV file to import products to WooCommerce
Step 2: Fill in your product details to the CSV
Step 3: Start the product import in WooCommerce
Step 4: Map the product fields
Step 5: Finish importing products and review
Step 1: Prepare a properly-formated CSV file to import products to WooCommerce
WooCommerce supports CSV and TXT file formats for importing products, but we recommend CSV files for better organization.
You can create a CSV using apps like Excel, Google Sheets, Apple Numbers, or OpenOffice and follow the WooCommerce CSV columns and formatting guide to set the correct column names and values.
There are 3 ways to obtain a properly formatted CSV file for WooCommerce import:
- Make your own: Create a CSV using apps like Excel, Google Sheets, Apple Numbers, or OpenOffice. Export the file as a CSV and set the correct column names and values using the WooCommerce CSV columns and formatting guide.
- Use a pre-built WooCommerce product import template: Search on Google and download CSV templates designed explicitly for importing WooCommerce products. The template should include properly formatted CSV with standard product fields as column headers.
- Combine 2 methods: Download the WooCommerce CSV template and customize it by adding new column titles for any unique fields in your store. Save the modified file as a CSV and map your fields later in this process.
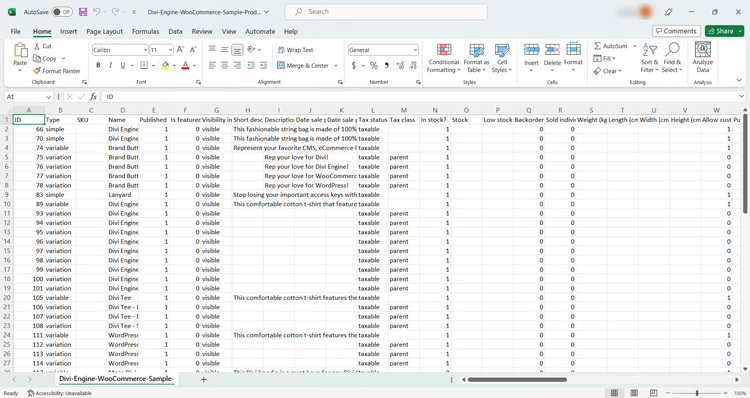
Prepare your CSV file to import WooCommerce products
Alt: properly-formated CSV file to import products to WooCommerce
Here are some tips to keep in mind when you’re learning how to import products WooCommerce:
- Ensure the CSV is in UTF-8 format.
- Stick to your store’s local timezone when including dates in the CSV.
- Use commas to separate multiple values within a field, such as multiple images, attributes, or categories in a single CSV cell.
- To specify hierarchy or taxonomy, use “>” symbol, like “Shirt > T-shirt” under the Category field.
- Use “1” or “2” to indicate true or false values (Boolean values) in the CSV field.
Step 2: Fill in your product details to the CSV
Now that you have a correctly formatted CSV file, let’s add your product details.
- Add data fields to your WooCommerce product import CSV file
It’s important to ensure that each detail corresponds to the correct column title, making it easier for WooCommerce to import and organize your products effectively.
For example, in the first row, you can enter the product’s name, such as “Jeans Jacket.” Each additional product should start on a new row.
The fields you fill in will depend on how you run your store, but some common essentials must be considered:
- SKU
- Name
- Short Description
- Description
- Published (1 for yes, 0 for no to indicate if the product should be published upon import)
- Visibility in Catalog (type “visible” or leave it blank)
- Regular Price
- Sale Price
- In Stock? (1 for yes, 0 for no)
- Stock (the inventory quantity)
- Weight
- Images (we’ll show you how to add this attribute in more detail below)
Continuing to the right, you can also include:
- Type (Variation, Simple, or Virtual)
- Categories
- Attribute Name (e.g., Size or Color)
- Attribute Values (e.g., S, M, L or Blue, Red, Green)
- Attribute Default (specify the attribute that should show by default)
- Attribute Visible (1 for yes, 0 for no)
- Attribute Global (1 for yes, 0 for no)
Ensure you format attributes correctly, separating unique values with commas. Also, remember to save or export your spreadsheet as a CSV file once you have added all the products and their respective details.
- Add images to your WooCommerce product import CSV file
To import images for your products, follow these steps:
- Upload the images to your WordPress site’s Media Library.
- Copy the image URL for each uploaded image.
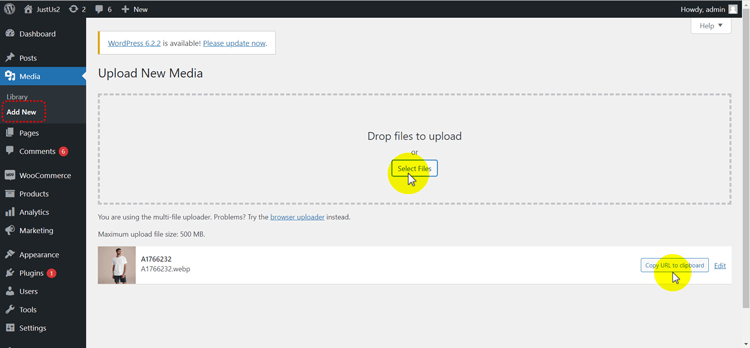
- Paste the image URL(s) into the CSV image or image field, corresponding to the product.

You can import multiple images for a product by placing the image URLs in one cell, separated by commas. The first URL listed will be the main product image, while the subsequent URLs will serve as supplementary gallery images.
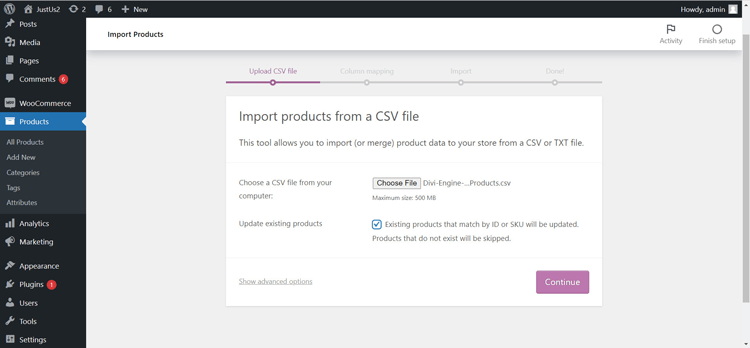
Step 3: Start product import in WooCommerce
First, head to your WordPress dashboard and navigate to the Products tab.
Once there, click on “All Products.”
If you’re starting with an empty inventory, you’ll notice two buttons: “Create Product” and “Start Import.” Select the “Start Import” option to initiate the process.
For those who already have existing products in their store:
- Once you’ve uploaded the CSV file and set any desired optional settings, hit “Continue” and proceed to the next step.
Step 4: Map product fields
Now that your CSV file is ready, it’s time to move on to step 4: ‘Product field mapping’. This crucial step ensures that the data in your CSV file aligns correctly with the corresponding product fields in WooCommerce.
First, the WooCommerce plugin will automatically map similar field names for you. However, you should review and manually set any mismatches.
Begin with the most vital fields that need your attention, such as SKU, Name, Short Description, Description, Published, and Visibility in Catalog.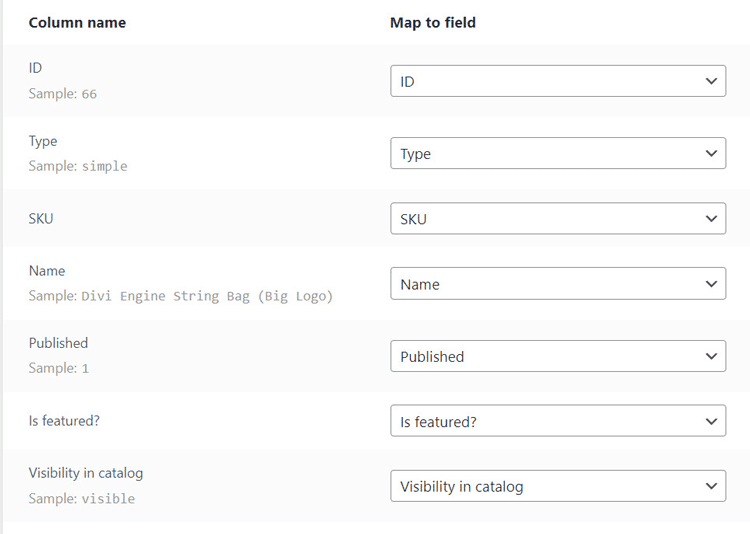
Take a closer look at other essential column names and ensure they are also correctly mapped. These include Regular Price, Sale Price, In Stock?, Stock, Images, Type, Categories, Tags, and all Attribute fields you use.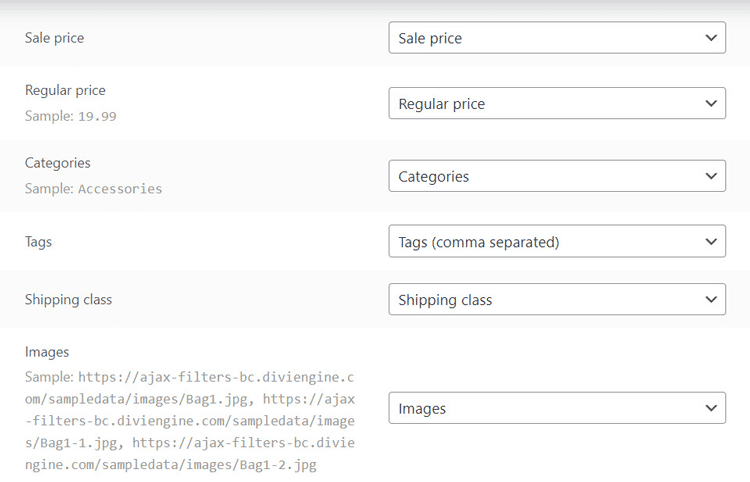
Remember, if there are any fields you don’t intend to use in your store, such as sale prices or attributes, simply set those fields to “Do Not Import.” This allows you to tailor the import process to your specific needs.
Once you have successfully mapped all the necessary product fields, it’s time to click the “Run the Importer” button. This initiates the import process, transferring your product data from the CSV file to your WooCommerce store.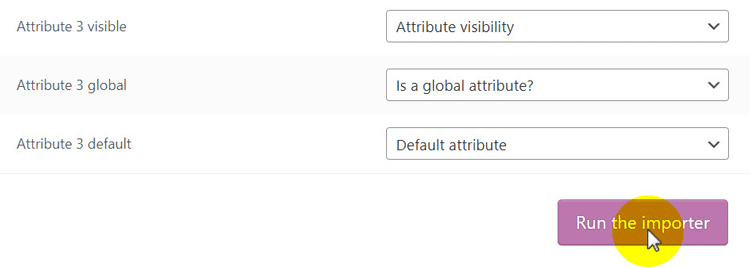
By carefully mapping the product fields, you ensure your imported products are accurately categorized and displayed on your online store. It’s a crucial step to maintain consistency and organization within your WooCommerce inventory.
Let’s move on to the final step and complete the WooCommerce product import process.
Step 5: Finish importing products and review
Once the import is done, you’ll be greeted with an Import Complete message and the number of products successfully imported. Take a moment to ensure that the number matches the total number of products from your WooCommerce CSV import list. WooCommerce also provides error messages in case any products fail to import.
Now it’s time to review the imported products to ensure everything went smoothly. Click on the “View Products” button to proceed with your review. This will open the Products page in WooCommerce, allowing you to scan through the inventory, including the recently imported items and those added before.
As you browse the product list, consider critical elements such as the Name, SKU, Stock, Price, and Categories to ensure they look correct. This is also the perfect opportunity to check the success of image imports.
Open some product pages from each imported batch and carefully review the following:
- Product Name
- Status
- Visibility
- Product Image (if uploaded)
- Description
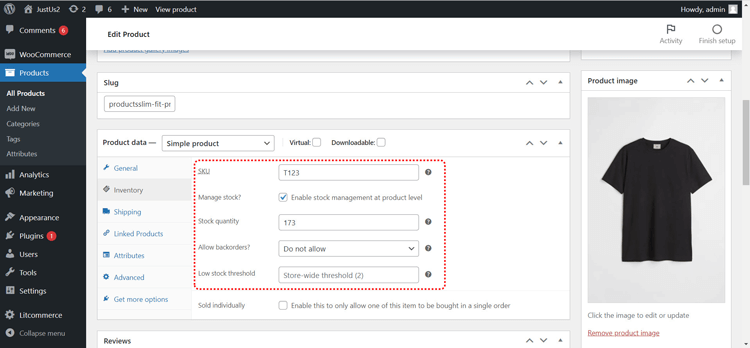
Scrolling further down the product page, verify that the following fields have been filled properly:
- Product Type
- Regular Price
- Sale Price
- Product Gallery images (if you imported multiple images per product)
- Short Description
- Product Categories
It’s also essential to check inventory counts, attributes, and shipping sizes. If you plan to import attributes, remember to set the Type column in your CSV to Variable to ensure the attribute imports show up correctly.
#Method 2: Automatically import products to WooCommerce with LitExtension
Though you can import products to WooCommerce for free with its built-in import feature, this method is highly prone to human error, quickly leading to data loss or damage (we’ll show you this method in more detail below).
Hence, if you have thousands of SKUs, orders, and customer data you can’t afford to lose, you should leave the WooCommerce product import to experts.
For example, if you want to migrate from Shopify to WooCommerce, you can outsource Shopify to WooCommerce Migration Service by LitExtension.
LitExtension will take the heavy-lifting & time-consuming task of product import and export for WooCommerce off your plate. All you have to do is:
Step 1: Set up Source Cart & Target Cart
First, register an account on the LitExtension site. On the migration page, click Create New Migration.
Afterward, pick Shopify as Source Cart Type and fill in your Shopify store’s URL.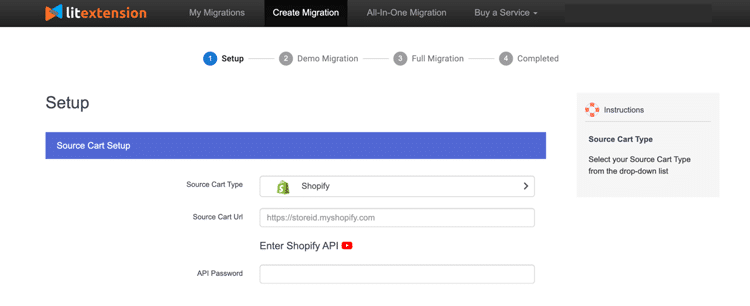
Next, fill in your Shopify API Password (please refer to this Shopify API tutorial to get the API key).
Moving onto the Target Cart setup.
Select WooCommerce as the Target Cart. Click LitExtension Connector to download the connector, extract the zip file, and upload the connector to Source Store’s root folder. 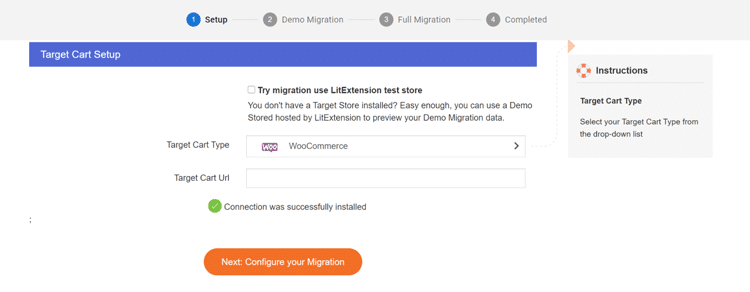
When you see Connection was successfully installed, hit Next: Configure your Migration to move to the next step.
Step 2: Select data to transfer to WooCommerce
After connecting your two stores, choose the entities you want to migrate. You can tick ‘Products’ or ‘Select All’ to import all data (e.g.: Customers and Orders) to WooCommerce.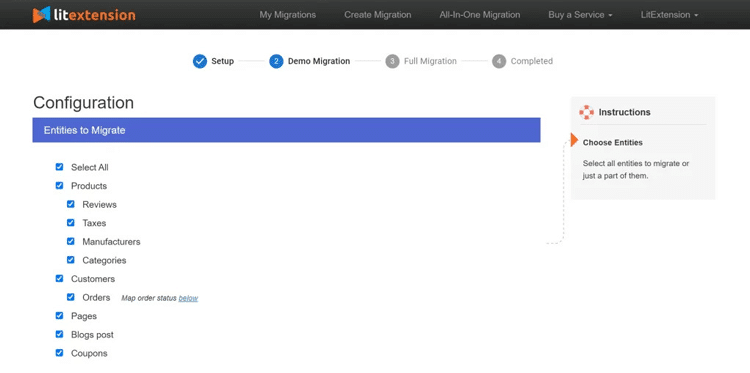
LitExtension also provides Additional Options to cater to stores with more complex migration demands.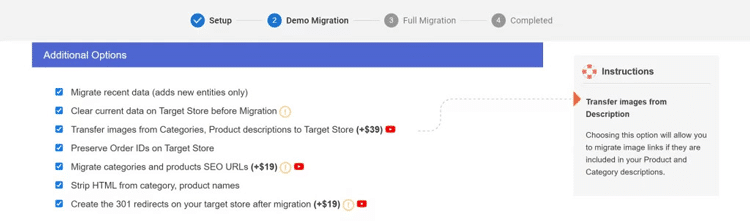
Step 3: Perform full migration
Before migrating from Shopify to WooCommerce, you can try their Demo Migration to get the hang of how it works. Otherwise, you can choose the “Skip Demo Migration”, which will initiate the WooCommerce product import migration process.
The cool thing is you don’t have to keep your browser open. When your data has been transferred successfully from Shopify to WooCommerce, LitExtension will email you about your WooCommerce product import migration.
And that’s how simple it is to import WooCommerce products with an automated service!
Further reading:
👉 What is WooCommerce in WordPress?
👉 13 Essential WooCommerce Plugins for Your Website
👉 30 Best WooCommerce Themes
WooCommerce Product Import: FAQs
How do I import a Product into WooCommerce?
To import a product into WooCommerce, you can use a CSV file.
Go to the WooCommerce admin panel, navigate to the “Products” section, and click on “Import.”
Choose your CSV file and map the columns to the appropriate product fields.
Finally, click “Import” to import the products into WooCommerce.
How do I import and export Products in WooCommerce?
WooCommerce export import process can be done as below:
For importing, go to the WooCommerce admin panel, navigate to “Products,” and click on “Import.” Choose your CSV file, map the columns, and click “Import” to import the products.
To export products, go to “Products,” click on “Export,” select the desired export options, and click “Generate CSV” to download the exported file.
Can I bulk upload Products to WooCommerce?
Yes, you can bulk upload products to WooCommerce using a CSV file.
Prepare a CSV file with all the product details, including attributes, categories, prices, and stock information.
Go to the WooCommerce admin panel, navigate to “Products,” click on “Import,”
Choose the CSV file, map the columns, and click “Import” to bulk upload the products to WooCommerce.
How do I import Products to WooCommerce for free?
WooCommerce provides built-in import/export functionality that allows you to import products for free using a properly-formated CSV file. For more details, please check out the five-step guide on WooCommerce product import.
Wrapping Up
Importing products to your WooCommerce store can be challenging, especially for newbies with little to no technical skills. Hence, after reading this article, we hope you know how to WooCommerce product import properly.