How to Create a Subscription Popup on WordPress: The Beginner’s Guide

Quick Answer: To create a subscription popup on WordPress, install ShopLentor, enable its popup module, design a template with Elementor, add a FluentCRM subscription form via shortcode, set your display trigger to scroll depth or exit intent, then test on desktop and mobile before publishing.
A subscription popup is one of the fastest ways to grow your email list, but only when it’s timed right, designed clearly, and connected to an email tool that actually captures the data. This guide walks you through the full setup on WordPress using ShopLentor and FluentCRM, from enabling the popup module to configuring triggers that convert without irritating your visitors.
Table of Contents
What is a Subscription Popup?
A subscription popup is a lightweight overlay that appears on your website to collect a visitor’s email address in exchange for something valuable, a discount, a free resource, early access, or simply a promise of useful updates.
Unlike a generic popup, a subscription popup has one specific job: get the visitor onto your email list. It needs a clear offer, a single input field, and a compelling button. Nothing else.
Done well, subscription popups convert between 3.5% and 11% of visitors depending on offer strength, timing, and design — with the top-performing campaigns reaching significantly higher. Done poorly, they damage user experience and increase bounce rates. The difference usually comes down to what you offer, when it appears, and how easy it is to close.
Note: This guide covers subscription popups — single-purpose email capture overlays. If you’re building a WooCommerce-specific newsletter popup that also connects to your store’s customer data, see How to Add a Newsletter Popup in WooCommerce.
If you want to understand popup types more broadly before building, What Are Popup Builders? is a good starting point.
Before You Start: What You’ll Need
Make sure these are in place before you build anything:
- WordPress with WooCommerce installed (for store-based use cases)
- ShopLentor plugin; the free version is sufficient to follow this guide
- Elementor – free version works for popup design
- FluentCRM – to capture, store, and segment your subscribers
- A clear opt-in offer – a discount code, free shipping threshold, downloadable guide, or exclusive content
Without a compelling offer, even a perfectly timed popup will underperform. Decide what you’re giving visitors before you open the popup builder.
Recommended Blogs for You:
👉 How to Add a Newsletter Popup in WooCommerce
👉 Learn How to Use the Psychology of Popups to Boost Signups by 250%
👉 10 Essential Tips for Creating an Email Popup
👉 How to Add a Popup on WordPress WooCommerce Site: A Comprehensive Guide
👉 What are Popup Builders? A Beginner’s Guide
How to Create a Subscription Popup on WordPress: Step-by-Step
Step 1: Install and Activate ShopLentor
- Open the WordPress Dashboard
- Search for ‘ShopLentor’
- Click ‘Install Now‘ and then ‘Activate.’
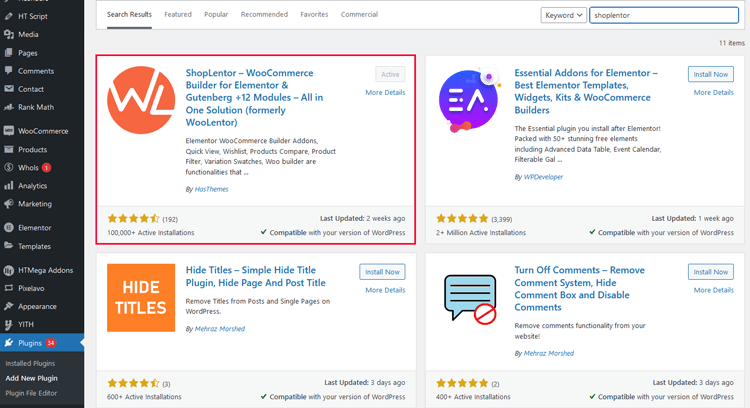
If you want to use ShopLentor Pro, upload the Zip file after purchasing it. The official ShopLentor documentation covers the Pro installation in detail.
Step 2: Enable the Popup Module
ShopLentor’s popup builder is a module — it’s disabled by default.
Go to ShopLentor → Modules from your sidebar.
Find Popup in the module list and toggle it on.
Click Save Changes.
This adds the popup builder to your dashboard menu.
Step 3: Create Popup Templates
To create a popup template using ShopLentor’s Popup Module, follow these simple steps:
1. Go to ShopLentor → Template Builder
Now, Click Add New Template.
A popup window titled “Template Settings” will appear, providing various fields to fill out.
- Select “popup” as the template type in the “Type” field.
- Choose Elementor as your preferred editor when creating the template.

Pro tip: Make sure Elementor is already installed and activated before this step, the editor option won’t appear without it.
Step 4: Design Your Popup in Elementor
Once the template opens in Elementor, keep the layout simple:
- Headline — lead with the benefit, not the ask (“Get 10% off your first order” works better than “Subscribe to our newsletter”)
- One-line subtext — what happens after they subscribe
- Email field — single field only; avoid asking for a name unless your email tool segments by it
- Submit button — use action copy: “Get My 10% Off” beats “Submit”
- Visible close icon — if visitors feel trapped, they leave; make the X easy to find
A minimal, clear popup consistently outperforms a feature-heavy one. Design for the decision, not for impressiveness.
Step 4: Add a FluentCRM Subscription Form
This step connects your popup to your actual email list.
1. Install FluentCRM:
- Go to Plugins → Add New
- Search FluentCRM, install, and activate it
2. Create a List and Tags (Optional)
Organize and segment your target customers for better targeting:
Navigate to FluentCRM > Contact in your dashboard.
Click Lists or Tags to begin creating them.
To create a List:
Click “Create List.”
Enter a title, slug, and optional internal subtitle. Click “Create.”
To create a Tag(Optional):
Click “Create Tag.”
Add a title, slug, and optional subtitle. Click “Create.”
3. Create Your Subscription Form
In FluentCRM, create the form that visitors will use to subscribe:
Navigate to Forms
and click “Create a New Form.”
Select a pre-built template or start fresh.
Enter the form title and assign it to a List and Tags you’ve created.
Customize the form fields and design as needed.
4. Copy the Shortcode
Once your form is ready, copy its shortcode. It will look like this: .
5. Add the Form to Your Popup
- Open the ShopLentor popup template editor.
- Paste the shortcode you copied from FluentCRM into the popup content area.

If you’re still choosing a popup tool, our comparison of the best WordPress popup plugins will help you decide which plugin fits your site best.hasthemes
Step 5: Configure Popup Settings
To personalize your popup template, click ‘Sample Design’ and select a design. Then, click ‘Save Settings’ to save your choice.
Next, click ‘Edit with Elementor’ to access the Elementor edit screen and easily modify the layout with your desired image and text.
For further customization, navigate to the popup settings option in Elementor. Here, you can use condition settings to fine-tune the popup behavior and timing.
Set multiple conditions to control when and where your popups appear precisely. You can apply conditions globally or exclusively to specific pages, allowing for granular control.
In Elementor’s Popup Settings panel, configure:
Trigger settings — when the popup fires:Trigger Best for Recommended setting Page load Welcome offers for first-time visitors 5–6 second delay on desktop Scroll depth Blog readers and content browsers 40–60% scroll Exit intent Recovering abandoning visitors On cursor-leave detection Inactivity Visitors who pause mid-page 20–30 seconds idle
Exit intent and scroll-based triggers consistently outperform immediate page-load popups because they reach visitors who have already engaged with your content — not ones who just landed.
Condition settings — where the popup shows:
- Show on homepage, blog posts, and product pages
- Exclude checkout and cart pages — interrupting a buyer mid-purchase directly increases cart abandonment
- For WooCommerce stores, consider different popup offers per page type (product discount on product pages, free guide on blog posts)
Frequency settings:
- Set a cookie to suppress the popup for 7–14 days after dismiss or subscribe
- Never show the same popup more than once per session
- Once a visitor subscribes, suppress subscription popups for that user entirely
Mobile settings:
- Use a compact banner or smaller overlay on mobile — never a full-screen popup
- Google’s intrusive interstitial guidelines penalise mobile overlays that block main content
- Ensure the close button is at least 44px in tap target size
Step 6: Test Everything Thoroughly
Before going live, check these important things:
- Test your popup on different web browsers (Chrome, Firefox, Safari)
- Look at your popup on both computers and phones
- Fill out the form several times using different test emails
- Check if your thank you message appears correctly
- Verify that test subscribers appear in FluentCRM

Fix any problems you find:
- Make sure the form is submitted without errors
- Verify that popup timing works as planned
Step 6: Publish Your Popup
When everything works perfectly, publish your popup: Click “Save and Publish” to make your subscription popup live.
Now, your popup is fully functional. Visitors can subscribe directly through the popup, and their details will be stored in FluentCRM.
Your subscription popup is now live on your WordPress site, ready to grow your email list!
Real WooCommerce Example
Here’s how this setup looks in practice.
Scenario: You run a WooCommerce skincare store. You want to convert first-time visitors into email subscribers by offering 10% off their first order.
Setup:
- Trigger: Page load with a 6-second delay
- Conditions: Homepage and product category pages only — cart and checkout excluded
- Offer: “Get 10% off your first order — enter your email below”
- Form: FluentCRM form, email only, assigned to “New Subscriber — 10% Welcome Discount” list
- Cookie: Suppress for 14 days after dismiss or subscribe
- Automation: FluentCRM sends the coupon code immediately on signup
Why this works: Visitors get a few seconds to browse before the popup appears. The offer is immediate and relevant. The form is one field. Dismissing it doesn’t trigger it again for two weeks. And subscribers get the reward instantly — no friction between signup and value.
This setup applies directly to any WooCommerce product store with minor adjustments to the offer and page conditions.
Best Settings for Conversion Without Annoying Visitors
Getting this balance right matters more than design.
Timing:
- Minimum 5 seconds on desktop, 10 seconds on mobile before showing
- Scroll (40–60%) or exit intent works better than immediate load for content pages
Design:
- One offer. One field. One button. One close icon.
- Short, benefit-led headline — what does the visitor get?
- Button text should describe the outcome: “Get My Discount” not “Subscribe”
Frequency:
- Cookie suppression after dismiss (7–14 days) and after subscribe (permanent)
- One popup per session maximum
Mobile:
- Compact banner or partial overlay — no full-screen modals
- Close button tap target minimum 44px
- Test on a real iPhone and Android before going live
Offer ideas by store type:
- eCommerce: 10–15% first order discount or free shipping
- Content site: downloadable guide, template, or resource
- Service business: free consultation, checklist, or video training
For real-world inspiration, see Best Email Pop-Up Examples, where we break down why certain designs and offers consistently outperform others.
Common Mistakes to Avoid
These quietly kill conversion rates or create SEO problems:
- Firing immediately on page load — visitors haven’t decided anything yet; give them time first
- Full-screen popups on mobile — Google’s intrusive interstitial policy applies; use compact designs
- Showing on checkout pages — the single fastest way to increase cart abandonment
- No frequency cap — showing on every visit burns goodwill with returning users
- Too many form fields — email only almost always outperforms email + name + phone
- No success message — always confirm the submission worked, even with a simple inline message
For a broader look at what makes email popups work across different store types, 6 Email Subscription Popup Examples to Increase Conversions shows real designs worth studying before you finalise yours.
Frequently Asked Questions
Does WordPress have a built-in subscription popup?
No. WordPress doesn’t include popup functionality by default. You need a popup builder plugin ShopLentor, Popup Maker, or similar tools to add this to your WordPress dashboard.
What is the difference between a subscription popup and a newsletter popup?
The terms are often used interchangeably. A subscription popup specifically collects email sign-ups, while a newsletter popup is a type of subscription popup focused on newsletter content. The setup and structure are the same; the distinction is mainly in the copy and offer.
For a WooCommerce newsletter popup specifically, see How to Add a Newsletter Popup in WooCommerce.
What trigger works best for subscription popups?
Exit intent and scroll-based triggers (40–60% scroll depth) consistently outperform immediate page-load popups for subscription forms; they reach visitors who’ve already engaged with your content. For WooCommerce product pages, a 5–6 second page-load delay works well for first-time visitors.
How often should a subscription popup appear to the same visitor?
Set cookie suppression for 7–14 days after a visitor dismisses. Never show the same popup more than once per session. Once a visitor subscribes, suppress subscription popups permanently for that user.
What’s a realistic conversion rate for a subscription popup?
According to Wisepops’ 2026 benchmark (based on over 1 billion popup displays), the average popup conversion rate is 4.82%. Popups with strong, targeted offers and well-timed triggers can push 10–12%. If your popup is converting below 2%, revisit the offer and timing before testing design changes.
Can I use a different email tool instead of FluentCRM?
Yes. The same shortcode approach works with Mailchimp, ActiveCampaign, MailPoet, and most WordPress-compatible email plugins. The steps are the same: install the plugin, create your form, copy the shortcode, and paste it into the ShopLentor popup template in Elementor.
Final Words
A subscription popup that converts well isn’t built around clever design. It’s built around the right offer, shown at the right moment, to a visitor who’s already interested. Get those three things right and the technical setup handles itself.
Start with the trigger and the offer. Test before you publish. Check it on mobile. Then let it run and watch your FluentCRM list grow.
Looking to do more with ShopLentor beyond popups? It handles WooCommerce page building, checkout customization, product page design, and more, all within Elementor, without code.