How to Install Google Analytics on WordPress: A Step-By-Step Guide
Are you looking to track your WordPress website activity? Installing Google Analytics is one of the smartest moves you can make.
Over 14.2 million websites use Google Analytics to unlock valuable user insights.
It reveals how visitors find and engage with your content.
Whether you run a blog, online store, or business site, tracking user behavior improves results.
This guide shows you how to install Google Analytics on WordPress quickly and easily.
You’ll start gathering actionable data about your site visitors right away.
Key Takeaways
- Learn how to install GA4 on WordPress easily using a step-by-step method.
- Understand why installing Google Analytics on WordPress is crucial for optimizing website performance.
- Follow a detailed process to create a Google Analytics account and set up a new GA4 property for your WordPress website.
- Discover how to setup Google Analytics on WordPress using the “HT Easy GA4” plugin.
- Understand the benefits of using the HT Easy GA4 plugin, including simplified setup.
- Recognize how important it is to install GA4 WordPress to make data-driven decisions.
Understanding Google Analytics
Understanding Google Analytics is essential for any website owner or digital marketer looking to gain valuable insights into their online performance.
Google Analytics is a powerful tool that provides detailed data and analytics about website traffic, user behavior, conversions, and much more.
This data helps businesses make smarter decisions to improve their website’s effectiveness. It also guides them in optimizing marketing campaigns and creating a better overall user experience.
Google Analytics provides a wealth of information, from tracking website visits to monitoring bounce rates and goal completions. This helps businesses understand their audience better and adjust their strategies more effectively.
With its user-friendly interface and customizable reports, Google Analytics empowers website owners to measure, analyze, and maximize their online presence.
Beginners and experienced users alike can unlock powerful insights with Google Analytics. Exploring this tool opens up a world of opportunities to optimize your digital efforts.
Why Install Google Analytics on WordPress?
Google Analytics is a powerful analytics tool that provides valuable insights into the activities of your WordPress website visitors.
Analyzing the data collected through Google Analytics tracking helps improve your website’s performance. It also allows you to refine your content strategy, user experience, and marketing efforts based on insights.
It helps you to measure and analyze key performance metrics such as visitor numbers, bounce rates, page views, time spent on site, and more.
With this information in hand, you can quickly identify areas for improvement on your website. You can then make necessary adjustments to ensure your site remains competitive.
Additionally, with an understanding of your visitors’ behavior and preferences, you can also create targeted campaigns to reach the right audience for your business.
When you add Google Analytics to WordPress, you’ll be able to maximize the success of your website and ensure that it is performing at its optimal level.
No matter what type of website you have or the size, it’s important to understand the importance of Google Analytics for WordPress.
With its powerful tracking capabilities and insights into visitor behavior, Google Analytics tracking is a valuable tool. It helps you make more informed decisions about how to optimize your WordPress website for maximum success.
HT Easy GA4
#1 📈 Google Analytics Plugin for WordPress
🚀 Supercharge your WordPress website with analytical insights. (Including WooCommerce Report)
Creating a Google Analytics Account
To enable Google Analytics on your website, follow these steps:
1. Sign Up for Google Analytics:
Go to the Google Analytics website (analytics.google.com) and sign in with your Gmail account to enable Google Analytics tracking on your site.
If you don’t have a Gmail account, create one first. After signing in, you’ll be directed to the Google Analytics homepage.
2. Create an Account:
Click on the “Start Measuring” button. On the next screen, you’ll need to create an account. Give your account a name.
If you plan to track multiple websites or properties under one account, choose a broad name like your business name.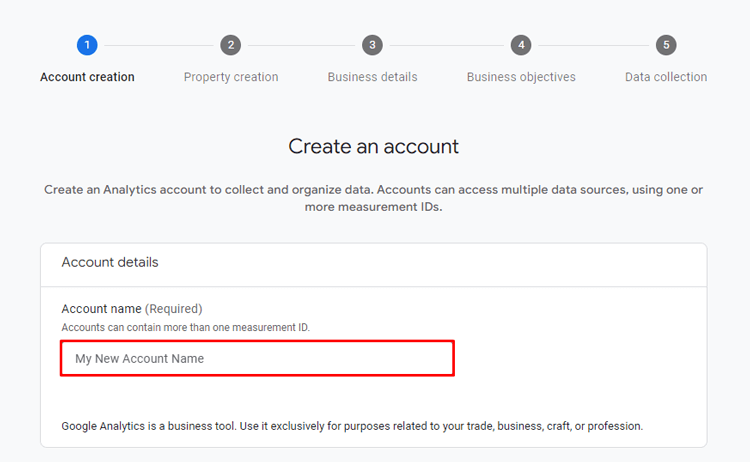
Set Up Analytics Property:
After creating the account, you’ll be asked to set up the Analytics property. Enter the name of your website, select the appropriate time zone, and choose the currency used for your business’s location.
Google Analytics will ask a few questions about your business and how you intend to use the platform. Answer these questions accordingly.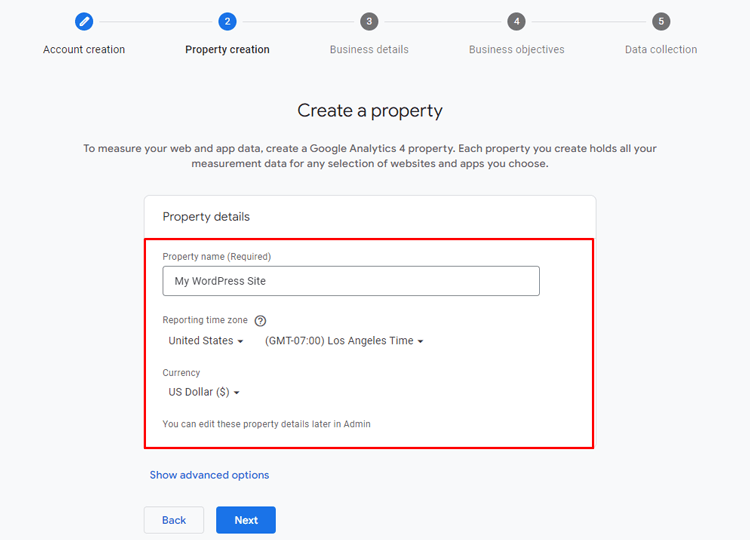
Business Details:
Insert Business Details according to its Category and Size. Click next to go Business objective step.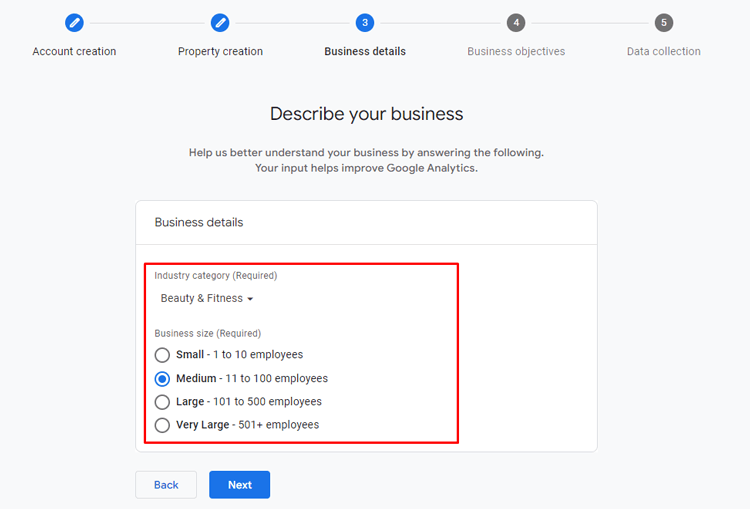
Business Objectives:
Choose your most suitable topic from the list of business objective topics.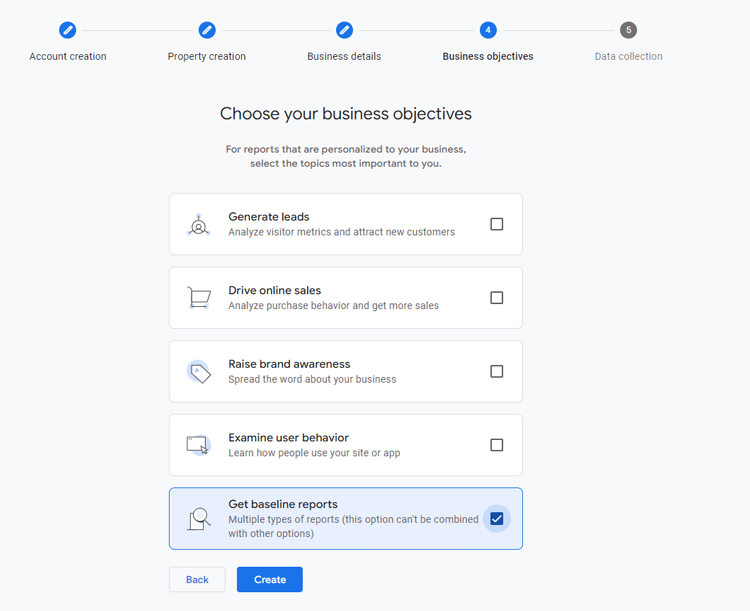
4. Agree to Terms and Email Communications:
Read through the terms of service and privacy policy, then agree to them. You can also choose to receive email communications from Google Analytics if you wish.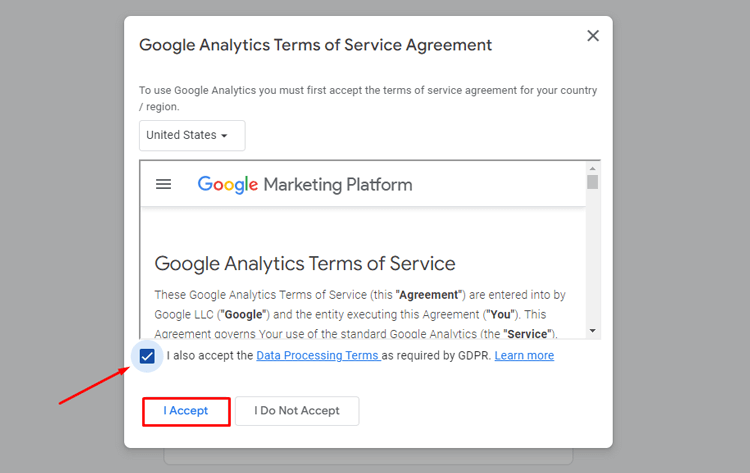
5. Set Up the Data Stream:
Once you’ve completed the setup process, you’ll be taken to the Google Analytics Dashboard.
On the Google Analytics Dashboard, click on the “Data Streams” option under the Analytics Property column. Click on the “+ Add Stream” button.
6. Select Web Stream:
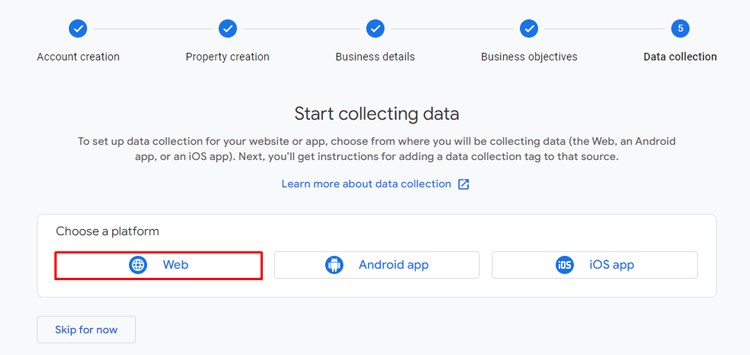
Since you are about to connect Google Analytics to a WordPress site, select “Web” as the stream type.
Add Site URL and Name: Enter your website’s URL and provide a name for the data stream (usually your WordPress website’s name).
Now click on the “Create Stream” button to generate the data stream for your WordPress website.
Once the data stream is created, you will see the stream name, stream URL, stream ID, and most importantly, the Measurement ID. The Measurement ID is a unique identifier for your website, and you will use it to integrate Google Analytics with your WordPress site.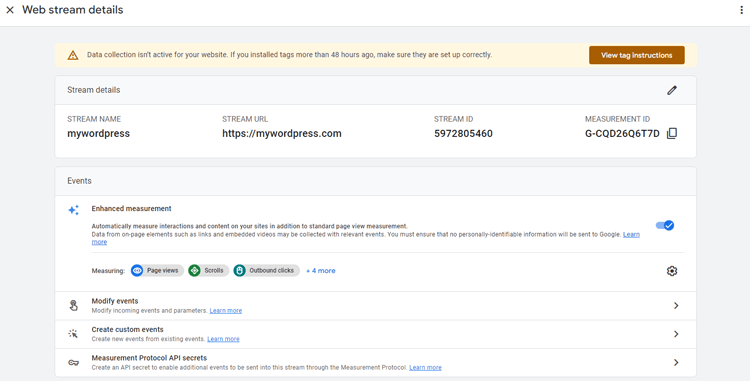
After obtaining the Measurement ID, you can add it to your WordPress site. The easiest way to do this is by using a Google Analytics WordPress plugin or by adding the tracking code manually to your site’s header.
Once the code is added, Google Analytics will start tracking data from your website. You’ll then be able to access detailed reports and insights through your Google Analytics account.
Recommended Blog for you:
👉 The Best Google Analytics Plugins for WordPress
👉 How to Add a Facebook Pixel to WordPress: Step-by-Step Guide
👉 How to Get Facebook Pixel Tracking Code: Step-by-Step Guide
👉 5 Best WooCommerce Google Analytics Plugins
👉 MonsterInsights vs Site Kit: The Ultimate Comparison Guide
How to Install Google Analytics on WordPress with a GA4 Plugin
With the right analytics tools and strategies in place, you can make sure that your WordPress site is performing at its optimal level and reaching its full potential.
Now, we’ll show you how you can easily integrate your WordPress website with Google Analytics using a robust WordPress Google Analytics 4 plugin named HT Easy GA4.
By following the steps outlined here, you can easily install Google Analytics on WordPress and begin leveraging its features to improve the performance of your website.
Installing the HT Easy GA4 WordPress Plugin
To install and activate the “HT Easy GA4” analytics plugin on your WordPress site, follow these steps:
Log in to your WordPress dashboard.
Click on the “Plugins” menu and select the “Add New” submenu.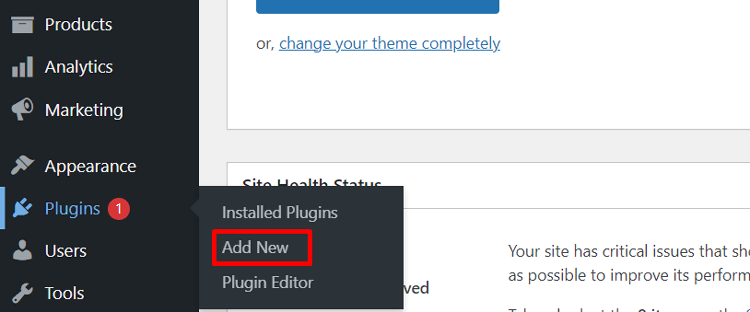
In the search bar located at the top right corner of the page, type “HT Easy GA4” analytics plugin and press Enter.
Click on the “Install Now” button next to the plugin’s name. WordPress will then download and install the “HT Easy GA4” google analytics WordPress plugin.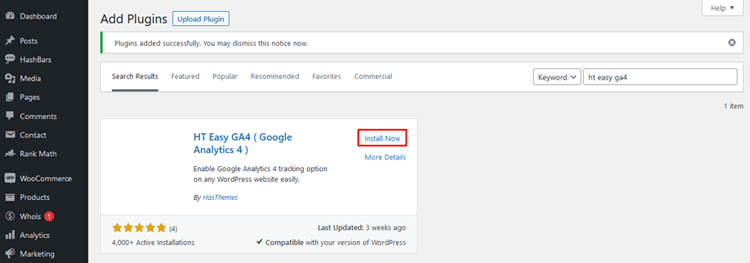
After the installation is complete, click on the “Activate” button to activate the “HT Easy GA4” analytics plugin.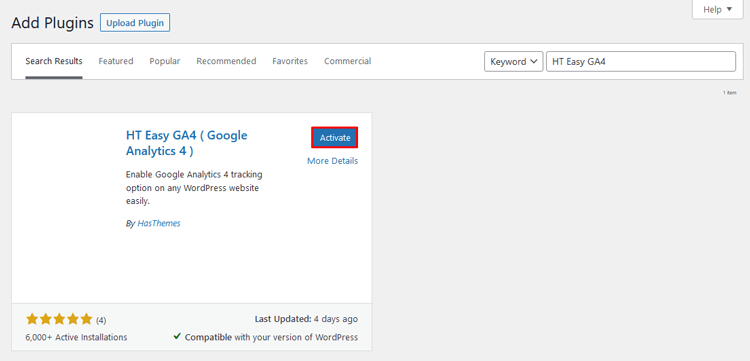
Once activated, you will see a new menu item called “HT Easy GA4” in the WordPress dashboard. You can access the settings and features of the “HT Easy GA4” analytics plugin by clicking on the “HT Easy GA4” menu. 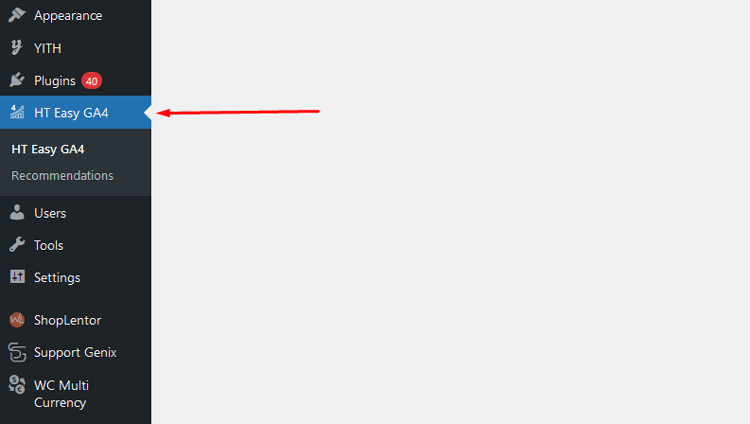
Now, the “HT Easy GA4” plugin is ready to be configured with your Google Analytics Measurement ID, and you can start tracking your website’s data with Google Analytics 4 (GA4) seamlessly. 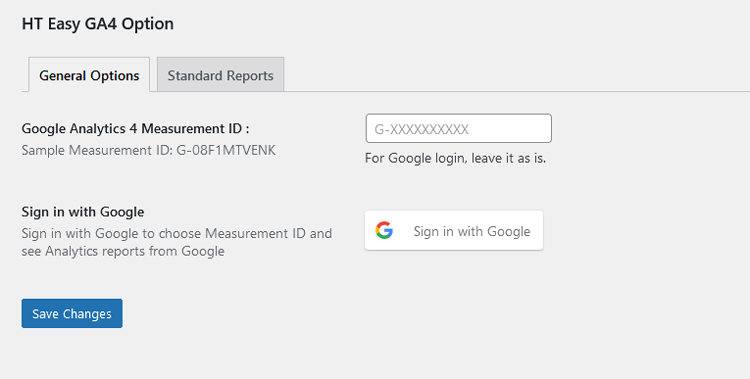
HT Easy GA4
#1 📈 Google Analytics Plugin for WordPress
🚀 Supercharge your WordPress website with analytical insights. (Including WooCommerce Report)
Configuring the Plugin
After activating the “HT Easy GA4” plugin, you’ll find a new menu called “HT Easy GA4” in your WordPress dashboard. Follow these steps to configure the plugin settings:
Directly Add Measurement ID (Basic Method):
You can directly place your Google Analytics Measurement ID in the provided field. This will automatically add the tracking script (gtag) to your site’s header, enabling website tracking.
However, for utilizing all of the plugin’s features, it is recommended to Sign in with Google and configure the Measurement ID. This will grant access to useful Google Analytics reports.
You’ll also be able to choose from any Measurement IDs in your Google Analytics account without leaving the WordPress dashboard.
Sign in with Google:
Click on the button labeled “Sign in with Google.” A new window will open, prompting you to sign in to your Google account using your username and password.
If you are already logged in, you’ll be able to select the Google account associated with your Google Analytics.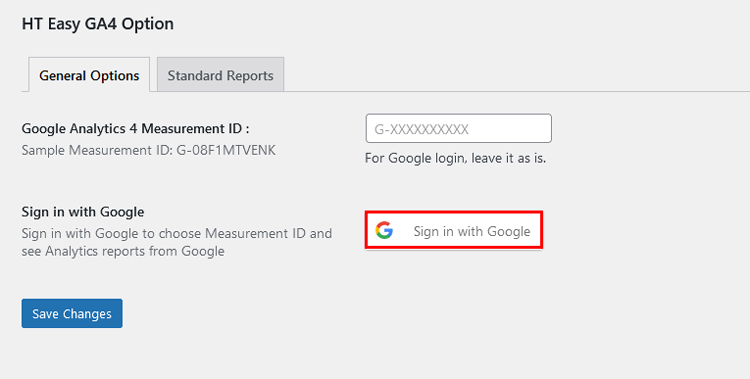
Grant Access:
Once you’ve selected the appropriate Google account, check the box to allow the plugin to connect Google Analytics. Click on the “Continue” button after granting access.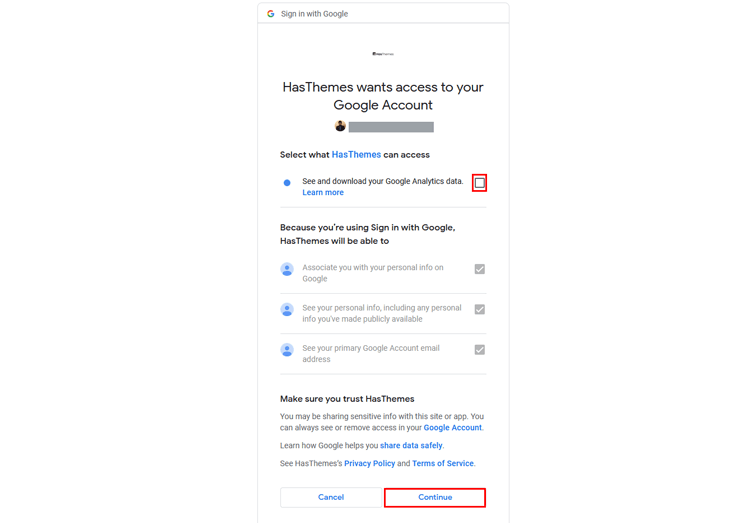
Connected to Google Analytics:
After connecting the plugin to Google Analytics, you will see a “Logout” button along with the email address used to log in. This button can be used to disconnect the plugin from the Google Analytics API.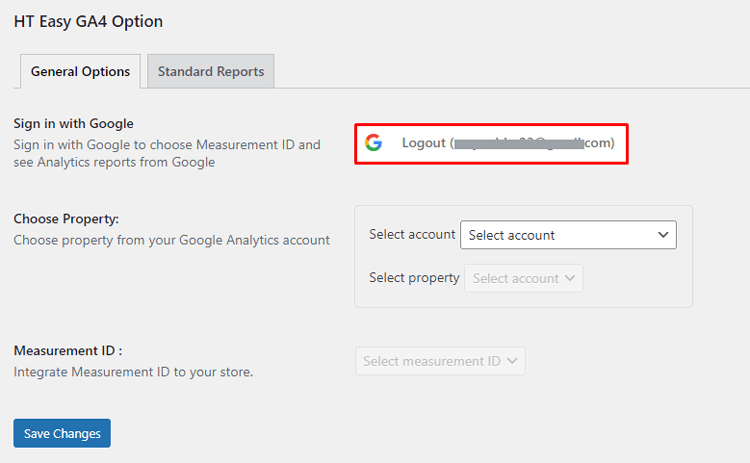
Select Account and Property:
From the dropdown list, select the Google Analytics account that is associated with your WordPress website.
Once you’ve chosen the account, the plugin will display the corresponding properties linked to that account.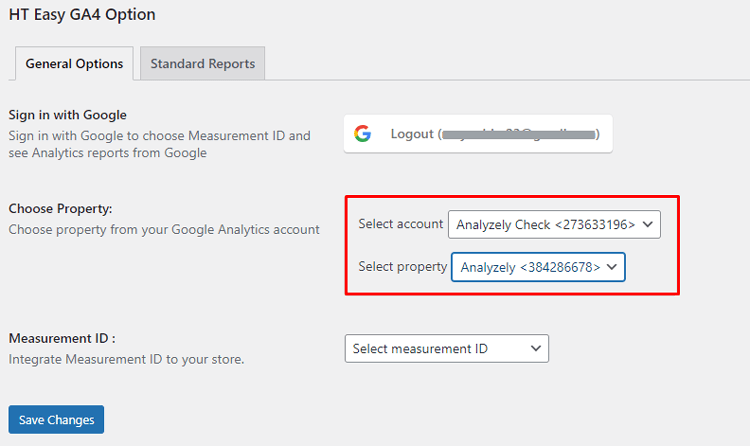
Choose Measurement ID:
Select the property from the dropdown list to see a list of measurement IDs associated with that analytics property.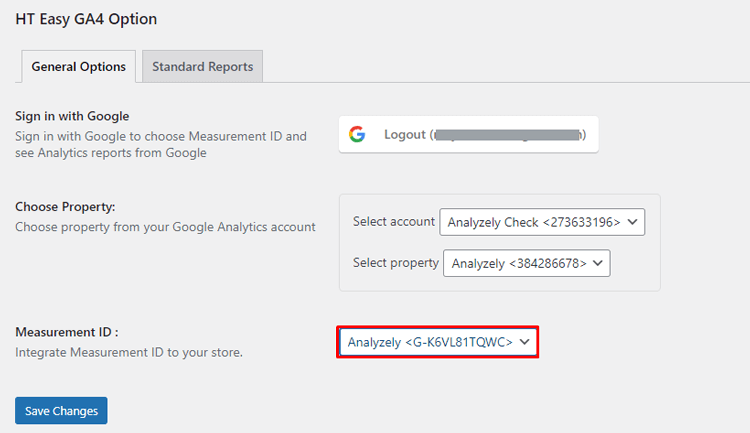
Pick the appropriate measurement ID for your website.
Save the Configuration:
After configuring all the options, save your settings. The plugin will now automatically add the tracking script to your site’s header, allowing it to track visitor data.
You no longer need to use other third-party plugins or add custom code snippets to your site for tracking purposes.
If you have manually added a tracking code or used any other third-party plugin, you can remove it.
Enable E-Commerce Events (Pro):
If you have the Pro version of the “HT Easy GA4” and “WooCommerce” plugins activated, you can enable eCommerce Events.
These events are used to track user behavior on eCommerce websites, such as tracking checkout visits, product views, cart additions, and purchases.
Event Tracking:
The plugin supports various event tracking options, such as “View Product,” “View Category,” “Add to Cart,” “Initiate Checkout,” and “Purchase.” These events help track user interactions with your products and website, allowing you to optimize your online store for better conversions and revenue.
Directly Placing the Measurement ID in GA4 Plugin Settings:
To access all of the plugin’s features, however, we recommend signing in with Google and configuring the Measurement ID.
This allows you to see and select any of the Measurement IDs in your Analytics account.
You also get access to the most useful Reports features without having to visit the Google Analytics website.
Frequently Asked Questions
Q: What is Google Analytics, and why is it important for WordPress websites?
A: Google Analytics is a free web analytics service offered by Google. It provides valuable insights into website traffic, user behavior, and other key metrics. For WordPress websites, Google Analytics is essential as it helps website owners understand their audience, track the performance of their content, and make data-driven decisions to improve their website’s effectiveness.
Q: How can I add Google Analytics to my WordPress site?
A: You can easily add Google Analytics to your WordPress site using a plugin like “HT Easy GA4.” Install and activate the plugin, then enter your Google Analytics Measurement ID in the plugin settings. The plugin will take care of adding the necessary tracking code to your site without requiring manual code edits.
Q: What is the “HT Easy GA4” plugin, and how does it work?
A: “HT Easy GA4” is a WordPress plugin designed to integrate Google Analytics 4 (GA4) with your WordPress website. It simplifies the process of adding the Google Analytics Measurement ID to your site, allowing you to track data without dealing with complex code implementation.
Q: Can I track specific events or actions on my WordPress site using “HT Easy GA4”?
A: Yes, “HT Easy GA4” supports event tracking in Google Analytics 4. You can track various user interactions, such as clicks on buttons, form submissions, downloads, video plays, and more. The plugin offers an easy-to-use interface to set up event tracking without extensive coding.
Q: Does the “HT Easy GA4” plugin provide analytics data directly within the WordPress dashboard?
A: Yes, “HT Easy GA4” offers a dashboard widget that displays basic analytics data directly within the WordPress admin area. This allows you to get a quick overview of key metrics without leaving your WordPress dashboard.
Q: Is the “HT Easy GA4” plugin free to use?
A: Yes, “HT Easy GA4” is available for free on the WordPress plugin repository, making it accessible to all WordPress users. You can install and use the plugin without incurring any direct costs.
Q: Can I use “HT Easy GA4” to track eCommerce transactions on my WooCommerce-powered WordPress online store?
A: Yes, “HT Easy GA4” is compatible with WooCommerce, and you can use it to track eCommerce transactions, sales, and other relevant data. It allows you to set up enhanced eCommerce tracking for your WooCommerce store effortlessly.
Q: How quickly can I see Google Analytics data after installing the “HT Easy GA4” plugin?
A: After setting up “HT Easy GA4” with your Google Analytics Measurement ID, it may take up to 24 hours or more for data to appear in your Google Analytics account. The data collection process can vary, so it’s important to be patient and allow sufficient time for tracking to take effect.
Q: Is there any technical support available for the “HT Easy GA4” plugin?
A: For technical support and assistance with the “HT Easy GA4” plugin, you can refer to the plugin’s support forums on the WordPress plugin repository. The plugin’s developer or community members may provide assistance for any issues you encounter.
Conclusion
Installing Google Analytics on WordPress is essential for effective website management. It helps you understand visitor behavior and make data-driven decisions for your site.
The steps outlined above make installation simple for any website owner. Anyone can set up Google Analytics quickly with the right guidance.
We introduced the HT Easy GA4 plugin for those needing a simpler solution.
Now that you know how to install Google Analytics on WordPress, feel free to contact us if you have any troubleshooting questions we can answer!