How to Customize WooCommerce Checkout Page Using ShopLentor(Formerly WooLentor)
Building an online business is tough, but the fierce competition among companies to attract consumers might make it appear like a race. The only way to stay ahead in this market is by being innovative! There’s no room for complacency when there are so many other competitors out there trying just as hard.
The WooCommerce checkout design significantly impacts conversion rates. Many store owners struggle with default checkout layouts. The Elementor WooCommerce checkout page offers flexible solutions for better user experiences.
There could be many reasons why your WooCommerce store is not generating the expected amount of sales. One reason could be that your checkout page is not optimized, which can lead to customers abandoning their purchases.
The checkout page is one of the most important pages on your store, as it is the last chance you have to convert a customer into a sale. If your checkout page is not optimized, you could be losing out on sales.
The checkout page is the last stop before a customer completes a purchase. If the checkout process is difficult or complicated, customers are likely to abandon their carts and look for another online retailer.
In this article, we’ll take a look at some important factors to consider when designing your elementor WooCommerce checkout page and how to customize WooCommerce Checkout page using ShopLentor (Formerly WooLentor).
- Key Takeaways
- How Crucial is the Checkout Page for an eCommerce Business?
- Why is It Necessary to Customize WooCommerce Checkout Page?
- How to Customize WooCommerce Checkout Page with WooLentor
- ShopLentor Checkout Billing Form
- ShopLentor Checkout Shipping Form
- WooLentor Checkout Order Review
- WooLentor Checkout Payment Method
- WooLentor Checkout Additional Info Form
- WooLentor Checkout Coupon Form
- WooLentor Checkout Login Form
- How to Improve the Checkout Page of Your WooCommerce Store
- Frequently Asked Questions
- Video Presentation for the WooCommerce Checkout Page Customization with ShopLentor (Formerly WooLentor) plugin.
- Conclusion
Key Takeaways
- Ensure a responsive, fast, and optimized checkout page that functions smoothly across all devices, thereby enhancing overall sales performance.
- ShopLentor enables you to customize the WooCommerce checkout page with an intuitive drag-and-drop interface, eliminating the need for coding.
- Choose from pre-built checkout templates or design a custom layout to enhance user experience and conversion rates.
- Add, remove, or rearrange checkout fields to streamline the process and collect relevant customer information.
- Enhance usability with a step-by-step checkout process, reducing cart abandonment and facilitating a smoother purchase completion for users.
How Crucial is the Checkout Page for an eCommerce Business?
The difference between a $100,000 and $1,000,000 online store often comes down to one critical factor: checkout optimization.
When customers reach your checkout page, they’re already 90% convinced to buy. The question is: will your checkout page seal the deal or send them straight to your competitors?
The checkout page is critical since it is the final stage that consumers go through before completing a transaction. A well-designed checkout page can encourage customers to complete their purchase, while a poorly designed checkout can lead to lost sales.
Your WooCommerce checkout page template should prioritize simplicity above all else. Studies show that custom checkout page templates in WooCommerce solutions reduce cart abandonment.
This is why it’s so important for online businesses to have a checkout process that is easy to navigate and simple to complete. The Elementor’s WooCommerce checkout page must be user-friendly, and it should offer a variety of payment options to make it convenient for customers worldwide.
Why is It Necessary to Customize WooCommerce Checkout Page?
There could be many reasons why your WooCommerce customize checkout page isn’t performing as well as you’d hoped.
Perhaps the checkout process is too complicated or lengthy, or maybe the checkout page isn’t mobile-friendly, and customers are abandoning their purchase because of it.
Whatever the reason, it’s important to make sure your checkout page is functioning smoothly.
How to customize WooCommerce Checkout page? One way to improve your checkout page is to customize it to fit your specific needs.
Many store owners need to customize the WooCommerce checkout page for a better flow. Your WooCommerce checkout page customization should focus on removing friction points.
WooCommerce offers a range of options for customizing the checkout process, so you can make sure it’s perfect for your business. You can choose from a variety of payment gateways, add tracking codes, and more. The possibilities are endless.
How to Customize WooCommerce Checkout Page with WooLentor

There are several plugins that allow you to customize WooCommerce Checkout page. In this article, we’ll learn how to do it with the WooLentor plugin. We’ll also learn how the Woolentor checkout page is designed to make it easier for customers to purchase items from your store.
Woolentor has put so much effort into designing our checkout page. We want to make it as easy as possible for customers to purchase items from your store.
The WooCommerce checkout form customization process is simple and streamlined, and it offers a range of payment options to make it convenient for customers from all over the world.
The plugin provides several pre-built layouts to expedite development. You can customize the checkout page WooCommerce Elementor without writing any code.
Woolentor is a Woocommerce and Elementor page builder add-on that lets you create custom WooCommerce checkout pages for WooCommerce websites like shop, cart, checkout, my account, and so on.
You may construct those pages by simply dragging and dropping. With this amazing plugin, you may also customize the styles for each component of those pages that meets your needs. The WooCommerce checkout customiser features save significant development time and resources.
Let me show you how to make a completely unique checkout page using this plugin step-by-step. You’ll need to install the Woolentor Pro version.
How to Customize WooCommerce Checkout Page using Elementor and WooLentor
Step 1: Add a New Template
We’ll start by going to the dashboard and clicking on the templates menu, then create a new template from there. Pick a type of template and give it a name.
Select the ‘Create Template’ option, and you’ll be redirected to the element or edit screen. Here, you can add widgets and select your structure.
Step 2: Choose Appropriate Checkout Widgets
We’ll start by adding the necessary widgets for our checkout page since we’re building a custom one.
If you go to the search box and type checkout, you’ll see all of the required widgets for a Woolentor-enabled checkout page. You may even add or remove fields if necessary by dragging and dropping the field’s position.
There are 7 widgets available for customizing the checkout page. You can drag and drop the widgets and make necessary changes.
Step 3: Save The Template
After you’ve finished editing, press the publish button to save the template. From Woolentor’s settings, set the template as the checkout page. That’s it! You’ll be able to give your customers an impressive checkout experience right away with these customized pages!
So, it was a basic step-by-step guide as to how you can create a WooCommerce custom Checkout page with Elementor & WooLentor.
Now that you got the idea, you might be wondering what else you could do with this fantastic plugin. Right?
Let’s have a look at all the widgets available in WooLentor specifically built to design the Checkout page only.
ShopLentor Checkout Billing Form
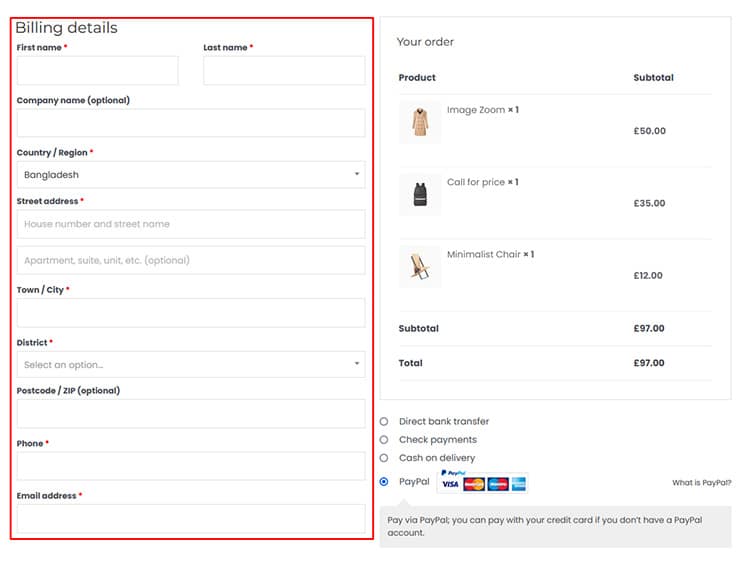
The checkout billing form is one of the most important parts of managing your e-commerce store. With the Checkout Billing Form, you can set up your own style and control all of its fields.
- Title text: From within the billing form panel, you may also change the title text that appears above the “billing form.”
- Customizing form field: You’ll be able to add text for people who haven’t created an account if you want to change or customize the form fields. This may be done simply by turning it on.
- Type of field: For each field, you’ll write the field name as a type of field, and here you may even create your own type for the field, add a label to the input box, and if you want to display a default placeholder text inside the input box.
- Removing field: You’ll be able to remove the fields that you don’t want to use for the billing form with this widget.
- Reorder or Relocate field: You may also reorder or relocate the fields simply by dragging and dropping them.
- Changing appearance: You might completely change the appearance of your website’s billing form by changing the typography, color, alignment, and a variety of other aspects.
ShopLentor Checkout Shipping Form
The Checkout Shipping Form is the ideal platform to manage all your shipping information. This form allows you to enter any necessary styles and fields, enabling easy organization. The title text that appears above the shipping form can be changed from this panel.
We will also enable an option to modify or customize each field on your order form, just as we did in our previous section about billing information.
We can click on the Style tab if we want to change both heading labels and input box styles, which allows us to design our shipping form as desired.
WooLentor Checkout Order Review
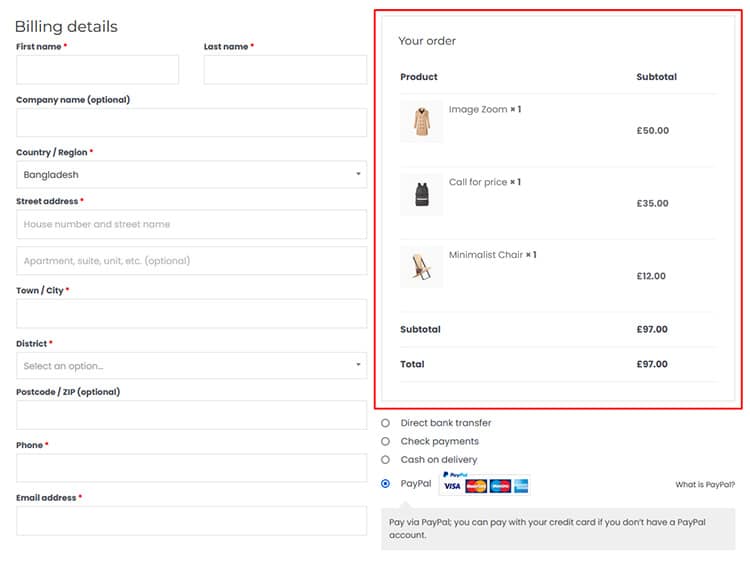
Create your own custom order review form with this customizable widget. Choose from a variety of styles and layouts to ensure every customer gets exactly what they need!
- The heading styles can be changed for your tables to make them look more professional. You’ll also have complete control over what kind of font is used in each row, as well as how it should be styled with color or texture!
- In the style settings, you have complete control over the styles of headings and content tables as well as prices!
WooLentor Checkout Payment Method
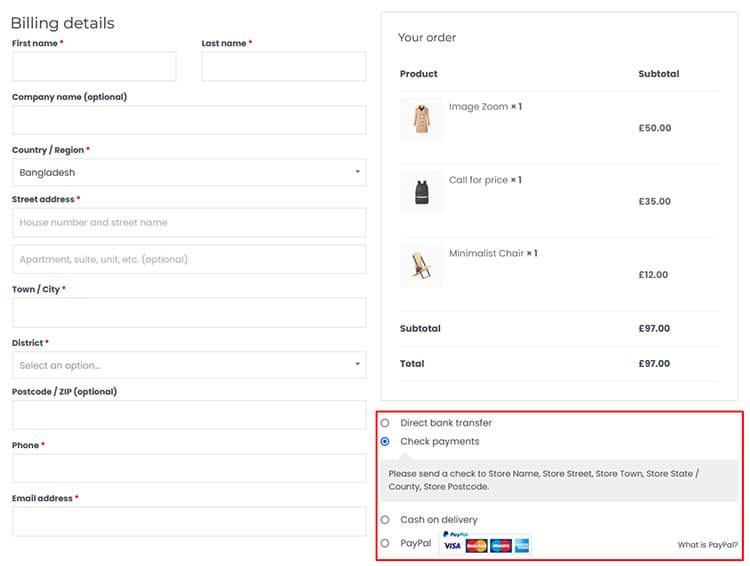
Select the ideal checkout payment method for your business. With this innovative and easy-to-use payment widget, you can provide customers with all the necessary information before they make a purchase.
- A new section has been added to the template, allowing customers to select their preferred payment method before placing an order.
- Now you have an even better opportunity to offer your customers a variety of payment methods, allowing them to choose the one that’s right for them.
WooLentor Checkout Additional Info Form
By using the WL: Checkout Additional Information Form widget, you can put additional information about your order on a checkout page. You might want this if there is some special request or need that isn’t captured in advance of purchase but which must be stated while placing an order.
- You can enable your customers to put additional information about their order on the checkout page by using an additional info form.
- You can also change the title text shown for this particular form.
WooLentor Checkout Coupon Form
Coupons have a very specific role in your eCommerce business. The checkout coupon form is a great way to save money on the next purchase!
They can help you grow by attracting new customers to the store and encouraging window shoppers to convert with an enticing discount offer. If they like what’s there, you can then upsell them.
You may modify your coupon code form with this simple, user-friendly widget. You have a variety of layouts and styles to pick from!
WooLentor Checkout Login Form
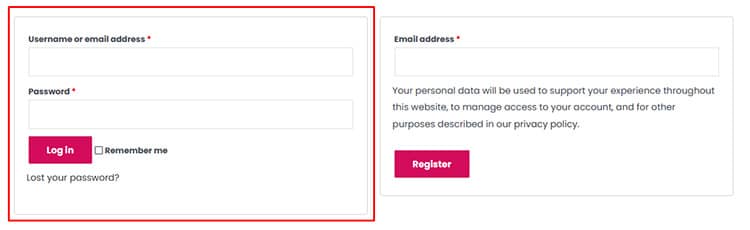
The login form can be customized to suit your needs. From the style tab, changes are possible in all elements of this widget, such as input boxes and submit buttons, for a perfect fit!
- You may click on the given link to visit the store, and a login form will appear.
- You can easily change how this widget looks by adjusting the style. You can customize everything, fonts, colors, and the form’s overall look.
Create the perfect Checkout page with these widgets that give you total control over every aspect.
You can even customize your checkout page by choosing from a variety of pre-built templates in the Template Library. It’s as easy and quick! Instead of spending hours creating a custom checkout page for WooCommerce from scratch, you can use pre-built templates designed for the checkout page. The process is easier than ever!
To get started, go to the Woolentor dashboard and choose templates from the menu. Here you’ll find over 60 pre-made templates for a variety of page kinds, including checkouts. We’ll start by importing the template into our library. Once it’s been added to the template library, we may freely customize the template as needed, and you can alter this pre-built template precisely as we did before.
After making any required modifications, update the template, then go to your website’s Woolentor settings to choose it as the checkout page.
WooLentor recently launched two new modules, “Shopify Style Checkout” and “Multi-Step Checkout.” These two modules help users create a visually appealing and user-friendly checkout page.
It gives your customers an easy checkout process. It also provides a better user experience. These features help you stay ahead of your competition.
How to Improve the Checkout Page of Your WooCommerce Store
A few other things you should keep in mind to improve the Checkout page of your WooCommerce store:
Optimize for Mobile Shoppers
Mobile checkout optimization is crucial, as over 70% of cart abandonment occurs on smartphones. ShopLentor provides specific mobile optimization controls, including:
- Responsive field sizing that automatically adjusts to screen dimensions
- Collapsible sections that simplify the mobile checkout journey
- One-handed friendly input positioning for thumb-accessible fields
- Automatic keyboard optimization that presents the correct keyboard type for each field (numeric, email, etc.)
Always test your checkout flow on multiple mobile devices after customization. Even minor friction in the mobile experience can significantly impact conversion rates.
Remove any fields you don’t need
Multiple checkout form fields discourage approximately 26% of customers from finishing their purchases. When consumers encounter a large number of form fields and options to complete the checkout process, they are frequently frustrated and perplexed. Anything you can do to limit the number of forms will improve your chances of converting them into a client.
Based on IP address, automatically detect the customer’s region
If your visitors come from around the world, like most shopping websites, you’ll need to adjust a few things. Change your payment, shipping, and currency options based on where your customers live.
You may not even be able to send or sell to them. Instead of having them go through the whole process and being shocked at the end, it’s better to tell them upfront.
One way to do this is by using auto-detection of their IP addresses, like 192.168.1.1. With this technology, you can automatically detect where your visitor is from and change the options on your checkout page accordingly. This will make it easier for them to complete the purchase and ensure a smooth experience all around.
Multiple Payment Options Can Be Included
In the mobile-first digital era, consumers have more payment alternatives than they’ve ever had, and they want even more options when making transactions (both offline and online). 6% of customers abandon their carts due to a lack of available payment choices.
Payment flexibility is crucial when customizing WooCommerce checkout template layouts. Due to credit card denials another 4% of clients abandon their purchases.
Ensure Customers Privacy
Consumers are concerned about their privacy, which is why it’s at the top of their list.
In certain studies, as many as 61% of respondents said they had decided not to buy a product from a business because it lacked a trust seal or was not SSL encrypted.
Because customers were insecure, 17% of shopping carts were left unfinished. Add trust seals and encryption to put customers at ease and make them feel more secure about their purchase.
Remove the Distracting page option
What is your checkout page’s main purpose? Isn’t it true that more conversions, sales, and customers are all good things?
If that’s the case, don’t show anything that doesn’t need to be there. The more clickable buttons you display on your checkout page such as products, social media icons, and so on.
The more likely visitors are going to click and leave the checkout page. This is true for both landing pages and eCommerce checkouts.
Understanding how to customize the WooCommerce checkout page design means eliminating distractions systematically. Your WooCommerce checkout page template should focus solely on completing purchases.
Frequently Asked Questions
Why would I customize my checkout page?
There are a few reasons why you might want to customize your checkout page. First, it can make your store look more professional and shop-like. Second, it can help you stand out from the competition. And third, it can help you increase conversions by making the checkout process simpler and more user-friendly.
How do I customize WooCommerce checkout page?
To customize your checkout page, simply install WooLentor, activate it, and select the “Checkout Page” tab. From there, you can add or remove fields, change the layout, and add extra features and widgets.
What’s the best way to make my checkout page unique?
Using any checkout page editor plugin such as WooLentor is a great way to customize your checkout process easier. This plugin will enable you to move, edit, add, or remove any checkout fields in a simple and straightforward manner. You can modify anything about the fields, including type, name, position, and more.
What are some extra features I can add to my checkout page?
Some extra features that you can add to your checkout page include: terms and conditions, shipping policy, return policy, Social media icons, an email signup form, and more!
Can I make my WooCommerce checkout look like Shopify?
Yes! You can make WooCommerce checkout like Shopify using ShopLentor (WooLentor). The plugin allows you to create a Shopify style checkout WooCommerce design with clean layouts, streamlined forms, and professional styling. You can customize WooCommerce checkout page design to match Shopify’s user-friendly interface and improve your conversion rates significantly.
Is it possible to customize checkout without coding knowledge?
Absolutely! Customizing WooCommerce checkout page without coding is simple with ShopLentor. The plugin offers a drag-and-drop interface that lets you edit WooCommerce checkout page template visually. You can style WooCommerce checkout page elements, create custom checkout layouts for WooCommerce, and modify WooCommerce checkout page functionality without writing a single line of code.
Video Presentation for the WooCommerce Checkout Page Customization with ShopLentor (Formerly WooLentor) plugin.
Conclusion
It’s no secret that running an online business is challenging. There are so many factors to consider, from designing a great website to make sure your checkout process is smooth and efficient. The checkout page is arguably the most important part of any online business, as this is where customers finalize their purchases.
We know that a great checkout page is essential to the success of any online business. So don’t hesitate to check out WooLentor today and see how to customize WooCommerce checkout page can help you take your business to the next level!