How to Sell Online Courses on WordPress (Step-by-Step Guide)

Quick Answer: To sell online courses on WordPress, install an LMS plugin such as CourseGlade, build your lessons and quizzes, set a price, and choose how students will pay and enroll. CourseGlade supports Stripe, WooCommerce, manual payment and free enrollment. Test the full checkout and student access before you launch.
You can sell online courses on WordPress without a monthly platform fee. You need a plugin that runs the lessons and a way to take payments. That is the whole setup.
The hard part is not the tools. It is making the right choices in the right order. This guide shows you how to sell online courses on WordPress, step by step. It also helps you decide between WooCommerce and a built-in checkout.
Table of Contents
What Does It Mean to Sell Online Courses on WordPress?
Selling a course on WordPress means you host the lessons on your own site and take payments yourself. You own the site, the student list, and the pricing.
Three parts work together:
- An LMS plugin. LMS stands for learning management system. It stores your lessons, tracks progress, and controls who can see what.
- A checkout. This is the page where a student pays. It can come from WooCommerce or from the LMS plugin.
- A payment gateway. This is the service that moves the money, such as Stripe. The money goes to your own gateway account.
A hosted course platform does all three for you. In return, it may charge fees or limit your control. WordPress gives you more control. You also take on more setup.
What You Need Before You Start
Check this list first. It saves time later.
- A WordPress site with hosting that you can manage
- An SSL certificate, so your checkout runs on HTTPS
- A course idea and a clear audience
- A plan for lessons, such as video, text, or audio
- A payment gateway account, such as Stripe
- Refund, privacy, and terms pages
A simple rule helps here. If you cannot describe your student and their result in one sentence, fix that first. Plugins cannot do it for you.
Need a website first? Our guide on how to create an educational website covers the basics.
How We Approached This Guide
We focused on the choices that decide whether you can actually sell. We checked each step against what LMS plugin documentation and the official CourseGlade pages say today. We left out theory about course creation, because the goal here is selling.
We used these questions to judge each step:
- Does it help a student pay without confusion?
- Does it give the student the right access after payment?
- Can a beginner set it up without code?
- Does it leave you in control of your money and your student data?
WooCommerce Checkout vs LMS Plugin Checkout
This is the first big choice. Both work. They suit different people.
WooCommerce checkout means each course is linked to a WooCommerce product. The student buys through your normal store checkout. WooCommerce then triggers the course access.
LMS plugin checkout means the LMS plugin shows its own checkout page. The student pays there and gets access right away. You do not need a store.Factor WooCommerce checkout Built-in LMS checkout Best for Stores that also sell products, or sites that need WooCommerce payment extensions Sites that only sell courses Setup Install WooCommerce, then connect it to your LMS plugin Turn on a gateway, such as Stripe, in the LMS settings Payment options Any gateway or extension that works with WooCommerce The gateways the LMS plugin supports Cart Student can buy courses with other products Course focused, usually one course at a time Account step Check your checkout and account settings Usually handled by the plugin Extra features Store tools, such as coupons and tax settings Course tools built around enrolment Complexity Higher, because there are two systems Lower, because there is one
If you sell through WooCommerce, check your checkout and account settings. Your LMS plugin must be able to match each completed order to the right student account. Each plugin handles this in its own way, so follow your plugin’s setup guide.
Which Should You Choose?
Use this simple rule:
- Only selling courses? Use the built-in checkout. You will have fewer moving parts.
- Already run a WooCommerce store? Use WooCommerce. Your customers, emails and reports stay in one place.
- Need a gateway other than Stripe? Use WooCommerce, so you can add its payment extensions.
- Want both? Pick an LMS plugin that supports both. Then you can switch later.
Example scenario: Imagine a store that sells coffee gear. The owner adds a short course on home brewing. Buyers already shop in the store. So the owner links the course to a WooCommerce product. A customer can buy a grinder and the course in one order. Now imagine a trainer with no store. She only wants a clean course checkout. A built-in checkout fits her better.
How to Sell Online Courses on WordPress: 9 Steps
Step 1: Pick a Course Topic That People Will Pay For
Start with one clear problem. Then build a course that solves it.
Ask yourself:
- Who is this for?
- What can they do after finishing?
- Why would they pay instead of searching for free videos?
Check demand before you build. Search forums, social groups, and question sites. Look for questions that repeat. Talk to a few people from your audience. A paid course works best when it saves time or gives a clear result.
Step 2: Choose Your Checkout
Use the table above. Make this choice early. It decides which plugins you install.
If you choose WooCommerce, you will also need to review your payment setup.
Our guide to WooCommerce payment gateways compares the main options.
Step 3: Choose an LMS Plugin
The LMS plugin is the core of your course site. It builds the course and controls access.
Check these points before you pick one:
- Does it work with your theme?
- Which payment gateways are included in the free version?
- Can it sell through WooCommerce if you need that?
- Does it support quizzes, free preview lessons, and student dashboards?
- Which features need a paid upgrade?
You have many choices. LearnDash is one well-known paid option. Other plugins have free versions. Compare them on the points above.
CourseGlade is our own plugin. We use it here as the practical example. According to its WordPress.org listing, the free version supports four selling options: Stripe, WooCommerce, manual payment, and free enrollment.
It also includes a course builder, coupons, a student dashboard, reviews, and quizzes. Bundles, subscriptions, and certificates need the Pro version.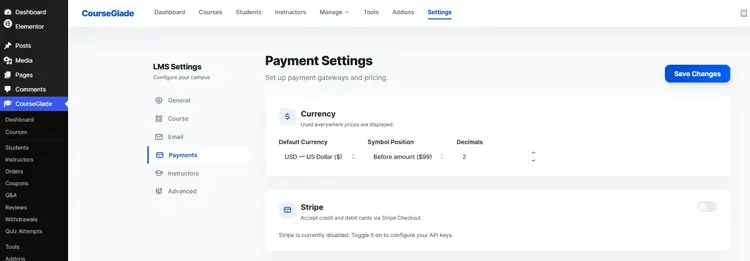
Whatever plugin you pick, install it, activate it, and follow its setup screen. Most plugins create the course pages for you.
Also check that your theme works with your LMS plugin.
If you need a new one, see these education WordPress themes.
Step 4: Build Your Course
You are selling a result. So build a course that is easy to finish.
A simple structure works well:
- Sections. Group your lessons by topic or stage.
- Lessons. Keep each lesson short and focused on one idea.
- Quizzes. Add a short quiz at the end of a section to check understanding.
- Free preview lessons. Let buyers see one or two lessons before they pay.
Free previews help buyers trust you. They see your teaching style. They also see the quality of the video and audio.
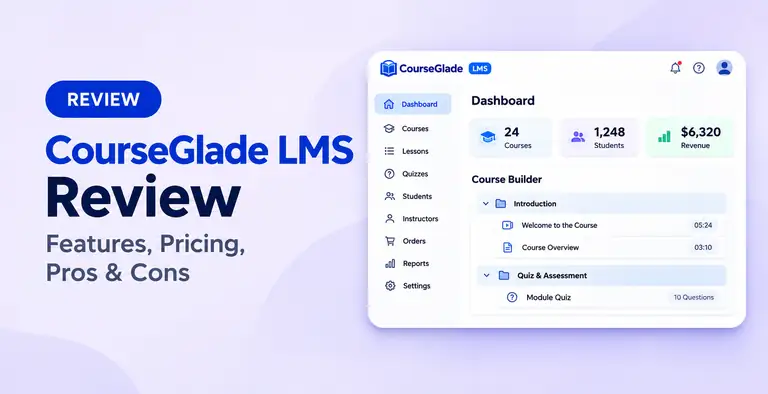
In CourseGlade, you build sections and lessons with a drag-and-drop curriculum builder. Lessons can be video, text or audio. You can mark free preview lessons and set pricing, access and instructors from the same course workflow. Quizzes support eight question types. Six are graded automatically, and short answer and essay questions go to an instructor for grading.
If you want a wider view of the whole site, read our guide on how to build an online course platform.
Step 5: Set Up Payments
Now connect the way you get paid.
If you use the LMS plugin checkout:
- Open the plugin’s payment settings.
- Turn on a gateway, such as Stripe.
- Add your gateway account details.
- Switch on the gateway’s test mode, if it offers one.
- Save the settings.
If you use WooCommerce checkout:
- Install and set up WooCommerce, including the cart and checkout pages.
- Add your payment gateway in the WooCommerce payment settings.
- Turn on the WooCommerce option in your LMS plugin’s payment settings.
- Check how your plugin connects each course to WooCommerce. Some plugins ask you to link a product by hand. Others manage it for you.
- Check your checkout and account settings, then place a test order.
Use your own gateway account in both cases. This keeps the money and the customer data under your control.
In CourseGlade, open CourseGlade, then Settings, then Payments. Choose Stripe, WooCommerce or manual payment there.
If you choose WooCommerce, you do not create and link a product by hand. CourseGlade manages the linked WooCommerce product, keeps its price in sync with the course, and enrolls the student when the WooCommerce order is completed. Use manual payment for bank transfers or invoices.
Step 6: Price Your Course
Pricing is a business decision. There is no single correct number. Use these checks:
- The result. What is the outcome worth to the student?
- The audience. Can they pay this price easily?
- The alternatives. What do similar courses cost? What do free options lack?
- The effort. How long is the course, and how much support do you give?
Then choose a pricing model:
- One time price. The student pays once and gets access.
- Sale price. A lower price for a limited time. It works for launches.
- Coupon codes. Discounts for partners, early buyers or email lists.
- Bundles. Several courses at one price.
- Recurring access. A membership or subscription model.
Free enrollment is also an option. A free course can bring in leads for your paid one.
In CourseGlade, one-time pricing, sale pricing with an end date, coupons, and free enrollment are in the free plugin. Course bundles and subscriptions are Pro features. You can compare the current plans on the CourseGlade pricing page.
If you plan to sell recurring access, read about membership plugins and subscription plugins. For discounts, see these coupon plugins.
Tip: Start with a price you can explain. You can raise it later as you add content and gather feedback.
Step 7: Set Up Emails, Accounts and Policies
This step is easy to skip. Do not skip it.
After a sale, the student should get:
- A receipt or order confirmation
- A welcome email with a login link
- A clear way to reach the course
Also set up:
- Login and registration pages. Students need to sign in easily.
- Password reset. This cuts support messages.
- A refund policy. Say clearly what you offer and for how long.
- Terms and privacy pages. Students share personal data with you. Tell them how you use it.
In CourseGlade, student registration, login, and password recovery pages come with the plugin. You can also hold course access until a new account confirms its email. It sends emails for enrollment, orders, and course completion.
Check the rules that apply in your country. Consumer, tax, and data laws differ. If you are unsure, ask a qualified professional.
Step 8: Test a Full Purchase
Do not launch before you test. Buy your own course as a new student.
- Log out of your admin account. Admins often get automatic access, so they can hide problems.
- Open the course page as a visitor.
- Add the course and go to checkout.
- Pay with a test payment. If you use Stripe, switch it to test mode first. Switch it back to live mode before launch.
- Check that you receive the order email.
- Check that the course appears in the student dashboard.
- Open a lesson and finish a quiz.
- Test a coupon code.
- Test a refund and check what happens to access.
Fix every issue you find. A broken checkout costs you real sales.
Step 9: Launch and Promote Your Course
Publishing the page is only the start. Now people need to find it.
- Write a clear sales page. State who it is for, what they learn, and what they get.
- Show proof. Use real student feedback only when you have it. Course reviews and a wishlist, like those in CourseGlade, help buyers decide.
- Use your email list. Your own audience is the easiest place to start.
- Create helpful content. Write posts and guides that answer your audience’s questions.
- Improve your search presence. Good titles, clear headings and fast pages help.
After launch, watch your sales and student questions. Use them to improve the course.
Our guide on WooCommerce SEO covers the basics, and they apply to course pages too.
Common Mistakes When Selling Online Courses on WordPress
Avoid these errors:
- Building before checking demand. Test the idea before you record anything.
- Using two checkouts at once. Pick one main path. Mixing them confuses buyers and creates access bugs.
- Using WooCommerce when you do not need it. If you only sell courses, a built-in checkout such as Stripe in your LMS plugin means fewer moving parts.
- Setting up WooCommerce by guesswork. Each LMS plugin links courses to WooCommerce in its own way. Follow your plugin’s guide, not steps copied from another plugin.
- Skipping the test purchase. Many problems only show up as a real student.
- Having no refund policy. Buyers want to know the rules before they pay.
- Making the course too long. A shorter course that gets finished is better than a long one that is not.
- Ignoring the mobile view. Many students will watch on a phone. Check your pages there.
- Paying for features you do not need. Start with the free tools. Upgrade when you have a real reason.
How to Choose the Right Setup
Use this quick guide:
- You run a WooCommerce store. Choose WooCommerce checkout with an LMS plugin that supports it.
- You only sell courses and want a simple setup. Choose the built-in checkout, such as Stripe in your LMS plugin.
- You need a gateway other than Stripe. Use WooCommerce and its payment extensions.
- You have several instructors. Look for revenue sharing and payout tools. CourseGlade’s free plugin includes instructor commissions and a withdrawal workflow.
- You want certificates, bundles, subscriptions or live classes. Check which plan includes them. In CourseGlade, these are Pro features.
- You are unsure. Pick a plugin that supports both checkout options.
Frequently Asked Questions
Can I sell online courses on WordPress for free?
Yes, you can start for free. WordPress itself is free, and some LMS plugins have free versions that include payments. You still pay for hosting, a domain, and payment gateway fees. Some features, such as certificates, may need a paid plan.
Do I need WooCommerce to sell courses on WordPress?
No. Some LMS plugins have their own checkout and payment gateways. WooCommerce helps when you already run a store or want its payment options and store tools.
What is the best plugin to sell courses on WordPress?
There is no single best plugin. The right one depends on your checkout choice, budget, and features. Compare payment options, theme support, quizzes, and which features are free. Test one before you commit.
How much does it cost to sell online courses on WordPress?
The cost depends on your setup. You usually pay for hosting, a domain, and possibly a premium plugin. Payment gateways also charge a fee on each sale. Check the current fees on your gateway and plugin before you decide.
How do I accept payments for my course?
Connect a payment gateway. Stripe is a common choice. Use the LMS plugin’s payment settings, or set up WooCommerce and link each course to a product. Always run a test purchase.
Can I sell a course as a subscription?
Yes. You can sell recurring access to one course or a group of courses. Some LMS plugins include this, and others need an add-on or a separate subscription plugin. In CourseGlade, subscriptions and memberships are part of Pro.
Conclusion
You now know how to sell online courses on WordPress. Start by choosing your checkout. Then pick an LMS plugin, build the course, connect payments, and set a fair price. Add your emails and policies. Test a full purchase before you launch.
Keep the first version simple. A small course that works well is better than a big one that breaks. You can add bundles, subscriptions, and certificates later.
If you want a simple place to start, you can try the free version of CourseGlade. It lets you test the full flow of building and selling a course on your own site.